Getting a Yellow Fever Vaccine Card was one of the precautions I took before going to South America a year ago.
This year, I will be visiting Africa and will be armed with the same vaccine I had since its validity is LIFETIME. Yep, you read it right. So if you also intend to visit the continents of South America and Africa, most likely you’ll be needing a Yellow Fever Vaccine.
Hi there! First of all, I am Daniel – a solo backpacker from the Philippines. If you don’t know my story yet, feel free to read this article where I talked about how I quit my job in order to travel. This article was also featured on TripZilla Philippines.
Also known as the International Certificate of Vaccination or Prophylaxis, the Yellow Fever Vaccine card is secured to protect both individual travelers and from the risk of importing or spreading the yellow fever virus.
My Yellow Fever Vaccine card | Dantravels.org
WHAT IS A YELLOW FEVER?
Mosquitoes are the primary carrier of this tropical viral disease. The “yellow” in the name refers to the jaundice that affects some patients. Symptoms of yellow fever include fever, headache, jaundice, muscle pain, nausea, vomiting, and fatigue.
The yellow fever virus is endemic in tropical areas of Africa and Central and South America. You can check the official WHO list of countries for current requirements.
From the snapshot above, the World Health Organization (WHO) recommends getting a Yellow Fever Vaccine certificate prior to visiting Colombia.
WHO NEEDS THE YELLOW FEVER VACCINE?
Travelers going to countries with risk for Yellow Fever Transmission
Seafarers required by their company to have the vaccination
NOTE: The yellow fever vaccine is said to be safe for people as young as 9 months of age.
WHERE CAN I GET THE YELLOW VACCINE?
One can get this vaccine including its yellow card (or Carte Jaune) in various Bureau of Quarantine Offices across the country. For Filipinos living within NCR, you can obtain this at the Bureau of Quarantine in Manila.
Schedule: Monday to Friday (except holidays), 8:00 AM – 3:00 PM
HOW TO GET YOUR YELLOW FEVER VACCINE
Log in and Fill out Forms: Upon arrival, approach the guard to log in. You will receive a Data Form, Yellow Fever Questionnaire, and Waiver form.
Interview: Proceed to the clinic for a short health interview with a quarantine officer.
Vaccination: Submit your forms and receive the shot. You’ll be asked to wait for 5 minutes to check for any immediate allergic reactions.
Payment: Pay at the cashier. The cost is 1,500 PHP.
Verification: Verify your personal details before the card is printed.
Claim Card: Receive your card signed by the Medical Officer.
Note: The whole process usually takes 10 – 30 minutes. Sweet!
MY FINAL SAY
As Desiderius Erasmus said, “Prevention is better than cure.” Getting protected before you travel ensures you don’t run into issues at immigration or, more importantly, with your health. Let me know in the comments how your experience went!
Someone once told me that ‘traveling the world is a rite of passage every human being should take’. While I firmly agree with his statement, unfortunately, the access to this privilege is predetermined by which country we are born in and the passport we were given.
I was born in the Philippines, a third world country. With the power that my weak passport holds, I accepted the fact that I can’t just easily enter and hop-in country to country.
My Philippine passport is ranked 68th on the Passport Index with 36 countries visa-free, 39 visa-on-arrival and 123 countries visa required. In comparison to European passports which ranked 2-10 on the Passport Index. You can obviously see the difference.
For us Filipinos, one of the most important deciding factors when it comes to choosing an international travel destination is visa requirements. I’m sure you agree.
One of the visa-free countries for Filipinos is Peru | Dantravels.org
HOW AIRLINES CHECK VISA REQUIREMENTS
Have you ever wondered how the airline crews determine what documentation you need upon checking in for your international flight?
The moment you give them your passport and tell them your destination, a slew of questions are directed at you. They usually raised questions like:
Do you have a visa copy, sir?
Do you have an onward ticket, sir?
Do you have a return ticket, sir?
Did you know that you may be refused upon entry if you don’t have an onward or return ticket? It’s true and that’s why they asked. You’ll understand why in the additional information below.
But how do they know what to ask? With this question in mind, I did some research.
And it turns out, they have a software called TIMATIC. This tells them in detail the passport and visa requirements for different nationalities for entering a foreign country.
Why do they have this? Well, because if you are deported from a foreign country due to documentation issues, the airline that got you there will have to pay hefty penalties. So airlines are extra cautious about ensuring that you have everything you need to enter the country you are flying to.
Unfortunately for us, travelers, TIMATIC is not available in the public domain. TIMATIC is proprietary software of the International Air Travel Association (IATA) and is a paid subscription service used by Airlines and Travel Agents.
WEBSITES TO CHECK IF YOU NEED A VISA
I have started my first foreign trip in 2015 in Southeast Asia. Fast forward to 2019, I was fortunate enough to visit 30 countries (and counting) including Australia, Russia, and as far as Peru in South America.
A lot of people are asking ‘Daniel, how do you check if you need a visa to enter this specific country?‘ ‘Do you need a transit visa during your layover or connecting flight?‘
True enough–if you add stuff like layovers and transit visas to the equation, your mind will probably start exploding.
That’s why IATA Travel Center and Emirate’s Before You Fly are there as my reliable website source. The sites tell me in detail what are the visa regulations applicable to Filipinos and for any other citizens in the world, actually.
1. IATA TRAVEL CENTER
The IATA travel center is a tool by IATA (the same guys who own TIMATIC) that will tell you everything you need to know about your passport and visa requirements for your international trip.
To my knowledge, this is the most accurate public database there is with respect to Visa Regulations. Many Travel Agents too use this to help their clients.
The only thing I don’t like about this tool is that it asks too much information–from the exact arrival date to the name of your airline carrier. Thus, it takes a lot of time even in filling up information.
2. BEFORE YOU FLY (BY EMIRATES)
Before You Fly by Emirates is my favorite tool in checking my visa requirements. Emirates is one of the world-renowned airline carriers, so you can count on Emirate’s Before You Fly as your trusted, centralized source for the latest international travel requirements.
Not only that it is simple and easy to use, but the result information it provides is also as detailed as that of IATA Travel Center.
LET’S GET THEM BOTH TO WORK!
Let’s say I am a Philippine passport holder traveling to New Zealand (in Auckland) with a connecting flight in Australia (in Sydney.) Refer to the ticket itinerary details below taken from Kayak.
Ticket itinerary sample MNL – SYD – AKL | Dantravels.org
IATA Travel Center
Go to their website and fill out your travel information accordingly.
Once done, tick the ‘I agree’ box and click the next page.
Add your personal information this time.
Type in the Captcha code and click the next page.
Then voila! You now have the result.
RESULTS: 1 – A visa is required in New Zealand 2 – A visa (transit) is also required even just connecting to Sydney, Australia
Please make sure to NOT ignore additional notes on the results especially the “Warning” and “Visa Exemptions”. When I was planning my trip to Georgia, I found out from Before You Fly site that having a valid US Visa exempts me from getting a Georgian eVisa.
In addition, I have also learned that I could be denied upon entry if I don’t have an onward ticket prior to checking-in to my flight to Georgia.
Here are the exact words from the Georgian visa results page:
“Visa Exemptions: Passengers with a visa issued by an EEA Member State , Bahrain, Bermuda, Canada, Cayman Isl., Falkland Isl. (Malvinas), Gibraltar, Israel, Japan, Korea (Rep.), Kuwait, New Zealand, Oman, Qatar, Saudi Arabia, Switzerland, Turks and Caicos Isl., USA, United Arab Emirates or Virgin Isl. (British) for a maximum stay of 90 days.”
“Warning: Visitors not holding return/onward tickets could be refused entry.”
To me, this information is a total relief!
MY FINAL SAY
If it is your dream to travel the world but has a third world passport, don’t fret. I’m sure there are other visa-free countries out there that you haven’t visited yet. You should first prioritize them. It is also your chance to build up your travel history. This is what I did to get my US tourist visa which is known as a difficult one to get.
And at the end of the day, we still should be grateful for what we have. Right?
I hope that I have made your travels easier by using these tips and tools on how to check if you need a visa, may they be transit or entry visa concerns. So next time you want to know visa requirements for your next trip, you can get it right from the horse’s mouth.
These tools should give you the comfort and confidence that you have taken care of all your documentation before you board the flight.
So quench your travel thirst and don’t forget to get that CHEAP plane tickets only at Kayak!
This post may contain affiliate links which means if you purchase something through that link, I will make a small commission at no additional cost to you. Think of it as buying a cup of coffee for me on someone else. Thanks & enjoy!
Visiting the Great Pyramids in Egypt is definitely one of my travel goals this year. That’s why as early as January, I have already been researching on how to get the Egypt tourist visa for Filipinos. And I successfully managed to get one at the Egyptian Embassy in Manila, Philippines!
In this blog post, I’ll be giving you the step-by-step guide, a list of the requirements, my experience throughout the whole application process, and other tips to help you get your Egypt tourist visa!
But again, just like in other visa application blogs I’ve written, no one can give you the guarantee of your Egyptian tourist visa’s approval – not me, not even a lawyer or a travel agent. If anyone does, is most likely a scammer!
As a travel blogger, what I can offer you here is just a guide with helpful tips to increase your chances of getting that Egypt tourist visa.
Anyway, enough of that and let’s get started!
REQUIREMENTS FOR EGYPT TOURIST VISA
Duly filled-up Visa Application Form; You can download the application form here. (Note: This is the universal form accepted by the Manila Embassy).
Two (2) pieces 2×2 size recent colored picture (with white background); I actually used only one (1) 2×2 photo which was pasted on my application form. But it wouldn’t hurt if you bring an extra photo.
Valid Passport which must have remaining validity of more than six months; You might not be required to submit your passport on the day of your first visit to the Embassy. Most of the time, the Embassy will take and review your requirements without your passport. The review might take up to 15 days and the Embassy will let you know its decision via phone call.
Bank Certificate, preferred to be one-week-old;
Employment Certificate with compensation / Business Registration if applicable; I’ll be honest. I actually did not exactly provide this because I quit my job to travel long term. Thus, I provided an Employment certificate from the previous company I worked for.
Travel Tour Itinerary; I can provide you a copy of mine if you like. It is a one-week long tour itinerary. Just leave a reply on the comment section below.
Copy of Philippine residency/ visa / Immigration ID Card (for foreign national applicants only).
Marriage Certificate / Birth Certificate, if traveling with family members.
Add a cover letter stating the purpose of your trip even if it’s not a requirement I think this should be a must especially if you have a case like mine that one requirement is not fully met. Thus, I prepared myself a visa cover letter personally explaining my situation, my capacities, and my hunger to travel.
Plane Tickets. This is NOT required but I submitted this anyway because I already have this. I had a plane ticket from Manila to Dubai and I intend to book my next flight from Dubai to Cairo (in Egypt) if my visa is approved. I suggest you check Kayak (use the widget below) as they usually offer cheap fare rates compared to other booking sites.
WHEN AND WHERE TO APPLY
WHEN: Application should be made at least one month prior to your intended departure. Please note that there is a waiting time (up to 15 days) in case the embassy needs to fully review the requirements you submitted.
💡 DAN’S PRO-TIP: CHECKING YOUR STATUS If you haven’t heard back after 10 working days, don’t hesitate to send a polite follow-up email to embassy.manila@mfa.gov.eg. Include your Full Name and Submission Date in the subject line to help the secretary find your records quickly!
📅 HOLIDAY NOTICE: The Embassy observes both Philippine and Egyptian holidays. If you are applying around this time, expect potential closures and factor in extra processing days!
WHERE: Visa application must be submitted personally to the Embassy during consular working hours from Monday – Wednesday from 9:00 A.M. till 12:00 P.M. except holidays. Please take note of the Egyptian holidays, too.
Prepare ALL the abovementioned requirements. Proceed to the Embassy of the Arab Republic of Egypt in the Philippines at 7th Floor, G.C Corporate Plaza Bldg., 150 Legaspi St., Legaspi Village, Makati City to submit these documents.
STEP 2: WAIT FOR THE EMBASSY’S CALL
Once submitted, wait for the call with the Embassy’s decision. If your visa is approved, then they will contact you to submit your passport (for the visa sticker) and payment.
You can also do a follow up by calling their contact number I indicated above. No worries, the Filipino Secretary (I think her name is Marian) is very accommodating and friendly.
💡 HOW TO GET “INSTANT” APPROVAL: While the standard wait is 15 days, I managed to get mine the same day! The secret? A rock-solid cover letter explaining my travel history and status as a digital nomad. It pays to be honest and detailed!
STEP 3. SUBMIT YOUR PASSPORT & PAY THE VISA FEE
What I like about this Embassy is they do not charge the visa processing fee unless and until your visa is approved. Yes, you heard it right! There is absolutely no risk in getting this visa! If your visa is approved, submit your passport and pay the visa fee.
The Egypt tourist visa fee costs 1,500 PHP. Then, the Secretary will give your receipt with date of when to claim your passport with visa.
⚠️ IMPORTANT UPDATE (2026): According to recent traveler reports, the Egypt tourist visa fee at the Manila Embassy has increased from 1,500 PHP to approximately 4,000 PHP. It is highly recommended to bring extra cash to your appointment as fees are subject to change without prior notice.
STEP 4. CLAIM YOUR PASSPORT WITH VISA STICKER
Finally, pick up your passport with visa sticker and congratulations on successfully getting your Egypt tourist visa!
My Egypt Tourist Visa
VISA SUMMARY
Type: Tourist Visa
Visa Validity: 6 months from the day of approval
Maximum Stay: 30 days within validity
No. of Entry: Single Entry
Visa Fee: 1,500 PHP (30 USD)
Visa Fee: 1,500 PHP (30 USD)
UPDATE (2026): The fee is now around 4,000 PHP
MY EXPERIENCE
When I arrived at the Embassy at around 10:00 AM, there were already 6 to 8 people in the waiting room. Some of them are still filling up the visa application form.
From that, I can tell that the Egyptian Embassy is informal and chill. You just need to turn off your mobile phone before entering the office.
Remember: Prior to entering the building, your bags will be checked and will require you to leave one government valid ID at the lobby, so bring one!
The Secretary then collected our documents and left the room. She probably handed it over to the Egyptian Consul (in another room) to review the documents.
She went back to the waiting room and announced those people who can now pay the visa fee. Please note that if you pay the visa fee, it means your visa is approved.
I was lucky that steps 1-3 all happened in one day! So I submitted my passport and paid the visa fee, all in 30 minutes! I saved one Makati trip. I met other applicants in the room who has to go and wait up to 15 days for approval and went back to the Embassy 3 times.
They did not tell me the reason why my visa was approved instantly, but I have a strong feeling it has to do with my travel history, capacity to travel, and my very personalized cover letter. I even mentioned in my cover letter about quitting my day job just to travel long term. As they say, honesty is the best policy =)
NOTE that I applied Monday and claimed my passport (with visa) Friday of the same week. So it only took four (days)! I was just so happy to save the step where you have to wait up to 15 days for the Embassy’s decision.
Now that your visa is (hopefully) on its way, here are a few essentials I recommend packing for your Egyptian adventure:
🇪🇬 QUICK EGYPT PACKING LIST: • Modest Clothing: Respectful attire (covering shoulders and knees) for visiting mosques and local areas. • Sun Protection: A wide-brimmed hat, high-SPF sunscreen, and quality sunglasses—the desert sun is no joke! • Universal Power Adapter: Egypt uses Type C and Type E wall plugs. • Comfortable Walking Shoes: You’ll be doing a lot of walking around the Giza plateau and ancient temples!
RECOMMENDED PACKAGE TOURS
In case you’re also looking for package tours to justify your tourism activity in Egypt for visa purposes, I highly recommend booking tours through Viator which is perfect for your Egypt itinerary. See tours and packages I personally handpicked for you:
This post may contain affiliate links which means if you purchase something through that link, I will make a small commission at no additional cost to you. Think of it as buying a cup of coffee for me on someone else. Thanks & enjoy!
I’m sure you’re super excited to visit the land of Himalayas and just can’t wait to get your Nepal itinerary ready. The country of Nepal might be solely known for its iconic Mount Everest, the tallest in the world, but there are also great places to see in Nepal without traveling far from its beating heart of Kathmandu.
Kathmandu, the capital city of Nepal, is the land of friendly and welcoming people where magnificent temples, monasteries and historical monuments can be found at almost every turn.
That’s why in this blog, I’ll be sharing with you my do-it-yourself Kathmandu itinerary including the budget cost breakdown during my 2-day trip in Kathmandu. So get yourself ready!
Hi there! First of all, I am Daniel – a solo backpacker from the Philippines. If you don’t know my story yet, feel free to read this article where I talked about how I quit my job in order to travel. This article was also featured on TripZilla Philippines.
For Filipinos, we are eligible of Nepal’s visa-on-arrival at any border points of the country including arrival at Tribhuvan International Airport (KTM)–the country’s sole international airport.
WHERE IS KATHMANDU?
Kathmandu is the capital and largest city of Nepal. It is a 2-hour flight away from Delhi, India or 3 ½ hours away from Bangkok, Thailand.
Language: Nepalese Currency: Nepalese Rupee (NPR) Airport: KTM (Tribhuvan) Preferred mode of transportation: by Taxi or by Foot Time Zone: GMT +5-¾
HOW I GOT THERE:
Finding a cheap flight ticket to Kathmandu, Nepal from India or Southeast Asia is relatively easy. Although I entered Nepal by crossing the India-Nepal border at Bhairahawa, I then booked my onward ticket from Kathmandu going to Bangkok, Thailand via Nepal Airlines using Kayak.
I suggest you check Kayak (click HERE) as they usually offer cheap fare rates compared to other booking sites.
HOW TO GET AROUND KATHMANDU?
Reminder: Kathmandu is incredibly hectic and it’s extremely easy to get lost. If you’re from the west, you need to prepare yourself mentally before traveling to Kathmandu in the same way you prepare yourself for India.
By Foot. Walking around may not be an option to most because of rampant pollution and noise of the streets but getting around by foot is actually how I reach places in Kathmandu (with Google Maps’ help) because I was on a tight budget.
If you also intend to go on an adventure on foot, then make sure to wear a face mask like I did.
By Taxi. Going around by taxi is I believe the best way to get around Kathmandu. Taxis are quite reasonably priced, though few taxi drivers use the meters in these days of rising fuel prices. Shorter rides around town (including to the bus station) cost around 200 NPR. Night-time rates (between 10 PM and 6 AM) cost 50% more.
If you wish to use the local public transport, you’d better have a local to help you with the stops as they are quite arbitrary.
WHERE DID I STAY?
I arrived at Kathmandu at around 7:00 AM from a 10-hour bus ride from Bhairahawa, a town in Nepal bordering India. Using my pre-downloaded Google Maps, I then walked almost 2 km to reach my hostel in the Thamel area.
Zen Bed and Breakfast: 3-night stay (click here to book)
Hostel room type: Bunk Bed in Mixed Dormitory Room
You can book a room at any Kathmandu hotel through Agoda or Booking.com. I usually book my room accommodations through booking.com. Room accommodation ranges from cheap hostels to luxury hotels. Book hostels through booking.com as they have free cancellation or pay-at-the-hotel option.
If Kathmandu hotel isn’t to your liking, try AirBnb. Airbnbs are immersed in neighborhoods, condos, and townhomes. There is a feeling you get when you stay in an Airbnb that makes you feel like you belong in that city or town. Since it is someone’s home, there is a certain amount of pride you feel while staying there. I have used Airbnb on some of my other trips and I loved it!
If you’re new to AirBnB, then you can get up to 42 USD free travel credit by signing up via this link.
MY 2-DAY KATHMANDU, NEPAL ITINERARY
DAY 1:
1st Stop: Swayambhunath (OR Monkey) Temple
I was breathless and sweating as I stumbled up the last steep steps in this temple. On your way, you’ll see lots of monkeys ready to greet you! That’s why they call it the Monkey Temple obviously. Swayambhunath Temple is an ancient religious architecture located on the top of a hill within the Kathmandu Valley. No fees required to get here.
From my hostel in Thamel, I walked more than 2 km west to reach this temple. Then I went back to the Thamel area to get myself some lunch.
Swayambhunath Temple | Dantravels.org
Duration (getting there + visiting): 2-3 hours
How I got there: By foot from my hostel in Thamel
2nd Stop: Narayanhiti Palace Museum
This museum is just a 10-minute walk from the Thamel area. There is an entrance fee of 500 NPR (per person) for foreigners. Although I only took a photo from the outside gate, it is advisable to see this place especially if you’re into modern history.
This palace is indeed both beautiful and mysterious, one is reminded of King Bijendra and his wife queen Aishwarya with all their family members who were massacred in 2001.
Narayanhiti Palace Museum | Dantravels.org
Duration (getting there + visiting): 1-2 hours
How I got there: By foot from Thamel
3rd Stop: Durbar square
I then walked almost 2 km south from the museum to reach Kathmandu’s Durbar Square as my next stop. For tourists, there is an entrance fee of 1,000 NPR per person. But because I look like a Nepalese descent, I was not asked to pay for the entrance. I just went straight in.
This is a UNESCO site damaged by a 7.9 earthquake in 2015. The architecture is like a mixed with Old Chinese and Indian backgrounds. Overall, it was a nice experience walking throughout the whole square even though they are still fixing the damages from the earthquake.
Durbar square | Dantravels.org
Duration (getting there + visiting): 2-4 hours
How I got there: By foot from Narayanhiti Palace Museum
4th Stop: Vaskarkirti Mahavihar
Just a short walk from the Durbar square, I found this Buddhist shrine which not many people visit. I just love being away from the crowd for a while!
People park their bikes near this open space. I asked the name of the shrine which people said White Chaitya. Later I found the name to be Vaskarkirti Mahavihar in Google Maps. This White Chaitya is smaller than other chaityas in Kathmandu but still beautiful and worth visiting.
Vaskarkirti Mahavihar | Dantravels.org
Duration (getting there + visiting): 1 hour
How I got there: By foot from Durbar Square
5th Stop: Thamel
Thamel is Kathmandu’s main tourist hub. My hostel is situated at Thamel road, and I basically get and access everything easily here such as food, ATMs, groceries, and even a few temples that could easily be reached by foot. If you’re going on hiking or trekking, there’s a lot of shops here for mountaineering.
But still, don’t forget to enjoy while wandering through Thamel at any pace. Lose yourself peacefully through all of its narrow streets and colorful bazaars.
Thamel road at night | Dantravels.org
Duration (getting there + visiting): 1-2 hours
How I got there: By foot (this is where my hostel is located)
DAY 2:
6th Stop: Garden of Dreams
If a break is needed from the intensity of chaotic Kathmandu, a stop in the Garden of Dreams may help. Behind its big outer walls is a very calm environment.
This garden is just a 5-minute walk from the Thamel area. The entrance fee costs 400 NPR for tourists.
Garden of Dreams | Dantravels.org
Duration (getting there + visiting): 1-2 hours
How I got there: By foot from Thamel
7th Stop: Pashupatinath Temple
The oldest and holiest Hindu shrine in Nepal is the Pashupatinath Temple located on the bank of Bagmati river is a world heritage site enlisted by UNESCO.
As a foreigner, you have to pay 1,000 NPR to enter but there are portions that you are not allowed to enter. Overall, there is so much to be seen here. There are always cremations occurring here, which did bother some people, both because of the smoke and the visual. I find it fascinating.
Again, since I look like a Nepali descent, I wasn’t asked to pay for the entrance fee and just went straight ahead.
Pashupatinath Temple | Dantravels.org
Duration (getting there + visiting): 3-4 hours
How I got there: By foot from the Garden of Dreams
8th Stop: Banks of the Bagmati River
The Bagmati River is considered holy by both Hindus and Buddhists. A couple of Hindu temples are located on its banks such as the Pashupatinath Temple. The holy river is dirty but that’s just the norm here I think.
The importance of Bagmati also lies in the fact that Hindus are cremated on the banks of this holy river, and Kirants (ethnic Himalayans) are buried in the hills by its side.
Banks of the Bagmati River | Dantravels.org
Duration (getting there + visiting): 1 hour
How I got there: By foot from the Pashupatinath Temple.
9th Stop: Boudhanath Stupa
Bouddhanath stupa is the most liked sightseeing place in Kathmandu. Visitors are required to pay 250 NPR (foreign nationals), 50 NPR (SAARC nationals) as entrance fees to the Bouddhanath. A lot of Tibetan people reside around the Stupa. And it is a very famous and holy place, especially of Buddhists people. It is one of the most popular world heritage sites of Nepal.
Just like in Pashupatinath Temple, I wasn’t asked to pay for the entrance fee and I just went straight ahead.
Duration (getting there + visiting): 2-3 hours
How I got there: By foot from the Pashupatinath Temple.
10th Stop: The Crematoria
Later that night, I went back to the Pashupatinath Temple with a local Nepali. We ride on his motorbike and he took me to the Crematoria along the banks of Bagmati.
We’ve both witnessed grief and happiness while in Crematoria. There is a couple of dead bodies we’ve spotted while also witnessing a fun and jolly Aarati performance. Aarati is a Hindu religious ritual of worship in which light (usually from a flame) is offered to one or more Hindu Gods.
Duration (getting there + visiting): 2-3 hours
How I got there: By motorbike
The local Nepali I was referring to was Prashant whom I met via Couchsurfing. It was indeed one of those Couchsurfing experiences I would never forget. We also had shared some local Nepali food for dinner.
Meet Prashant from Kathmandu, Nepal | Dantravels.org
MY 2-DAY EXPENSES IN KATHMANDU
Day 0 (Arrival)
30 USD (3,410 NPR) – Visa-on-arrival fee
100 NPR – Fare, Rickshaw bike to the bus terminal
800 NPR – Fare, Bus A/C from Bhairahawa to Kathmandu
JUST SHARING: I have been entering Durbar Square and temples for free because of my Asian look. If you think you look Nepali enough, just enter and go with the local crowd and act like you belong. Keep your cameras on your bag, too. It should do the trick.
Total Expenses: 218 USD (11,110 PHP)
RECOMMENDED PACKAGE TOURS
I hope that you find this 3-DAY KATHMANDU, NEPAL ITINERARY useful!
If you have more days to spend in Nepal, you can include these cool tours & activities and travel essentials with discounts on your itinerary:
Booking.com. I usually book my hostel accommodation at booking.com. Thus, I recommend you guys trying it as well for your Kathmandu or Nepal itinerary. Room accommodation ranges from cheap hostels to luxury hotels. Book hostels through booking.com as they have free cancellation or pay-at-the-hotel option.
Airbnb. Try Airbnb in finding comfy and cozy rooms for your Nepal itinerary! I have used Airbnb on some of my other trips and I loved it!
Have you tried Airbnb? Sign up with my link and you will get up to 42 USD (2,200 Php) off your first stay. Click this link to get that discount.
Flights
KAYAK. All of my flight bookings are all from KAYAK. Kayak is one of the world’s leading travel search engines and searches hundreds of travel sites.
Nepal Package tours
Viator. Viator is the world’s leading resource for researching, finding and booking the best travel experiences worldwide.
Click here to find the best Viator deals in Nepal.
This post may contain affiliate links which means if you purchase something through that link, I will make a small commission at no additional cost to you. Think of it as buying a cup of coffee for me on someone else. Thanks & enjoy!
I recently crossed the India-Nepal border and managed to get my Nepal visa on arrival with no issues at Nepal’s Bhairahawa Immigration office. Although there’s nothing nice to see while crossing the Sunauli-Bhairahawa border, I was more than happy to have Nepal as my 30th country (not that I’m counting.) Nepal was also the newest addition to the countries I have visited before the end of year 2019.
So without further ado, here is my guide on how to get your Nepal visa on arrival specifically when crossing Nepal from India overland.
WHO ARE ELIGIBLE OF NEPAL VISA ON ARRIVAL?
First things first, do you need a visa on arrival to visit Nepal? Well, depending on your nationality, you may or may not need a visa on arrival. See the detailed information below which category you fall in.
Visa Free
India
NOTE: Only the citizens of India do not need a visa to enter Nepal, and can reside permanently as Nepali citizens with no restrictions
Visa Required in advance
Citizens of the following states are required to apply for a visa prior to arrival in Nepal:
Afghanistan
Cameroon
Eswatini
Ethiopia
Ghana
Iraq
Liberia
Nigeria
Palestine
Somalia
Syria
Zimbabwe
Visa on arrival
With the exception of nationals of states mentioned above, ANY foreign nationals can obtain a tourist visa on arrival. Multiple entry visas can be issued for a duration of stay of 15, 30 or 90 days.
Visa fee waiver
Nationals of SAARC member countries can receive a tourist visa free of charge for 30 days at no cost. Those countries are:
Afghanistan
Bangladesh
Bhutan
Maldives
Pakistan
Sri Lanka
NOTE: In addition, residents of China, Hong Kong, and Macau can have their visa fees waived if they are traveling as tourists since 1 January 2016.
As a Philippine passport holder, I am eligible of getting a Nepal visa on arrival and that is what I’ll be discussing further down below.
Please note that the Nepal visa on arrival is available at:
Tribhuvan International Airport in Kathmandu, Nepal
Any other Entry and Exit points established at the border regions also provide ‘On Arrival Visa’ to foreign nationals hoping enter to Nepal via land.
The Sunauli border is the most popular entry point from India to Nepal, and vice-versa when traveling overland.
WHAT YOU NEED TO GET A NEPAL VISA ON ARRIVAL
There are three things you need to prepare in order to successfully apply for a visa on arrival at the Bhairahawa Immigration Office in Nepal’s border.
Cash.
Take note that they DON’T accept payment by debit or credit cards but only by cash in either USD or their local currency (though the US dollar is preferred.)
The cost depends on how long you intend to stay in Nepal. I paid 30 USD for a 15-day valid visa.
30 USD – 15 days max.
50 USD – 30 days max.
125 USD – 90 days max.
Photo IDs. Two passport-sized photo IDs (2×2 size will do as well.)
Confirmed hotel booking. I have only booked my first two-night stay in a cheap hostel I found on Booking.com.
You will need this information (such as your hostel’s address and its contact number) to fill up the visa form. So make sure you have it prepared.
You can book a room at any hotel in Nepal through Agoda or Booking.com. I usually book my room accommodations through booking.com. Room accommodation ranges from cheap hostels to luxury hotels. Book hostels through booking.com as they have free cancellation or pay-at-the-hotel option.
TRAVELING FROM GORAKHPUR TO SUNAULI CROSSING
If you’re coming from another city in India to travel to Nepal overland, you’ll most probably be traveling by railway train to Gorakhpur which has the closest train station to the Sunauli border crossing.
Overnight train from Delhi to Gorakhpur | Dantravels.org
Again, there’s nothing nice about Gorakhpur or even Sunauli. Nothing at all. Someone once told me that Gorakhpur is just a dusty and unappealing town you want to get out of immediately.
It’s kind of true. After exiting the Gorakhpur railway station at around 10:00 AM, I went straight to the bus station going to Sunauli. You can get to the bus station by foot in 15 minutes. On your way to the bus station, you’ll see this statue of a man riding in a horse.
The buses run all day, starting from about 6:00 AM. They leave approximately every hour, or as soon as they’re full. The bus would take 3-4 hours to get you to Sunauli.
NOTE: Bus fare (Gorakhpur to Sunauli) is 117 INR or 1.63 USD.
CROSSING THE BORDER FROM THE INDIAN SIDE
I arrived at the Sunauli border (on the Indian side) at around 2:00 PM by bus from Gorakhpur. The buses drop passengers in a parking lot a few hundred meters from the border. You can walk, but if you don’t want to, negotiate a cycle rickshaw to take you across.
The busy border gate taken from Sunauli (the Indian side) | Dantravels.org
Just like Gorakhpur, Sunauli is just a dusty town in a poor and inhospitable part of Uttar Pradesh. It’s also recommended that you make the border crossing as quickly as possible.
For foreigners, the first stop is the Indian immigration office to get a departure stamp in your passport. You’ll find it on your right-hand side before the border.
I got my Indian exit stamp at the Indian Immigration and finally crossed the border at 2:45PM.
The second stop is the Nepal Immigration Office at Belahia, Bhairahawa, on the other side of the border. It’s again on your right-hand side, a short distance after crossing. Nepal visa on arrival are issued there.
GET YOUR NEPAL VISA ON ARRIVAL (VOA) IN 4 EASY STEPS
Just like any other visa-on-arrival procedure I’ve been through, getting a Nepal visa on arrival (VOA) is very easy and straightforward:
STEP 1: FIND THE IMMIGRATION OFFICE BUILDING
After officially crossing the border, I went looking for the Immigration office on the Nepal side to process first my Nepal visa on arrival. You’ll find its building on the right side—just a short walk from the border gate.
Ask the officer that you want to process your Nepal visa-on-arrival.
STEP 2: FILL UP THE FORM
The officer will hand you two forms—the visa application form and the arrival form. Fill them up. Make sure you also have a passport-sized photo (in my case I used my extra 2×2 photo IDs) to be glued on the application form.
You need to have an address in Nepal ready as this information is required. I used the address on my hostel in Kathmandu.
STEP 3: PAY THE VISA FEE
Once you have the form filled up, just give it to the visa officer together with your passport. You will be asked how long do you intend to stay in Nepal as the amount of the visa fee will depend on them.
Then pay your visa fee accordingly. I paid 30 USD for a 15-day max of stay.
Some visa fee reminders on the bulletin boards | Dantravels.org
STEP 4: GET YOUR PASSPORT WITH VISA STICKER!
Then you’ll have to wait for about 5-10 minutes. Once your name is called, you’re basically done.
The officer will hand your passport with a visa sticker including the “arrival stamp”!
NOTE: It only took me 15 minutes to finish the whole visa process. But of course it depends on how many people are on queue.
Nepal Visa On Arrival sticker | Dantravels.org
SUMMARY:
Visa Type: Tourist Visa
Visa Validity: 15 Days
Visa Fee: USD 30.00
SECURE YOUR ONWARD TRAVEL
Now you’re ready to go and explore Nepal. But before that, you would want to organize onward travel. You don’t want to spend your first night in the town of Bhairahawa, right?
Pokhara and Kathmandu are roughly the same distance away from Bhairahawa, about eight hours or more. There are a few options for getting there: shared jeep or minivan, or bus. There’s a bus terminal at Bhairahawa, about two kilometers from the border (take a cycle rickshaw). However, plenty of travel agents will approach you with offers of transport before that.
In my case, I took an overnight bus from Bhairahawa bus terminal to Kathmandu city. The bus normally leaves at 7:00 PM or 8:00 PM at the bus station. It costs me 800 NPR (or 7 USD) for an A/C bus.
OTHER IMPORTANT NOTES
Crossing the Indian-Nepali border at Sunauli is not that hard to do! It is not heavily guarded nor regulated as a normal entry or exit border point should be. And as a foreigner like me, there could be a tendency of missing the immigration exit and entry stamps. So in case you’re crossing an international land border too, please don’t forget these stamps!
Make sure you have dollars with you (before crossing the border) to pay your visa fee. And some extra more just in case! I know I said this already but I really wanted to reiterate this.
In case you intend to change your US dollar banknotes to Nepali Rupees, make sure the banknotes are looking new and don’t have any cut or slit. Even a small cut on the corner could get your banknotes rejected in EVERY money changer in the area.
But don’t you worry, there is also an ATM—just about a 5-minute walk from the border area. Just keep asking where it is!
If you’re crossing from Nepal to India, Indian e-visas aren’t accepted at the border. You’ll need to apply for a visa at the Indian Embassy in Kathmandu. Indian e-visas are only accepted if arriving at India’s international airports and seaports.
I hope that you find this NEPAL VISA ON ARRIVAL (TOURIST VISA GUIDE) blog useful!
In case you’re also looking for package tours to simply jumpstart your actual itinerary, I highly recommend booking tours through Viator which is perfect for your Nepal itinerary. See tours and packages I personally handpicked for you:
Booking.com. I usually book my hostel accommodation at booking.com. Thus, I recommend you guys trying it. Room accommodation ranges from cheap hostels to luxury hotels. Book hostels through booking.com as they have free cancellation or pay-at-the-hotel option.
Airbnb. Try Airbnb in finding comfy and cozy rooms in Kathmandu or any city in Nepal! I have used Airbnb on some of my other trips and I loved it!
Have you tried Airbnb? Sign up with my link and you will get up to 42 USD (2,200 Php) off your first stay. Click this link to get that discount.
Flights
KAYAK. All of my flight bookings are all from KAYAK. Kayak is one of the world’s leading travel search engines and searches hundreds of travel sites.
I suggest you check Kayak (click HERE) as they usually offer cheap fare rates compared to other booking sites.
Nepal Package tours
Viator. Viator is the world’s leading resource for researching, finding and booking the best travel experiences worldwide.
Click here to find the best Viator deals in Nepal!
Travel Insurance
World Nomads. If you don’t have travel insurance when times get tough, basically you are screwed. Traveling always comes with inherent risks attached. Whether you are trekking in the Himalayan mountains or wandering the streets of Pokhara, unforeseen events can suddenly upend your world.
Generally speaking, travel insurance covers you for the following: Medical Costs – hospital visits, emergencies, evacuations; Property Loss – luggage and their contents; Travel Issues – accommodation and transportation expenses. Thus, I highly recommend you guys getting a travel insurance. I bought one from the World Nomads (available in 130+ countries) where most travelers get their travel insurances.
Go to this link to get to your World Nomads travel insurance.
This post may contain affiliate links which means if you purchase something through that link, I will make a small commission at no additional cost to you. Think of it as buying a cup of coffee for me on someone else. Thanks & enjoy!
Dushanbe, the capital city of Tajikistan, might not resonate in every traveler’s mind as much as London, Paris or Tokyo, but there are charming characteristics to this Tajik city. The truth is to be told—its heart and soul is definitely the people and their warm hospitality like no others. Trust me on this! Its uniqueness has definitely lived up to my expectations when I visited this city last November 2019.
I flew in to Dushanbe from Tashkent and stayed there for a week. I roamed around Dushanbe in the first couple of days and then stayed with a local Tajik host via Couchsurfing. If you ask me what are the must-see places in the city, here I’ve put together the perfect 2-day Dushanbe itinerary including the city’s main attractions. I have also included my detailed day-to-day and overall expenses for a budget traveler’s reference. Let’s do this!
Hi there! First of all, I am Daniel – a solo backpacker from the Philippines. If you don’t know my story yet, feel free to read this article where I talked about how I quit my job in order to travel. This article was also featured on TripZilla Philippines.
The famous Ismail Somoni Avenue | Dantravels.org
DO YOU NEED A VISA FOR TAJIKISTAN?
Depending on your nationality, you might or might not need a visa. Check out my Tajikistan visa guide to check if you’re legible for an evisa or no visa at all.
Dushanbe is the capital and largest city of Tajikistan–the fourth and last country in Central Asia I’ve visited in 2019. The city is located in Gisar valley at 2,700 ft above sea level. It is roughly a 4 ½-hour flight away from Dubai, and about 5 ½-hours of flight from Moscow.
Language: Tajik; some Persian & Russian, too Currency: Tajikistani Somoni (TJS) Airport: DYU (Dushanbe) Preferred mode of transportation: Taxi; Marshrutka (Minibus) Time Zone: GMT +5
FLIGHTS TO DUSHANBE:
Finding a cheap flight ticket to Dushanbe, Tajikistan from Central Asia is relatively easy. I booked mine coming from Tashkent, Uzbekistan via Uzbekistan Airways. Please note that since I entered Uzbekistan through a 5-day visa-free transit, I can only exit the Uzbekistan through its flag carrier (Uzbekistan Airways) bound to the next country. It’s one of their transit visa mandatory requirements.
I suggest you check Kayak (click HERE) as they usually offer cheap fare rates compared to other booking sites.
HOW I GOT TO THE CITY:
I arrived at Dushanbe International Airport (DYU) at around midnight from a 3-hour flight from Tashkent’s airport (TAS).
Early in the morning, I took a taxi to reach my hostel in downtown Dushanbe. If you’re new in Dushanbe, I recommended to go by taxi but…haggle as much as you can!
40 TJS (4.13 USD) – Taxi from airport to my hostel
NOTE: Street addresses are useless in Dushanbe; drivers go by landmarks. Have your accommodation’s phone number handy. They can guide your driver to the location.
You can book a room at any hotel in Dushanbe through Agoda or Booking.com. I usually book my room accommodations through booking.com. Room accommodation ranges from cheap hostels to luxury hotels. Book hostels through booking.com as they have free cancellation or pay-at-the-hotel option.
If Dushanbe hotel isn’t to your liking, try AirBnb. Airbnbs are immersed in neighborhoods, condos, and townhomes. There is a feeling you get when you stay in an Airbnb that makes you feel like you belong in that city or town. Since it is someone’s home, there is a certain amount of pride you feel while staying there. I have used Airbnb on some of my other trips and I loved it!
If you’re new to AirBnB, then you can get up to 42 USD free travel credit by signing up via this link.
HOW TO GET AROUND DUSHANBE?
Marshrutka (Minivan) in Dushanbe | Dantravels.org
By Taxi. These are the best options (metered and shared taxis) for foreigners compared to other public means of transportation. Most fares are between 10-20 TJS, 30 TJS for only the longest of trips. Agree on the fare in advance or choose a metered taxi.
By Minibus (Marshrutka). Marshrutkas cost 1-2 TJS per trip. However, they can be uncomfortably overfull and with claustrophobically low ceilings.
By Foot. Get your feet ready as you will walk to many places in Dushanbe, too. And as I mentioned in my budget travel tips blog – “walk as much as you can!“
By Bus (and Trolleybus). Buses are not really recommended for short-term travelers. Plus, I was told you can only get on the bus with a bus card.
MY 2-DAY DUSHANBE ITINERARY (TAJIKISTAN ITINERARY)
DAY 1
1st Stop: Dushanbe Flagpole Park
At 165 meters (541 feet), it was the tallest free-standing flagpole in the world from its completion in 2011 until the 2014 erection of the (171m) Jeddah Flagpole. I was able to visit this park on a windy day and thus I’ve seen the flag in its full glory. It is impressive and nicely integrated into the surroundings.
It is easily reachable by taking trolleybus 2,10 and 11 or Minibus 8,13 23 and 37 to the Putovskiy Bus stop. After getting off the bus, cross the Ismail Somoni Avenue and the white arched entrance with gold letters will be seen. The entrance is also a great area to take a photo of the tall flag pole.
Dushanbe Flagpole Park | Dantravels.org
Duration (getting there + visiting): 1-2 hours
How I got here: By Minibus from my hostel’s nearest bus stop.
2nd Stop: National Museum of Tajikistan
The museum is also located in the Flagpole park. I visited this site to see the external beautiful sculptures. Most tourists particularly wanted to see the reclining and sleeping Buddha. The entrance fee costs 250 TJS (25 USD) for foreigners.
This museum is strongly recommended to travelers to Tajikistan as it will give you an overview of the nation’s long and complex history.
National Museum of Tajikistan | Dantravels.org
Duration (getting there + visiting): 1 hour
How I got here: By foot (this is within the Flagpole Park)
3rd Stop: Palace of the Nation
The Palace of the Nation is located next to the Flagpole park. This presidential mansion is very impressive from a distance, as that’s the only way you’ll get to see it. Tourists wandering too close to the perimeter are quickly shooed away. Don’t try taking a photo or at least don’t get caught =)
Duration (getting there + visiting): 1 hour
How I got here: By foot (this is also within the Flagpole Park)
4th Stop: Rudaki Park
This one is definitely a stunning park, huge and well kept. It was full of people when I visited but has a really nice atmosphere! There is a statue of Rudaki which is the centerpiece of the park. This is a must-see in Dushanbe!
Rudaki Park | Dantravels.org
Duration (getting there + visiting): 1 hour
How I got here: By foot from the Flagpole Park
5th Stop: Statue of Ismoil Somoni
A great walk through Rudaki Avenue will take you up to the Ismael Somoni monument, national hero for defending the Tajik nation.
The Somoni monument is probably the most popular attraction in Dushanbe. It is located in Dusti (Friendship) Square which has an interesting history. The 13 meter tall monument to Somoni is dwarfed by a 43 meter arch directly behind, which is topped by a golden crown.
Statue of Ismoil Somoni in Dushanbe | Dantravels.org
Duration (getting there + visiting): 1 hour
How I got here: By foot from Rudaki Park
6th Stop: The Independence Monument
The Independence monument is located at the western end of Tehron Street. This area is a short walk west from the Ismoil Somoni monument. Together with the Simoni statue and the Tall Flagpole with Flag, this monument resides in the Rudaki Park complex. All are impressive.
The Independence Monument | Dantravels.org
Duration (getting there + visiting): 1 hour
How I got here: By foot from Ismoil Somoni Monument
DAY 2
7th Stop: Komsomol Lake and Park
I started off the second day of my do-it-yourself walking tour here at Komsomol Lake and Park in Dushanbe. It took me 30 minutes to get here from my hostel.
From Komsomol lake, you can have a wonderful view of Dushanbe’s skyline with some of the capitals newest buildings including the Palace of the Nation, the large Tajik flagpole and the Nowruz palace.
Komsomol Lake | Dantravels.orgKomsomol Park or sometimes called Youth Park | Dantravels.org
Duration (getting there + visiting): 1-2 hours
How I got here: By foot from my hostel
8th Stop: Dushanbe Grand Mosque
The Dushanbe Grand Mosque is still under construction when I visited its site. But it is already considered the biggest Mosque ever built in Tajikistan. For me, it’s the most beautiful piece of architecture I’ve seen in Dushanbe!
Dushanbe Grand Mosque | Dantravels.org
Duration (getting there + visiting): 1-2 hours
How I got here: By foot from Komsomol Lake
9th Stop: Tajik National University
Before I head to another Mosque (on my 10th stop), I stopped over at Tajik National University which is a 10-15 minute walk from Dushanbe Grand Mosque. This huge Tajik university is the first and largest university in Tajikistan.
Tajik National University | Dantravels.org
Duration (getting there + visiting): 1 hour
How I got here: By foot from Grand Mosque
10th Stop: Haji Yaqub Mosque
A true landmark in the heart of city named in honor of Mawlana Yaqub-i Charkhi, a 15-century Naqshbandiya Sufi order sheikh. The Haji Yaqub Mosque was the largest mosque in the city before the new mosque (the Grand Mosque) on Karamov Street was constructed. There were also vendors here that sell Tajik souvenirs in case you want to buy something to remember Dushanbe or Tajikistan.
Haji Yaqub Mosque | Dantravels.org
Duration (getting there + visiting): 1-2 hours
How I got here: By foot from Tajik National University
11th Stop: Victory Square and Monument
The Victory Square is located on Ayni street and is easily reached by Trolleybus 4 or Minibus 2 and 7. The Victory Square has a 2-pillar structure and an IS-2 tank monument crammed between a busy road on each side. Be careful as crossing roads on foot can be a challenge.
Victory Square Dushanbe | Dantravels.org
Duration (getting there + visiting): 1 hour
How I got here: By minibus from Yaqub Mosque’s nearest crossing street.
COUCHSURFING IN DUSHANBE
In the next couple of days in Dushanbe, I have spent it staying with a Couchsurfing host! Thus, I won’t be including my expenses during those days.
But anyway, here is Dilshod (left) from Dushanbe–a very friendly host! Dilshod and his other two brothers have welcomed me in their home like I’m a part of their family.
Dilshod and I having lunch together | Dantravels.org
If you need room to stay (temporarily) in Dushanbe for free, my friend Dilshod would be more than happy to warmly welcome you and provide you food in his home. In return, just be nice to him and be patient to him as he is still learning English. In that way, he’d be able to also practice his spoken English. Contact him on his Facebook Couchsurfing page.
This is Dilshod’s older brother–Jamoladin | Dantravels.org
MY 2-DAY EXPENSES IN DUSHANBE
Day 0 (Arrival at Hostel, Rest)
81.6 USD (791.12 TJS) – Flight from Tashkent, Uzbekistan to Dushanbe, Tajikistan. I pre-booked it online at Kayak.
1.6 TJS – Fare, Minibus to Victory Monument (0.1 is missing?)
2 TJS – Snack (Hotdog in a bun)
12 TJS – Food (Plov meal)
NOTE: I walked some 3 kilometers back to my hostel
Subtotal: 30.6 TJS (3.16 USD)
Last Day (Departure)
1.5 TJS – Minibus #15 to a bus stop near Airport
18 TJS – Snacks (2x Lays)
6 TJS – Bread
6 TJS – Soft drink (Fanta)
230 USD (2,230 TJS) – Flight from Dushanbe, Tajikistan to Delhi, India. I pre-booked it online at Kayak.
Subtotal: 2,261 TJS (233.21 USD)
Total Expenses: 346.23 USD
What do you think of this 2-day Dushanbe itinerary?
I hope that you find this 2-DAY DUSHANBE BUDGET ITINERARY and TRAVEL GUIDE blog useful!
If you have any questions, please feel free to ask in the comment section below.
RECOMMENDED PACKAGE TOURS
In case you’re also looking for package tours to simply jumpstart your actual itinerary, I highly recommend booking tours through Viator which is perfect for your Tajikistan itinerary. See tours and packages I personally handpicked for you:
Booking.com. I usually book my hostel accommodation at booking.com. Thus, I recommend you guys trying it for your Dushanbe itinerary. Room accommodation ranges from cheap hostels to luxury hotels. Book hostels through booking.com as they have free cancellation or pay-at-the-hotel option.
Airbnb. Try Airbnb in finding comfy and cozy rooms for your Dushanbe itinerary! I have used Airbnb on some of my other trips and I loved it!
Have you tried Airbnb? Sign up with my link and you will get up to 42 USD (2,200 Php) off your first stay. Click this link to get that discount.
Flights
KAYAK. All of my flight bookings are all from KAYAK. Kayak is one of the world’s leading travel search engines and searches hundreds of travel sites.
I suggest you check Kayak (click HERE) as they usually offer cheap fare rates compared to other booking sites.
Dushanbe (Tajikistan) Package tours
Viator. Viator is the world’s leading resource for researching, finding and booking the best travel experiences worldwide.
Click here to find the best Viator deals in Dushanbe
Travel Insurance
World Nomads. If you don’t have travel insurance when times get tough, basically you are screwed. Traveling always comes with inherent risks attached. Whether you are trekking in the Pamir mountains or wandering the streets of Dushanbe, unforeseen events can suddenly upend your world.
Generally speaking, travel insurance covers you for the following: Medical Costs – hospital visits, emergencies, evacuations; Property Loss – luggage and their contents; Travel Issues – accommodation and transportation expenses. Thus, I highly recommend you guys getting a travel insurance for your Dushanbe itinerary. I bought one from the World Nomads (available in 130+ countries) where most travelers get their travel insurances.
Go to this link to get to your World Nomads travel insurance.
This post may contain affiliate links which means if you purchase something through that link, I will make a small commission at no additional cost to you. Think of it as buying a cup of coffee for me on someone else. Thanks & enjoy!
Samarkand is a real gem along the ancient Great Silk Road. This iconic crossroads between east and west was named a UNESCO World Heritage Site in 2011. No wonder why it’s a favorite destination for many travelers to Uzbekistan. For history buffs and architecture enthusiasts, Samarkand is a true paradise.
There are many wonderful places to see in Samarkand. But—if you only have one day to spare (like myself,) this is the perfect travel guide and itinerary for you. Here, I’ve compiled the superb 1-day Samarkand itinerary specifically for budget travelers, with my expenses included.
Hi there! First of all, I am Daniel – a solo backpacker from the Philippines. If you don’t know my story yet, feel free to read this article where I talked about how I quit my job in order to travel. This article was also featured on TripZilla Philippines.
Me with Ulugh Beg Madrasah | Dantravels.org
After spending a day in Tashkent, capital of Uzbekistan, I immediately headed to Samarkand the next morning to see the ancient city of Samarkand myself. I couldn’t wait to explore this southern city which is known for its ancient mosques and mausoleums!
But first–do you need a visa to enter Uzbekistan? Well, depending on your nationality, you may or may not need a visa. See the information below which category you fall in. Other countries not listed below require an Uzbek visa in advance.
Citizens of the following 65 countries can visit Uzbekistan without a visa:
I. 90 days
Armenia Azerbaijan Belarus Georgia Kazakhstan Moldova Russia Ukraine
II. 60 days
Kyrgyzstan
III. 30 days
All European Union citizens Andorra Argentina Australia Bosnia and Herzegovina Brazil Brunei Canada Chile Iceland Indonesia Israel Japan Liechtenstein Malaysia Monaco Mongolia Montenegro New Zealand Norway San Marino Serbia Singapore South Korea Switzerland Tajikistan Turkey United Arab Emirates Vatican
Uzbekistan introduced the system of electronic visas for a period of up to 30 days from 15 July 2018. A single or multiple entry visa is valid for 30 days. The cost of obtaining an electronic visa for 20 USD. Travelers have to apply for the e-Visa for Uzbekistan at least three days in advance before their trip.
As of 21 March 2019 eVisa is available to the citizens of the following 77 jurisdictions:
Albania, Algeria, Angola, Antigua and Barbuda, Bahamas, Bahrain, Bangladesh, Barbados, Belize, Bhutan, Bolivia, Cabo Verde, Cambodia, Cameroon, China, Colombia, Costa Rica, Côte d’Ivoire, Cuba, Dominica, Dominican Republic, Ecuador, Egypt, El Salvador, Fiji, Gabon, Ghana, Grenada, Guatemala, Guyana, Honduras, Hong Kong, India, Iran, Jamaica, Jordan, Kiribati, Kuwait, Laos, Lebanon, Maldives, Marshall Islands, Mauritius, Mexico, Micronesia, Morocco, Nauru, Nepal, Nicaragua, North Korea, North Macedonia, Oman, Palau, Panama, Paraguay, Peru, Philippines, Qatar, Saint Kitts and Nevis, Saint Lucia, Saint Vincent and the Grenadines, Samoa, Saudi Arabia, Senegal, Seychelles, Solomon Islands, South Africa, Sri Lanka, Suriname, Thailand, Tonga, Trinidad and Tobago, Tunisia, United States, Uruguay, Vanuatu, Venezuela, Vietnam
IMPORTANT NOTE: Citizens of the following countries and territories do not require a visa for a 5-day stay if they are transiting through the international airports of Uzbekistan. According to the IATA Timatic, the outbound flight from Uzbekistan must be on Uzbekistan Airways.
Albania, Algeria, Antigua and Barbuda, Bahamas, Bahrain, Barbados, Belize, Bhutan, China, Colombia, Costa Rica, Dominica, Dominican Republic, Ecuador, Equatorial Guinea, Fiji, Gabon, Grenada, Guatemala, Guyana, Honduras, India, Jamaica, Kuwait, Lebanon, Maldives, Mauritius, Mexico, Morocco, Nauru, North Macedonia, Oman, Palau, Panama, Peru, Philippines, Qatar, Saint Kitts and Nevis, Saint Lucia, Saint Vincent and the Grenadines, Saudi Arabia, Seychelles, South Africa, Sri Lanka, Suriname, Thailand, Trinidad and Tobago, Tunisia, Turkmenistan, United States, Uruguay, Vietnam, Venezuela
As a Philippine passport holder, I am both eligible of eVisa and Transit visa. And you might wonder why I chose to go with the 5-day visa-free transit instead. To be honest, I was actually fed up of processing too much visa lately. You see I’ve been traveling into different Asian countries in the past 3 months with my 3rd-world-country passport (and it sucks to have one!) Besides, I actually don’t mind staying for a short period of time. The important thing is–I got my Uzbekistan passport stamp!
WHERE IS SAMARKAND?
Samarkand, alternatively spelled as Samarqand, is a city in south-eastern Uzbekistan and one of the oldest continuously inhabited cities in Central Asia. Prospering from its location on the Silk Road between China and Europe, at times Samarkand was one of the greatest cities of Central Asia.
Language: Uzbek (and some Russian) Currency: Uzbekistani Soʻm (UZS) Preferred mode of transportation: Taxi / Minibus Time Zone: GMT +5
FLIGHTS TO SAMARKAND
Finding a cheap flight ticket to Samarkand from Europe and Central Asia is relatively easy. If you intend to book a flight ticket to Samarkand, I suggest you check Kayak (click HERE) as they usually offer cheap fare rates compared to other booking sites.
HOW I GOT TO SAMARKAND:
I made it through Samarkand from a 5-hour commute by bus from Tashkent.
Tashkent to Samarkand bus at Tashkent Avtovokzal | Dantravels.org
From Tashkent as my starting point, I utilized Tashkent’s metro and headed to the Olmazor metro station. I walked some 200 meters to find the Tashkent Avtovokzal building—the main terminal where intercity buses operate.
I got myself a bus ticket from the counter worth 35,000 UZS (3.69 USD). The bus left Tashkent at around 12:00 NN. Buses going to Samarkand leave every 2 hours and start to operate between 7:00 AM and 8:00 AM.
Hostel room type: Bunk Bed in Mixed Dormitory Room
Hostel rate: 6 USD per night (see note below)
Is breakfast included: Yes
NOTE: It was supposed to be 10 USD per night but I had a good deal (a discount!) with the owner of this hostel. I only paid 6 USD per night in exchange for a good rating and review on the booking site.
You can book a room at any hotel through Agoda or Booking.com. I usually book my room accommodations through booking.com. Room accommodation ranges from cheap hostels to luxury hotels. Book hostels through booking.com as they have free cancellation or pay-at-the-hotel option.
If Samarkand hotel isn’t to your liking, try AirBnb. Airbnbs are immersed in neighborhoods, condos, and townhomes. There is a feeling you get when you stay in an Airbnb that makes you feel like you belong in that city or town. Since it is someone’s home, there is a certain amount of pride you feel while staying there. I have used Airbnb on some of my other trips and I loved it!
If you’re new to AirBnB, then you can get up to 42 USD free travel credit by signing up via this link.
HOW TO GET AROUND SAMARKAND?
By Minibus. Numbered minibuses run a fair network of routes in Samarkand between 6:00 AM to 9:00 PM. The fare costs 1,200 UZS KGS (0.13 USD). However, I don’t really recommended it for short term travelers. It would be better going around by taxi or even by foot!
By Taxi. I am not a fan of taking taxis but when in Samarkand, it’s actually the most convenient way to travel from one point to another within the city. But if you think you can get to your destination on foot, then go walk!
By Foot. Get your feet ready as you will walk to many places in Samarkand. Yes, I walk a lot while moving from point to point in my Samarkand itinerary . And as I mentioned in my budget travel tips blog – “walk as much as you can!“
MY 1-DAY SAMARKAND ITINERARY
Before I begin my Samarkand itinerary list, let me just acknowledge this good friend of mine—Maksim. I met this fellow traveler in my hostel in Samarkand because we shared the same room. He was with me the whole day of my do-it-yourself trip in Samarkand. Don’t be fooled by his Korean looks though, he speaks Russian really well and thus he gets along just fine with locals.
Lunch at Siyob Bazaar with my friend, Maksim | Dantravels.org
1st Stop: Amir Timur Statue
Amir Timur is deeply entrenched in the history of Samarkand. Thus when visiting Samarkand, the Timur statue is a must-photo-op. We started off this Samarkand itinerary with a 10-minute walk to this monument from the hostel. It is located at a roundabout in a busy section of town. It shows him wearing a crown and appropriately sitting on a throne leaning on his sword.
Amir Timur Statue | Dantravels.org
Duration (getting there + visiting): 1 hour
How I got here: By foot from hostel
2nd Stop: Gur Emir Mausoleum
Gur-e Amir Complex is the mausoleum of the Asian conqueror Timur (who is also known as Tamerlane) in Samarkand. There is a 15,000 UZS (1.58 USD) entrance fee if you intend to see what’s inside. Though I didn’t enter the gate, I urge you to see what’s inside. There you’ll see the central burial chamber glitters with gold and is exquisitely decorated with calligraphy across the walls, making a fitting burial space for Timur himself.
It’s a humbling experience and one that you must do if in Samarkand. You can book your ticket here in advance.
Gur Emir Mausoleum | Dantravels.org
Duration (getting there + visiting): 1-2 hours
How I got here: By foot from Amir Timur statue
3rd Stop: Registan Complex
Known as the centerpiece of the city and one of the most important monuments of Islamic arts—this is the famous Registan Complex and its three madrasahs. From left to right: Ulugh Beg Madrasah (left), Tilya-Kori Madrasah (middle), and Sher-Dor Madrasah (right).
The Registan was the heart of the ancient city of Samarkand of the Timurid dynasty. You can book your ticket here in advance.
The beautiful Registan Complex | Dantravels.orgMe with Ulugh Beg Madrasah | Dantravels.orgMe standing my back on the Sher-Dor Madrasah | Dantravels.org
Duration (getting there + visiting): 2-4 hours
How I got here: By foot from the Gur-e Amir Complex
4th Stop: Bibi Khanym Mosque
Compared to Registan and Gur e Amir Mausoleum, the Bibi Khanym Mosque isn’t as impressive. The entrance here is 25,000 UZS per person. But the good thing is that it wasn’t too crowded or touristy and you can enjoy a bit of solitude here.
Bibi Khanym Mosque | Dantravels,org
Duration (getting there + visiting): 1-2 hours
How I got here: By foot from Registan Complex
5th Stop: Siyob Bazaar (Siab Bazaar)
This bazaar isn’t as impressive as the Chorsu Bazaar in Tashkent . And probably benefits from the fact that a lot of tourists just go to Samarkand and this is the only bazaar they see. But it’s a cool site to see nonetheless. Perched next to the Bibi Khanym mosque, with good views of that building, it’s right in the center of Samarkand and gives you a real feel for Uzbekistan just wandering around.
Siyob Bazaar | Dantravels.org
NOTE: This is also where Maksim and I stopped over for lunch!
Duration (getting there + visiting): 1 hour
How I got here: By foot from Bibi Khanym Mosque
6th Stop: President’s Tomb / Hazrat Khizr Mosque
If you walk past the Siab Bazaar on a footbridge, you will find Hazrat Khizr Mosque where the tomb of Uzbekistan’s first President Islam Karimov rests. It is another mausoleum that is a must-visit in Samarkand. When you’re here, make sure to check out the viewpoint terrace which offers a good view of the city of Samarkand. There would be an entrance fee to some parts of the mosque but Maksim and I went only to the free ones.
Duration (getting there + visiting): 1 hour
How I got here: By foot from Siab Bazaar
7th Stop: Shah-i Zinda
Shah-i Zinda—Samarkand’s most moving and beloved site is this stunning avenue of mausoleums. It contains some of the richest tilework in the Muslim world. Entrance fee is 15,000 UZS with additional 6,000 UZS if you are bringing a digital camera with you. This place is definitely worth a visit if you’re in Samarkand!
Duration (getting there + visiting): 1-2 hours
How I got here: By foot from the President’s Tomb
8th Stop: Afrisiyob Museum
Though Maksim and I didn’t go inside this museum because we felt like it’s a bit pricey with an entrance fee to 25,000 UZS (because I guess we both don’t fancy museums), still go check this out if you’re traveling in Samarkand.
Afrisiyob Museum | Dantravels.org
Afrosiyob Museum is located at a place which is believed to be where Afrosiyob, the legendary king of Turan in the book of kings, was from. The museum offers a glimpse at the history of the region, particularly Samarkand. There are many remnants of wall paintings and stone carvings with enough explanation on the objects itself.
Duration (getting there + visiting): 1-2 hours
How I got here: By foot from Shah-i Zinda
9th Stop: Afrisiyob Archeological Site
Adjacent to Afrisiyob Museum is where this archeological site is situated. Maksim and I met a young Japanese traveler named Niko wandering alone in this site. So we chatted a little bit before we head to our last stop.
Maksim and Niko walking around Afrisiyob site | Dantravels.org
Archaeological excavations at this site revealed that as far back as before the Common Era Afrasiab was a major Central Asian cultural and trade center. The artifacts excavated on the site include terracotta statuettes, beautifully ornamented earthenware, fragments of ossuaries and tools, various glass and metal items, adornments and coins. Among the most remarkable finds are fragments of a mural currently displayed in the Afrasiyob Museum.
Duration (getting there + visiting): 1 hour
How I got here: By foot from Afrisiyob Museum
10th Stop: Observatory of Ulugbek
We’ve reached this site after 20-30 minutes of walking from Afrisiyab Archeological Site. And yes, we’ve been walking all day starting from our hostel until here to our last stop. But then again, with its 25,000 UZS entrance fee, we felt like it’s a bit pricey and thus we instead found ourselves taking advantage of the free pictures we can get without going inside the observatory.
Mirzo Ulughbek was the one who built the great Ulugh Beg Observatory between 1424 and 1429. It was considered by scholars to have been one of the finest observatories in the Islamic world at the time and the largest in Central Asia. Below is his statue located at the entrance of the observatory.
Duration (getting there + visiting): 1 hour
How I got here: By foot from Afrisiyob Archeological Site
And there you have it. Let’s call it a day! And no, I didn’t go on foot going back to my hostel. I’m dead tired! I went by a shared taxi with the help of Maksim’s bargaining prowess.
MY 1-DAY EXPENSES IN SAMARKAND
Day 0 (Arrival)
1,400 UZS – Fare, metro to Olmazor metro station
35, 000 UZS – Intercity bus from Tashkent bus terminal (near Olmazor) to Samarkand
1,200 UZS – Bus #52 from Samarkand bus terminal to somewhere inner of the city
NOTE: It was far from my hostel where I get off from that Bus #52. I remember I walked about 2 km to reach my hostel. I find it confusing how to ride public buses in Samarkand!
Subtotal: 150,600 UZS (15.83 USD)
Day 1
21,000 UZS – Entrance fee at Shah-i Zinda Mausoleums (it includes a 6,000-som fee for a digital camera.)
What do you think of this 1-day SAMARKAND itinerary?
I hope that you find this 1-DAY TOUR SAMARKAND BUDGET ITINERARY and TRAVEL GUIDE blog useful!
If you have any questions, please feel free to ask in the comment section below.
RECOMMENDED PACKAGE TOURS
In case you’re also looking for package tours to simply jumpstart your actual itinerary, I highly recommend booking tours through Viator which is perfect for your Samarkand itinerary. See tours and packages I personally handpicked for you:
Booking.com. I usually book my hostel accommodation at booking.com. Thus, I recommend you guys trying it for your Samarkand itinerary. Room accommodation ranges from cheap hostels to luxury hotels. Book hostels through booking.com as they have free cancellation or pay-at-the-hotel option.
Airbnb. Try Airbnb in finding comfy and cozy rooms for your Samarkand itinerary! I have used Airbnb on some of my other trips and I loved it!
Have you tried Airbnb? Sign up with my link and you will get up to 42 USD (2,200 Php) off your first stay. Click this link to get that discount.
Flights
KAYAK. All of my flight bookings are all from KAYAK. Kayak is one of the world’s leading travel search engines and searches hundreds of travel sites.
I suggest you check Kayak (click HERE) as they usually offer cheap fare rates compared to other booking sites.
This post may contain affiliate links which means if you purchase something through that link, I will make a small commission at no additional cost to you. Think of it as buying a cup of coffee for me on someone else. Thanks & enjoy!
Despite stories that there is nothing to see in Tashkent, I still wanted to give it a chance. And I’m glad I did. By utilizing Uzbekistan’s 5-day visa-free transit, I managed to enter Uzbekistan last November 2019 through Tashkent airport. With only one day to spend in Tashkent before I head south of the country, I was able to see what Tashkent is made of. The city has a mixture of modern new office buildings, hotels, parks, and crumbling Soviet-style apartment blocks. Moreover, it is a very Soviet city that has little remaining from its ancient Central Asian past.
But there is more to these! If you’re curious enough to know what main attractions this city has to offer, here I’ve compiled the perfect 1-day Tashkent tour itinerary with travel guide and budget included.
Hi there! First of all, I am Daniel – a solo backpacker from the Philippines. If you don’t know my story yet, feel free to read this article where I talked about how I quit my job in order to travel. This article was also featured on TripZilla Philippines.
Amir Timur Square | Dantravels.org
Tashkent might be the capital of Uzbekistan, but it receives little attention from travelers. It’s a city that tourists come through, and often skip all the places to visit in Tashkent for the Great Silk Road attractions in Samarkand or Bukhara. I actually did the same thing (haha!) but at least I spent one whole day in Tashkent.
First things first–do you need a visa to enter Uzbekistan? Well, depending on your nationality, you may or may not need a visa. See the information below which category you fall in. Other countries not listed below require an Uzbek visa in advance.
Free-Visa Entry
Citizens of the following 65 countries can visit Uzbekistan without a visa:
I. 90 days: Armenia, Azerbaijan, Belarus, Georgia, Kazakhstan, Moldova, Russia, Ukraine
II. 60 days: Kyrgyzstan
III. 30 days: All European Union citizens, Andorra, Argentina, Australia, Bosnia and Herzegovina, Brazil, Brunei, Canada, Chile, Iceland, Indonesia, Israel, Japan, Liechtenstein, Malaysia, Monaco, Mongolia, Montenegro, New Zealand, Norway, San Marino, Serbia, Singapore, South Korea, Switzerland, Tajikistan, Turkey, United Arab Emirates, Vatican
EVisa
Uzbekistan introduced the system of electronic visas for a period of up to 30 days from 15 July 2018. A single or multiple entry visa is valid for 30 days. The cost of obtaining an electronic visa is 20 USD. Travelers have to apply for the e-Visa for Uzbekistan at least three days in advance before their trip.
As of 21 March 2019, eVisa is available to the citizens of 77 jurisdictions, including the Philippines, Thailand, India, USA, and Vietnam.
Visa-free transit
IMPORTANT NOTE: Citizens of many countries (including Philippines and Thailand) do not require a visa for a 5-day stay if they are transiting through the international airports of Uzbekistan. According to the IATA Timatic, the outbound flight from Uzbekistan must be on Uzbekistan Airways.
As a Philippine passport holder, I am both eligible for eVisa and Transit visa. And you might wonder why I chose to go with the 5-day visa-free transit. To be honest, I was actually fed up with processing too much visa lately. You see I’ve been traveling into different Asian countries in the past 3 months with my 3rd-world-country passport and it sucks to have one. Besides, I actually don’t mind staying for a short period of time. The important thing is–I got my Uzbekistan passport stamp! Woo hoo…
Uzbekistan passport stamp transit visa | Dantravels.org
WHERE IS TASHKENT?
Tashkent is the capital city of Uzbekistan–the third country in Central Asia I have visited. It is located in the north-east of the country close to the Kazakhstan border. In fact, it is just 13 km away from the nearest Kazakh border crossing. By plane, it is a little more than 3 hours of flight from Dubai or almost 4 hours from Moscow.
Language: Uzbek (and some Russian) Currency: Uzbekistani Soʻm (UZS) Airport: TAS (Tashkent) Preferred mode of transportation: Metro train Time Zone: GMT +5
FLIGHTS TO TASHKENT:
Finding a cheap flight ticket to Tashkent from Europe and Central Asia is relatively easy. I booked mine coming from Bishkek, Kyrgyzstan via Uzbekistan Airways. It is advisable to fly in and out of Uzbekistan with Uzbekistan Airways if you’re entering via transit visa like myself.
I suggest you check Kayak (click HERE) as they usually offer cheap fare rates compared to other booking sites.
HOW I GOT TO THE CITY:
I arrived at Islam Karimov Tashkent International Airport (TAS) at around 7:30 PM from an hour flight from Bishkek-Manas Airport (FRU).
My Couchsurfer host, Noor, was actually waiting for me right outside the arrival gate. It was so nice of him in making an effort to pick me up at the airport and accompanied me to his home. We even shared some Kebab meal on our way. It was all his treat!
Noor and I having Kebab | Dantravels.org
I was glad to connect with him through Couchsurfing just in the nick of time. Otherwise, I could have spent more money staying in hostels.
NOTE: There are several public marshrutkas (minibusses) at the airport. Just ask which one is going to your hotel. If you have the budget, feel free to ride a taxi. Taxis in Tashkent are cheaper in terms of European standards (but still I try to avoid taxis as much as I can.)
But in case you intend to stay in a hotel, you can book a room through Agoda or Booking.com. I usually book my room accommodations through booking.com. Room accommodation ranges from cheap hostels to luxury hotels. Book hostels through booking.com as they have free cancellation or pay-at-the-hotel option.
Use my link to book your hostel and you’ll get 10% of your booking back after your stay. Click this link to get that discount.
If Tashkent hotel isn’t to your liking, try Airbnb. Airbnbs are immersed in neighborhoods, condos, and townhomes. There is a feeling you get when you stay in an Airbnb that makes you feel like you belong in that city or town. Since it is someone’s home, there is a certain amount of pride you feel while staying there. I have used Airbnb on some of my other trips and I loved it!
If you’re new to Airbnb, then you can get up to 42 USD free travel credit by signing up via this link.
HOW TO GET AROUND TASHKENT?
By Metro. Tashkent’s metro is the easiest way to get around, running between 5:00 AM and midnight. There are 3 color-coded metro lines. You’ll need to buy a zheton (token) for each trip which costs 1,400 UZS (0.15 USD).
By Bus and Marshrutka (Minibus). Numbered buses and minibuses run a fair network of routes in Tashkent. The fare costs 1,400 UZS (0.15 USD).
By Foot. Get your feet ready as you will walk to many places in Tashkent, too. And as I mentioned in my budget travel tips blog – “walk as much as you can!“
By Taxi. Taxis are excellent but as always–a bit expensive. Totally not recommended for short-term and budget travelers.
TASHKENT 1 DAY TOUR (MY TASHKENT ITINERARY)
1st Stop: Memorial Park And Museum of Victims of Repressions.
First off on my Tashkent itinerary is visiting this memorial park in Tashkent. It’s clean, beautiful, totally serene and peaceful. It’s a place one can just go and sit alone for hours onwards. It is unbelievable that such a serene & peaceful place can have such a gory history behind it. The Tashkent TV tower (my 2nd stop) is in full view from the park. I would highly recommend to take some time out to sit beside the flowing water of the canal to seep in the serenity of the place.
Memorial Park And Museum of Victims of Repressions | Dantravels.org
The locals also seemed to be enjoying the place and were so friendly. I met this group of young Uzbek students with their teacher while having an excursion within the area. When I told them I was a tourist and do not speak Uzbek nor Russian, they tried their best to talk to me in English and they were also so excited to have a photo with me.
Duration (getting there + visiting): 1-2 hours
How I got here: By Marshrutka from hostel (don’t be afraid to ask a local for directions!)
2nd Stop: Tashkent TV Tower
The Tashkent TV tower was the first thing I’ve noticed in the city while we were on our way to my host’s place (after arriving from the airport). The lights are spectacularly pretty and bring the city to life during the night. And the next morning I was able to see it up close. So happy to see this iconic landmark of Tashkent!
Tashkent TV Tower | Dantravels.org
Duration (getting there + visiting): 1 hour
How I got here: By foot from the Memorial Park
3rd Stop: Amir Timur Square
Amir Timur Square is located in the city center where you can see the statue of Amir Timur himself riding a horse with the view of Hotel Uzbekistan in the background. It’s impossible to be in Tashkent and not come across the central square of Amir Timur. It is a place with a lot of locals and tourists pouring in and taking a lot of photos. It also surrounded by a big forested park.
Amir Timur Square | Dantravels.org
Duration (getting there + visiting): 1-2 hours
How I got here: By Metro (Bodomzor station to Amir Temur Hiyoboni station)
4th Stop: Amir Timur Museum
I didn’t go inside the museum–but, purely from the outside, it’s worth a look. Right next to Amir Timur square, it takes no time at all just to pop by and it’s certainly worth taking a look. The building itself is unlike those that you would find in the western countries and is a great introduction to being in Uzbekistan. A local told me that there are paintings and exhibits inside which explain why Timur is seen as a national hero.
This pedestrian street is close to Amir Timur Square. You can relax and enjoy some good music or take a bicycle and just roam around the area. There also amusement activities and artists selling painting with smiling locals make it a must-visit!
Broadway Alley | Dantravels.org
Duration (getting there + visiting): 1 hour
How I got here: By foot from Amir Timur Museum
6th Stop: State Museum of History of Uzbekistan
This museum was worth visiting to get an overview of the history of Uzbekistan. The first floor exhibits are from prehistory–lots of stone tools and pottery from thousands of years ago. There are also exhibits that cover the history of the Persian period, the Greek Macedonian period, the Arab invasions, followed by much glorifying of the Amir Temur (Tamerlane) empire, and followed by the Russian period. The entrance fee costs 16,000 UZS and is good for 2 hours but you can also book your ticket online HERE.
State Museum of History of Uzbekistan | Dantravels.org
Duration (getting there + visiting): 1-2 hours
How I got here: By foot from Broadway Alley
7th Stop: Navoi Opera Theater
Commonly known as the “Opera”, the Alisher Navoi Theater is a beautiful building in the city center. The theater recognizes Alisher Navoi, who lived 600 years earlier and recognized as the founder of Turkik literature. Worth a view of this interesting architecture if not a show.
Navoi Opera Theater | Dantravels.org
Duration (getting there + visiting): hour
How I got here: By foot the State History Museum.
8th Stop: Chorsu Bazaar
Chorsu Bazaar feels incredibly authentic and is much bigger than just a central dome. Truthfully, I didn’t find any of the things on offer particularly appealing for tourist, but the whole draw of Chorsu Bazaar for me are the parts that aren’t geared up for tourism–the food market, the inside of the dome where all of the butchers and fruit sellers are located, the ability to simply walk around and feel that you’re part of a bustling and busy Uzbek bazaar. It is definitely worth a visit and is next door to the Kukeldash Madrasah, which can be accessed from the market.
Duration (getting there + visiting): 1-2 hours
How I got here: By Metro (Kosmonavtlar station to Chorsu station)
9th Stop: Kukeldash Madrasah
Kukeldash Madrasah is situated just walking distance from Chorsu bazaar and was built in 1570 by the Shaybanid Dynasty of rulers. This Madrasah has a serene aura about it, but if you are planning on visiting Bukhara, Khiva or Samarkand then it is not that interesting as you will see more grand and original madrasahs.
PS: I just got a view of the Madrasah from its exterior as being a Non- Muslim entry would be refused. Thus, entrance fee is required.
Kukeldash Madrasah | Dantravels.org
Duration (getting there + visiting): 1 hour
How I got here: By foot from Chorsu Bazaar
10th Stop: Minor Mosque
Also known as the white mosque, The Minor mosque is an interesting and striking white building with its impressive white marble and large manicured gardens and fountain. The great architecture blew me away. Simply a must-see in Tashkent.
Minor Mosque | Dantravels.org
Duration (getting there + visiting): 1-2 hours
How I got here: By Metro (Chorsu station to Bodomzor station)
MY 1-DAY EXPENSES IN TASHKENT
Day 0 (Arrival)
114.85 USD (1,092,970.25 UZS) – Flight from Bishkek, Kyrgyzstan to Tashkent, Uzbekistan. I pre-booked it online at Kayak.
0 UZS – My CS host paid for my minibus transport from the airport to his home.
NOTE: My host also treats me for dinner (that Kebab meal photo above).
Subtotal: 1,092,970.25 UZS (114.85 USD)
Day 1
1,400 UZS – Fare, Minibus from host’s place to somewhere near Memorial Park
1,400 UZS – Fare, Metro from Bodomzor to Amir Temur Hiyoboni
1,400 UZS – Fare, metro from Kosmonavtlar station to Chorsu station
4,000 UZS – Food (bread with meat)
1,400 UZS – Fare, Metro from Chorsu to Bodomzor
7,000 UZS – Food (some cake bread)
1,400 UZS – Fare, bus from Bodomzor to CS host’s place
NOTE: My host also prepared an Uzbek dinner meal for me!
Subtotal: 35,000 UZS (3.68 USD)
Day 2 (Departure)
1,400 UZS – Fare, bus from CS host to somewhere near Hyatt Hotel (to withdraw at ATM)
1,400 UZS – Fare, metro from Mustaqillik Maydoni to Olmazor
35, 000 UZS – Intercity bus from Tashkent bus terminal (near Olmazor) to Samarkand
NOTE: My host also prepared an Uzbek breakfast meal for me (as a farewell)
Subtotal: 37,800 UZS (3.97 USD)
Total Expenses: 122.5 USD (6,228.57 PHP)
What do you think of this 1-day TASHKENT itinerary?
I hope that you find this 1-DAY TOUR TASHKENT BUDGET ITINERARY and TRAVEL GUIDE blog useful!
If you have any questions, please feel free to ask in the comment section below.
RECOMMENDED PACKAGE TOURS
In case you’re also looking for package tours to simply jumpstart your actual itinerary, I highly recommend booking tours through Viator which is perfect for your Tashkent itinerary. See tours and packages I personally handpicked for you:
Booking.com. I usually book my hostel accommodation at booking.com. Thus, I recommend you guys trying it for your Tashkent itinerary. Room accommodation ranges from cheap hostels to luxury hotels. Book hostels through booking.com as they have free cancellation or pay-at-the-hotel option.
Airbnb. Try Airbnb in finding comfy and cozy rooms for your Tashkent itinerary! I have used Airbnb on some of my other trips and I loved it!
Have you tried Airbnb? Sign up with my link and you will get up to 42 USD (2,200 Php) off your first stay. Click this link to get that discount.
Flights
KAYAK. All of my flight bookings are all from KAYAK. Kayak is one of the world’s leading travel search engines and searches hundreds of travel sites.
I suggest you check Kayak (click HERE) as they usually offer cheap fare rates compared to other booking sites.
This post may contain affiliate links which means if you purchase something through that link, I will make a small commission at no additional cost to you. Think of it as buying a cup of coffee for me on someone else. Thanks & enjoy!
Bishkek, the capital city of Kyrgyzstan, is actually just a 5-hour drive from Almaty, Kazakhstan. But since I was entering the country through visa-on-arrival, I flew in to Bishkek airport (from Almaty) where my visa can only be processed. And just like Almaty, the Kyrgyz capital still has retained its former Soviet Asian flavor.
With numerous green spaces, parks, and gardens alongside Soviet-era buildings and monuments, you’ll start to appreciate more of this underrated city. Even though you’re only staying for a short period of time, you’ll definitely enjoy the most of it. That’s why to help you jumpstart your next holiday here, I’ve compiled my 3-day Bishkek itinerary and travel guide which includes the detailed cost breakdown of my day-to-day expenses!
Hi there! First of all, I am Daniel – a solo backpacker from the Philippines. If you don’t know my story yet, feel free to read this article where I talked about how I quit my job in order to travel. This article was also featured on TripZilla Philippines.
Me with the Kyrgyzstan flag | Dantravels.org
DO YOU NEED A VISA FOR KYRGYZSTAN?
Depending on your nationality, you might or might not need a visa. Check out my KYRGYZSTAN VISA GUIDE to check if you’re legible for a visa on arrival or no visa at all.
Bishkek is the capital city of Kyrgyzstan–the second Central Asian country I’ve been to. It is situated in the central part of the Chui Valley at the foot of the Kyrgyz range of the Ala-Too Mountains. It is only a 30-minute drive to the Kazakh border of Korday and approximately 5 hours to the big city of Almaty, Kazakhstan. By plane, it is a little more than 4 hours of flight from Moscow, Russia or almost 2 hours from Astana, Kazakhstan.
Language: Kyrgyz and Russian Currency: Kyrgyzstani Som (KGS) Airport: FRU (Bishkek-Manas) Preferred mode of transportation: Bus / Marshrutka (Minivan) Time Zone: GMT +6
FLIGHTS TO BISHKEK:
Finding a cheap flight ticket to Bishkek from Europe and Central Asia is relatively easy. I booked mine coming from Almaty, Kazahkstan via Astana Airlines. If you’re also entering Kyrgyzstan through visa-on-arrival, your visa can ONLY be processed at the Bishkek (Manas) Airport.
I suggest you check Trip.com (click HERE) as they usually offer cheap fare rates compared to other booking sites.
HOW I GOT TO THE CITY:
I arrived at Bishkek-Manas International Airport (FRU) at around 8:00 PM from a 30-minute flight from Almaty Airport (ALA).
I spent my first night in Kyrgyzstan sleeping within the airport’s waiting area. The next morning, I took the very first trip of Marshrutka (public minivan) going to the city downtown. Minivan #380 runs from Airport to Bishkek (and vice versa) as early as 6:00 AM.
50 KGS (0.72 USD) – Marshrutka #380 and then transfer to;
10 KGS (0.14 USD) – Marshrutka #243
From getting off at the nearest bus stop to my hostel, I then walked about 10 to 15 minutes to reach my hostel (Imagine Hostel) using my 2GIS offline Maps.
You can book a room at any hotel in Bishkek through Agoda or Booking.com. I usually book my room accommodations through booking.com. Room accommodation ranges from cheap hostels to luxury hotels. Book hostels through booking.com as they have free cancellation or pay-at-the-hotel option.
Use my link to book your hostel and you’ll get 10% of your booking back after your stay. Click this link to get that discount.
If Bishkek hotel isn’t to your liking, try AirBnb. Airbnbs are immersed in neighborhoods, condos, and townhomes. There is a feeling you get when you stay in an Airbnb that makes you feel like you belong in that city or town. Since it is someone’s home, there is a certain amount of pride you feel while staying there. I have used Airbnb on some of my other trips and I loved it!
If you’re new to AirBnB, then you can get up to 42 USD free travel credit by signing up via this link.
HOW TO GET AROUND BISHKEK?
A trolley bus in Bishkek | Dantravels.orgInside the trolley bus in Bishkek | Dantravels.orgA Marshrutka (Minivan) in Bishkek | Dantravels.org
By Bus (and Trolleybus). Buses run a fair network of routes in Bishkek. Single-trip tickets cost 10 KGS (0.14 USD).
By Marshrutka. These minivans are faster and somewhat more frequent than buses. However, they can be uncomfortably overfull and with claustrophobically low ceilings. Single-trip tickets also cost 10 KGS (0.14 USD).
NOTE: The very useful 2GIS offline map app helps you plot your route and shows you in real-time which numbered buses and marshrutkas are due to arrive at which bus stop. The 2GIS app also works even without internet data.
By Foot. Get your feet ready as you will walk to many places in Bishkek, too. And as I mentioned in my budget travel tips blog – “walk as much as you can!“
By Taxi. Taxis are excellent but rather expensive.
MY 3-DAY BISHKEK ITINERARY
DAY 1
1st Stop: Ala-Too Square
Any visit to Bishkek will include passing by or spending some time at Ala-Too Square. The main attractions are all nearby, within walking distance – History Museum, various parks, shopping centers, etc. The Manas statue, the giant state flag, and the standing guards make each day special here. It is must-see for any tourist in Kyrgyzstan!
Ala-Too Square | Dantravels.org
Duration (getting there + visiting): 1-2 hours
How I got here: By Marshrutka from hostel (using my 2GIS Maps app)
2nd Stop: State History Museum
The museum was closed when I went to visit. But it is still a worthwhile museum to take a picture together with its huge building.
State History Museum | Dantravels.org
Duration (getting there + visiting): 1 hour
How I got here: By foot (this is within Ala-Too Square)
3rd Stop: Panfilov Park
This park has a lot of amusement rides that kids would love and adults alike. It is a beautifully designed park, and looked great during the autumn months, with the leaves changing colors. I enjoyed my time there just relaxing.
Panfilov Park | Dantravels.org
Duration (getting there + visiting): 1-2 hours
How I got here: By foot from Ala-Too Square
4th Stop: Osh Bazaar
Osh Bazaar is one of the biggest marketplaces in Bishkek. The Bazaar offers an amazing assortment of just about anything from clothing to food, meat, cheese, dried fruits, and spices. This place is full of crowds during weekends though.
Osh Bazaar | Dantravels.org
Duration (getting there + visiting): 1-3 hours
How I got here: By Marshrutka from a bus stop near Panfilov Park (using my 2GIS Maps app)
DAY 2 (ALA ARCHA GORGE)
5th Stop: One-day tour to Ala-Archa Gorge
The must-visit Ala Archa National Park in the Tian Shan mountains is located 39 km from Bishkek. It is a perfect place for hiking or camping surrounded by impressive views on high rocky peaks and beautiful rivers.
Luckily, I found and joined a Couchsurfing (CS) event in Bishkek going to Ala Archa National Park. The event was organized by Mirel (a Kyrgyz local) and her friends. There were local Kyrgyzstanis who joined as well as myself—a foreigner. I was the only foreigner who joined from CS because other CS joiners have backed out. Well, it happens all the time in CS, I’m not surprised.
But…kudos to Mirel and her friends who made this event a memorable one for me and for everyone else for sure. They actually have a facebook page in case you might want to contact them.
NOTE: I paid 500 KGS (7.16 USD) to join this event. It includes the cost of transportation and food. Not bad!
Here is a quick timeline for our activities:
10:45 AM – We left the meetup point at Moto Center, Bishkek.
11:00 AM – We had a stopover at Globus supermarket to buy some food and snacks.
12:00 NN – We finally arrived at Ala-Archa National Park
12:10 PM – We had a one-by-one introduction of ourselves. I don’t understand what they were saying ‘cause they all speak in Russian.
12:20 PM – We walked around and explored the areas of the national park, took pics and made all that goofy stuff like dancing—you probably would see me dancing in some of their videos. Haha. Please don’t tag me!
1:20 PM – We went back to the car and headed to the picnic area. It was cold at 7 deg C but we had vodka to warm us up a bit. We also had other sorts of different snacks. We also cooked a Kyrgyz dish called ‘dymdama’.
5:00 PM – We packed up and left the picnic area and headed back to the city.
6:00 PM – We arrived back in Bishkek City.
Mirel and I at Ala Archa Gorge | Dantravels.org
Duration (getting there + visiting): the whole freakin’ day!
How I got here: By Marshrutska to the meetup point (using my 2GIS Maps app)
DAY 3
6th Stop: Victory Park
Victory Park is located on the southern edge of Bishkek and is not to be confused with Victory Square (my 8th stop). The park is a beautifully maintained area with many trees and flower beds. This monument with three columns joined at the top by a pyramid shape is the centerpiece of the park.
Victory Park | Dantravels.org
Duration (getting there + visiting): 1-2 hours
How I got here: By Marshrutka from hostel (using my 2GIS Maps app)
7th Stop: Boulevard Erkindik
Boulevard Erkindik (also known as Dzerzhinka) is one of the most popular places in Bishkek. The long densely forested street is beautiful and is totally loved by locals.
Boulevard Erkindik | Dantravels.org
Duration (getting there + visiting): 1-2 hours
How I got here: By Marshrutka from Victory Park (using my 2GIS Maps app)
8th Stop: Victory Square
The Victory Square houses an eternal flame to those who perished in WW2. The three massive arches depict a yurt (a traditional nomad house in Central Asia) and the statue of a woman. When I visited it on a rainy afternoon, a wedding ceremony is taken place.
Victory Square | Dantravels.org
Duration (getting there + visiting): 1 hour
How I got here: By foot from Erkindik Blvd.
9th Stop: Bishkek Park (Mall)
Take your time and spend an afternoon wandering here. Bishkek Park is a new mall that has virtually all the brands under one roof. It has good food courts, supermarket, and many fashion retail stores.
Bishkek Park (Mall) | Dantravels.org
Duration (getting there + visiting): 1-2 hours
How I got here: By Marshrutka from Victory Square (using my 2GIS Maps app)
10th Stop: Panorama Bishkek
Panorama Bishkek offers you a good viewpoint of the entire city of Bishkek. I went here one evening with my Kyrgyz friend Bektur driving in his car.
NOTE: You can also get there by marshrutka #200 and then just walk for 30 minutes towards the viewpoint. Better if you go during daytime.
The photo you see with those flashy lights is actually NOT the view Bektur and I have seen. But still…that’s a photo taken from the viewpoint which I randomly borrowed from Google. Haha!
Unfortunately when we’ve arrived, it was dark and with no flashy lights as I would expect. I suspect it’s because of the smog that covers the city that night.
Anyhow, Bektur gave me a dinner treat after going to the viewpoint. A free Laghman (central Asian noodle dish) is not something disappointing after all! Haha!
A dinner treat from Bektur | Dantravels.org
Duration (getting there + visiting): 3-4 hours
How I got here: By my friend’s car (but you can also go by Marshrutka then just hike up a bit!)
COUCHSURFING IN BISHKEK
On the next two days in Bishkek, I have actually spent it staying with a Couchsurfing host! I didn’t do much at that time since I was working on my two websites. That’s why I won’t be including my expenses during those two days.
But anyway, here is Ermek (right) from Bishkek–a very friendly host! We are having dinner together with his flatmate, Bakytbek.
Ermek (Right) and his room mate | Dantravels.org
MY 3-DAY EXPENSES IN BISHKEK
Day 0 (Arrival at Hostel, Rest)
63.78 USD (4,454.12 KGS) – Flight from Almaty, Kazakhstan to Bishkek, Kyrgyzstan. I pre-booked it online at Kayak/Trip.
What do you think of this 3-day Bishkek itinerary?
I hope that you find this 3-DAY BISHKEK BUDGET ITINERARY and TRAVEL GUIDE blog useful!
If you have any questions, please feel free to ask in the comment section below.
RECOMMENDED PACKAGE TOURS
In case you’re also looking for package tours to simply jumpstart your actual itinerary, I highly recommend booking tours through Viator which is perfect for your Bishkek itinerary. See tours and packages I personally handpicked for you:
Booking.com. I usually book my hostel accommodation at booking.com. Thus, I recommend you guys trying it for your Bishkek itinerary. Room accommodation ranges from cheap hostels to luxury hotels. Book hostels through booking.com as they have free cancellation or pay-at-the-hotel option.
Airbnb. Try Airbnb in finding comfy and cozy rooms for your Bishkek itinerary! I have used Airbnb on some of my other trips and I loved it!
Have you tried Airbnb? Sign up with my link and you will get up to 42 USD (2,200 Php) off your first stay. Click this link to get that discount.
Flights
TRIP. All of my flight bookings are from TRIP. Trip.com is one of the world’s leading travel search engines and searches hundreds of travel sites.
I suggest you check Trip.com (click HERE) as they usually offer cheap fare rates compared to other booking sites.
Bishkek (Kyrgyzstan) Package tours
Viator. Viator is the world’s leading resource for researching, finding, and booking the best travel experiences worldwide.
Click here to find the best Viator deals in Bishkek!
This post may contain affiliate links which means if you purchase something through that link, I will make a small commission at no additional cost to you. Think of it as buying a cup of coffee for me on someone else. Thanks & enjoy!
Almaty was the capital of Kazakhstan until 1997 when it was moved to Astana (now Nursultan). One of the reasons given for the move was because of Almaty’s geographical location–it is in a southeast corner of the country which is too close to Kyrgyzstan and China’s border. I, on the other hand, moved and traveled down south from Astana to Almaty due to the extreme cold of Astana.
And I made a good choice–not only Almaty has a much warmer climate, but it also has all the attractions of a major city with none of the claustrophobia or stress. If you’re curious enough to know what top attractions this city has to offer, here is my 5-day Almaty itinerary and travel guide which includes the detailed cost breakdown of my day-to-day expenses!
Hi there! First of all, I am Daniel – a solo backpacker from the Philippines. If you don’t know my story yet, feel free to read this article where I talked about how I quit my job in order to travel. This article was also featured on TripZilla Philippines.
Me with a backdrop of the snowcapped Zailiysky Alatau | Dantravels.org
DO YOU NEED A VISA FOR KAZAKHSTAN?
First things first–do you need a visa to enter Kazakhstan? Well, depending on your nationality, you may or may not need a visa. See the information below which category you fall in. Other countries not listed below require a Kazakh visa.
Free-Visa Entry
Citizens of the following countries and territories can visit Kazakhstan without a visa:
**30 days: Argentina, Brazil, Ecuador, Serbia, South Korea, Tajikistan, Turkey, United Arab Emirates, Uzbekistan
***14 days: Hong Kong
Visa-Free Program
Citizens of the following countries do not require a visa for stays of fewer than 30 days as part of a visa-free policy for countries with the large foreign direct investment in Kazakhstan’s economy:
All European Union citizens, Australia, Bahrain, Canada, Chile, Colombia, Iceland, Indonesia, Israel, Japan, Kuwait, Liechtenstein, Malaysia, Mexico, Monaco, New Zealand, Norway, Oman, Philippines, Qatar, Saudi Arabia, Singapore, Switzerland, Thailand, United States, Vatican City, Vietnam
With my Philippine passport, I fell under the visa-free program and was able to enter Kazakhstan through Astana TSE airport with no issues last October 2019!
Well wait, not really… The visa-free program of Kazakhstan for Filipinos was just recently announced and took effect on September 30, 2019. I was backpacking in Tehran, Iran that time when it was announced. So I actually entered Kazakhstan through TSE airport a few days after it took effect. And upon checking in to my airline carrier (SCAT airlines), I waited for almost AN HOUR because the airline crews are verifying if Filipinos can really enter Kazakhstan visa-free. But anyway, the important thing is GOT IN and got my boarding pass!
Almaty is located in the mountainous area of southern Kazakhstan near the border of Kyrgyzstan in the foothills of the Trans-Ili Alatau mountains. In fact, it is only a 5-hour minibus ride from Bishkek, the capital city of Kyrgyzstan. By plane, it is a little more than 4 hours of flight from Moscow or Dubai.
Language: Kazakh and Russian Currency: Kazakhstani Tenge (KZT) Airport: ALA Preferred mode of transportation: Bus / Metro Time Zone: GMT +6
FLIGHTS TO ALMATY:
Finding a cheap flight ticket to Almaty from Europe and the Middle East is relatively easy. In my case, however, I took a train coming from Astana (Nursultan) to Almaty since I’m already in Kazakhstan.
I suggest you check Kayak (click HERE) as they usually offer cheap fare rates compared to other booking sites.
HOW I GOT TO THE CITY:
I arrived at Almaty (Alma-Ata 2 station) at around 7:00 AM from a 15-hour train ride from Astana (Astana-Nurly-Zhol station.) I booked its train ticket online with the help of my friend Akniyet.
Inside the train bound to Alma-Ata 2 station | Dantravels.org
I then walked towards the Raiymbek Batyr metro station using my 2GIS offline Maps (Note: offline Google Maps will do as well.) I got off at Baikonur metro station where my hostel (Hostel Eleon) is only 5 to 10 minutes on foot.
80 KZT (0.21 USD) – Metro from Raiymbek Batyr station to Baikonur station
HOW TO GET AROUND?
Getting around Almaty via Bus and Metro | Dantravels.org
By Bus (and Trolleybus). Just like Astana, Almaty has an excellent city bus network, with bus route maps shown at many bus stops. The bus is how you get around best in Almaty!
Buses start between 6:00 AM and 7:00 AM until 10:00 PM. Single-trip tickets cost 150 KZT (0.40 USD) if you pay by cash. The very useful 2GIS offline map app helps you plot your route and shows you in real-time which numbered buses are due to arrive at which bus stop. The 2GIS app also works even without internet data.
NOTE: It is cheaper if you pay by transport card (called Onay) costing to only 80 KZT (0.21 USD) but I don’t really recommend it for short-term travelers.
By Metro / Subway. Almaty’s metro runs from Raiymbek Batyr station, near Alma-Ata 2 railway train station, down south to Moscow station. There are future plans to expand Almaty’s metro train network but as of this writing, the city only has one line of metro.
NOTE: You can also use a refillable Almaty card (sold at all metro stations) or swipe in with the multi-transport Onay card.
By Foot. Get your feet ready as you will walk to many places in Almaty, too. And as I mentioned in my budget travel tips blog – “walk as much as you can!“
By Taxi. Taxis are excellent but rather expensive.
You can book a room at any hotel in Almaty through Agoda or Booking.com. I usually book my room accommodations through booking.com. Room accommodation ranges from cheap hostels to luxury hotels. Book hostels through booking.com as they have free cancellation or pay-at-the-hotel option.
Use my link to book your hostel and you’ll get 10% of your booking back after your stay. Click this link to get that discount.
If Almaty hotel isn’t to your liking, try AirBnb. Airbnbs are immersed in neighborhoods, condos, and townhomes. There is a feeling you get when you stay in an Airbnb that makes you feel like you belong in that city or town. Since it is someone’s home, there is a certain amount of pride you feel while staying there. I have used Airbnb on some of my other trips and I loved it!
If you’re new to AirBnB, then you can get up to 42 USD free travel credit by signing up via this link.
MY 5-DAY ALMATY ITINERARY
DAY 1:
1st Stop: Republic Square of Almaty
Starting off my Almaty itinerary is this impressive monument situated uphill in Almaty, but a rewarding visit. The monument is surrounded by historical monuments in Kazakhstan’s past and notable figures. To get a good picture of the whole site you need to cross a busy road.
Almaty Republic Square | Dantravels.org
Duration (getting there + visiting): 1 hour
How I got here: By Bus from hostel (using my 2GIS Maps app)
2nd Stop: Medeu
This is in Medeu! Because I’m on a tight budget, I went up hiking on foot than going by cable car. Yeah, tiring but it was fun. Especially meeting and getting to know the locals along the way. And when the locals found out I’m from the Philippines, they would say “Oh Manny Pacquiao!” I didn’t know Manny (the Filipino boxer) is very well-known in Kazakhstan.
The never-ending stairs at Medeu | Dantravels.org
Duration (getting there + visiting): 3-4 hours
How I got here: By Bus #12 (using my 2GIS Maps app)
3rd Stop: Shymbulak Ski Resort
If you’re already in Medeu, do not also miss Shymbulak ski resort which is located in the picturesque gorge of the Trans-Ili Alatau mountains. You can take a trip up to the top of the ski resort (Talgar pass), which involved three gondolas from Medeu. Although I did not go, I still advise you to go since the views were spectacular. It will be 4,000 KZT (10.38 USD) for the entire trip.
The view of Trans-Ili Alatau mountains from Medeu | Dantravels.org
Duration (getting there + visiting): 2 hours
How to get here: By Gondola / Cable Car
4th Stop: Almaty Central park
This place was an absolute must-visit especially if you have children. The park is absolutely huge and there are activities everywhere you look. There are plenty of places to sit down and eat or have a drink. It’s also friendly for the budget-minded as there is plenty to walk around and see.
Somewhere at Almaty Central park | Dantravels.org
Duration (getting there + visiting): 1-2 hours
How I got here: By Bus #12 (Medeu-Abay) then another bus (all using my 2GIS Maps app)
DAY 2:
5th Stop: First President’s Park
First President’s Park is a huge park in south Almaty, and you could spend all day here! It’s the perfect getaway located right in the middle of a busy street, thanks to plenty of space to walk around and enjoy nature. The park was opened in November 2011 in respect to the first President of Kazakhstan Nursultan Nazarbayev. You might also catch a graduation or a wedding photoshoot here if you’re lucky!
First President’s Park | Dantravels.org
Duration (getting there + visiting): 3-4 hours
How I got here: By Bus (using my 2GIS Maps app)
6th Stop: St. Nicholas Cathedral
This Russian Orthodox cathedral is located in a really attractive grounds. Beautiful colors make it really attractive and photogenic from all angles. The elaborately painted interior walls and ceilings and the icons made it an interesting visit.
St. Nicholas Cathedral | Dantravels.org
Duration (getting there + visiting): 1-2 hours
How I got here: By foot from my hostel
DAY 3:
7th Stop: Park of Panfilov’s 28 Guard
The park is named after the heroes of the Great Patriotic War. The Panfilov heroes were 28 soldiers of an Almaty Infantry who died fighting the Germans outside of Moscow during the war. There is one huge monument that stands out (in the photo below) with a burning eternal flame in front of it and a few other smaller monuments around this area. This park is the crown jewel of Almaty’s history.
Park of Panfilov’s 28 Guard | Dantravels.org
Duration (getting there + visiting): 1-2 hours
How I got here: By Metro (Zhibek Zholy station)
8th Stop: Ascension Cathedral
Located also within the Panfilov’s park is the lovely Ascension Cathedral. Probably the most renowned Orthodox cathedral in Kazakhstan and understandably so. The interiors and exteriors are very impressive and the cathedral looks wonderful from all sides. The interior takes the form of most Christian orthodox churches and the murals are fantastic.
Ascension Cathedral | Dantravels.org
Duration (getting there + visiting): 1 hour
How I got here: By foot from Panfilov’s 28 Guard monument
9th Stop: Zelenyy Bazar
Zelenyy Bazar is known to be the oldest market in Almaty. There are lots of vegetables and fruit and a lot of meat (especially horsemeat!). It was interesting to walk around and check the goods as well as clothing and some souvenirs outside the market.
Zelenyy Bazar | Dantravels.org
Duration (getting there + visiting): 1-2 hours
How I got here: By foot from Ascension Cathedral
10th Stop: The Central Mosque of Almaty
This is the main mosque in Almaty and is in a good position for visiting since it’s close to the bazaar and metro (Raiymbek Batyr station). The mosque was an excellent example of local architecture. The interior is well worth visiting, too. You need to wear long pants and a scarf (for women) if you intend to enter the mosque.
The Central Mosque of Almaty | Dantravels.org
Duration (getting there + visiting): 1-2 hours
How I got here: By foot from Zelenyy Bazar
DAY 4:
11th Stop: One-day hike to Mt. Boukreev
With my new-found friend Nurseit, he invited me to join a day tour hike to Mt. Boukreev–it is one of the peaks in the Trans-Ili Alatau mountains surrounding Almaty. He knows a group of hikers that organizes a FREE hiking tour every Sunday.
NOTE: I met Nurseit in a language exchange site, I believe it was ConnectPals. Go check out ConnectPals!
At around 8:00 AM, we left the jump-off point at Medeu and all of us headed to Mt. Boukreev (3,010 masl). I think we’re around 50+ who joined the climb.
My friend Nurseit even brought food and snacks for the two of us so I wouldn’t worry about spending too much on food.
NOTE: This climb was organized by Taurest.kz. Go check out their Instagram here!
At around 2:00 PM, I’ve finally reached the summit! It’s beautiful up there! You have no idea!
Below is a photo of my friend Nurseit and myself. He is a local Kazakh and most of the time we use Google Translate to be able to understand each other.
But anyway, the local people I’ve met at the climb love to practice their English!
Nurseit and I at the summit of Mt. Boukreev | Dantravels.org
Duration (getting there + visiting): the whole freakin’ day!
How I got here: By Bus to Medeu (using my 2GIS Maps app), then CLIMB up!!!
Later that night, Nurseit and his friends treat me for dinner with one of their national dishes called Beshbarmak (a horse meat dish)! And I also tried the horse milk!
I’m trying horsemeat for the first time with Nurseit and his friends | Dantravels.org
DAY 5:
12th Stop: Kok Tobe Hill
Kok Tobe Hill is where you can enjoy a panoramic view of Almaty city and it can be reached by cable car or by road and then hike. In my case, I went by cable car with the remaining cash I have before I head to Almaty airport. It costs 2,000 KZT (5.16 USD) per round trip.
If you are visiting Almaty, it is a must-visit place. It is a kind of little amusement park for kids on top of hills.
Duration (getting there + visiting): 2-3 hours
How I got here: By Bus (using my 2GIS Maps app), then cable car to the top of the hill!!!
EXTRA DAY:
13th Stop: Big Almaty Lake
I wasn’t able to visit the Big Almaty lake when I was in Almaty due to time constraints. But if I have one more day to spend, I’d definitely come here. Note that visiting here would require at least half of your day as this place is not reachable by public buses nor metro. But I’m telling you this place is a must-see site in Almaty. It is a very beautiful and scenic lake where the city gets its water supply.
There are several tour organizers from Viator that offers a day tour to Big Almaty Lake for a cheap price. Check out my “Recommended Package Tours” section below.
Big Almaty Lake
Duration (getting there + visiting): Half-day
What do you think of this 5-day Almaty itinerary?
I hope that you find this 5-DAY ALMATY BUDGET ITINERARY and TRAVEL GUIDE blog useful!
If you have any questions, please feel free to ask in the comment section below.
MY 5-DAY EXPENSES IN ALMATY
Day 0 (Arrival)
6811 KZT – Train ticket from Nursultan to Almaty. I booked it online with the help of my friend Akniyet.
230 KZT – Food (Pie cake)
80 KZT – Metro from Raiymbek Batyr station to Baikonur station
8,400 – 6 Night stay in Hostel
700 KZT – Food (Chicken-rice meal with tea)
450 KZT – Food (Chicken-rice meal)
Subtotal: 16,671 KZT (43.28 USD)
Day 1
180 KZT – Drink (Bottled of water)
150 KZT – Bus fare from Hostel to a bus stop near the Republic Square
150 KZT – Bus #12 fare from Abay avenue to Medeu
150 KZT – Bus fare from Medeu to Abay avenue.
140 KZT – Food (2x Bread with beef)
240 KZT – Drink (3x Coffee packs)
150 KZT – Bus fare from a bus stop near Abay avenue to Central Park
150 KZT – Bus fare from Central Park to a bus stop near Hostel.
0 KZT – Food (Sultanali, my hostel roommate, treats me for dinner!)
Subtotal: 1,310 KZT (3.40 USD)
Day 2
650 KZT – Food (Hotdog-rice meal)
150 KZT – Bus fare from Hostel to first President’s Park
200 KZT – Food (Corn)
150 KZT – Bus fare from first President’s Park to Hostel
380 KZT – Food (Bread)
Subtotal: 1,530 KZT (3.97 USD)
Day 3
700 KZT – Food (Laghman, Kazakh noddles)
80 KZT – Metro from Baikonur station to Zhibek Zholy station
80 KZT – Metro from Raiymbek Batyr station to Baikonur station
650 KZT – Food (Chicken-rice meal)
100 KZT – Drink (Coffee)
Subtotal: 1,610 KZT (4.18 USD)
Day 4
0 KZT – Nurseit paid my bus fare from my hostel to Abay avenue, should be 150 KZT.
0 KZT – Nurseit again paid for my bus fare from Abay to Medeo, should be 150 KZT
800 KZT – fare for the rented bus from hiking endpoint to city crossing (Gorganaya st.)
150 KZT – bus fare back to Medeu (I met Aynur and her sister from the climb whose car are parked at Medeo and she drove me home to my hostel)
0 KZT – Food (Dinner treat from Nurseit and his friends)
Subtotal: 950 KZT (2.47 USD)
Day 5 (Departure)
150 KZT – Bus fare from my hostel to KokTobe Gondola / Cable Car
2,000 KZT – Cable Car fee (back & forth)
560 KZT – Food (2x Cup Noodles)
150 KZT – Bus #79 fare from somewhere near Koktobe to Almaty Airport
200 KZT – Hot water at the Airport (for my noodles!)
63.78 USD (24,568 KZT) – Flight from Almaty, Kazakhstan to Bishkek, Kyrgyzstan. I pre-booked it online at Kayak.
Subtotal: 27,628 KZT (71.73 USD)
Total Expenses: 129.03 USD (6,536.72 PHP)
RECOMMENDED PACKAGE TOURS
In case you’re also looking for package tours to simply jumpstart your actual itinerary, I highly recommend booking tours through Viator which is perfect for your Almaty itinerary. See tours and packages I personally handpicked for you:
Booking.com. I usually book my hostel accommodation at booking.com. Thus, I recommend you guys trying it for your Almaty itinerary. Room accommodation ranges from cheap hostels to luxury hotels. Book hostels through booking.com as they have free cancellation or pay-at-the-hotel option.
Airbnb. Try Airbnb in finding comfy and cozy rooms for your Almaty itinerary! I have used Airbnb on some of my other trips and I loved it!
Have you tried Airbnb? Sign up with my link and you will get up to 42 USD (2,200 Php) off your first stay. Click this link to get that discount.
Flights
KAYAK. All of my flight bookings are all from KAYAK. Kayak is one of the world’s leading travel search engines and searches hundreds of travel sites.
I suggest you check Kayak (click HERE) as they usually offer cheap fare rates compared to other booking sites.
Kazakhstan Package tours
Viator. Viator is the world’s leading resource for researching, finding and booking the best travel experiences worldwide.
Click here to find the best Viator deals in Almaty


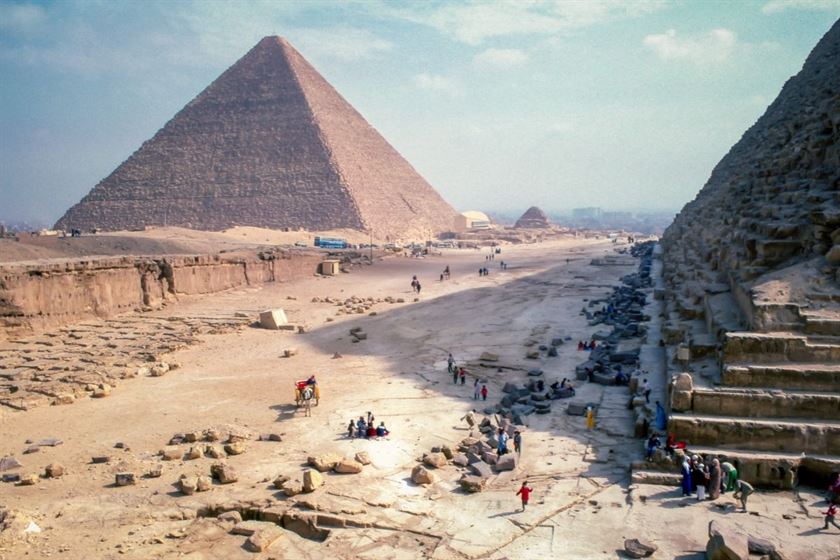
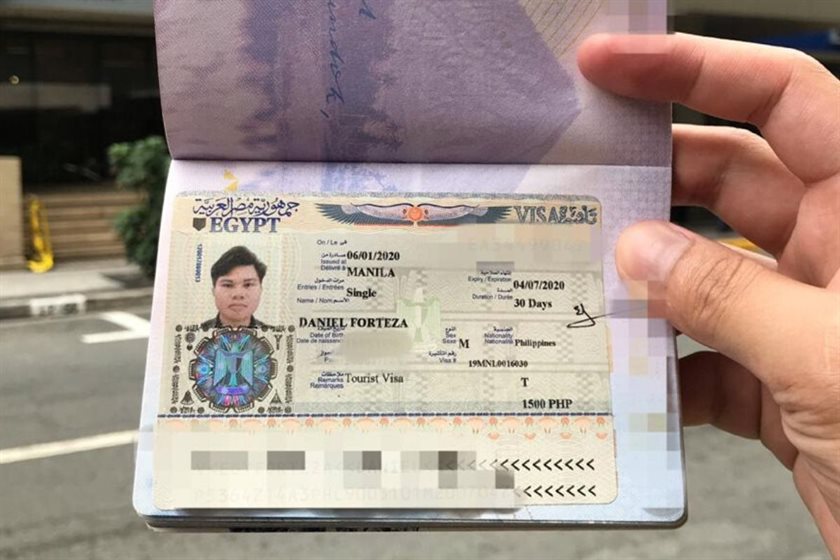


 Dan Travels