Hilarious and Funny Travel Quotes for Millennials

By Dan Forteza

Funny Travel quotes are a great way to get inspired and at the same time to bring fun and entertainment. There is a simple reason for that: they keep the travel persona in you going! Whenever you are not able to travel for whatever reason, a funny travel quote may help you sometimes to get you moving! So here some of my Funny Travel Quotes collection.

Hi there! First of all, I am Daniel from the Philippines. If you don’t know my story yet, feel free to read this article where I talked about myself becoming a digital nomad. This article was also featured on TripZilla Philippines.

Let me know which one is your favorite funny travel quotes. Enjoy!

Funny Travel Quotes for Millennials

Friends: Why are you always gone? Me: Why are you always here?

                                    <img src="http://dantravels.org/wp-content/uploads/elementor/thumbs/FRIENDS_-WHY-ARE-YOU-ALWAYS-GONE_-ME_-WHY-ARE-YOU-ALWAYS-HERE_-oaj7fwrww5kk9woaz6cbeqjd3qtkqteswg5ml7ery8.jpg" title="FRIENDS_ WHY ARE YOU ALWAYS GONE_ ME_ WHY ARE YOU ALWAYS HERE_" alt="FRIENDS_ WHY ARE YOU ALWAYS GONE_ ME_ WHY ARE YOU ALWAYS HERE_">

Dear Flight Attendants, If you see I’m asleep when you’re serving snacks & drinks, please wake my ass up. Sincerely, I want my money’s worth.

                                    <img src="http://dantravels.org/wp-content/uploads/elementor/thumbs/Dear-Flight-Attendants-If-you-see-Im-asleep-when-youre-serving-snacks-drinks-please-wake-my-ass-up.-Sincerely-I-want-my-moneys-worth.-oaj6u135szma0oggqpuyd9b3aunzkgjqk5gqfbuosg.jpg" title="Dear Flight Attendants, If you see I’m asleep when you’re serving snacks &amp; drinks, please wake my ass up. Sincerely, I want my money’s worth." alt="Dear Flight Attendants, If you see I'm asleep when you're serving snacks &amp; drinks, please wake my ass up. Sincerely, I want my money's worth. funny travel quotes">

I googled my symptoms. Turns out I just need a vacation.

                                    <img src="http://dantravels.org/wp-content/uploads/elementor/thumbs/I-GOOGLED-MY-SYMPTOMS.-TURNS-OUT-I-JUST-NEED-A-VACATION.-oaj60f66iv34avgrmx40tqadnwlr3p04hlo47jr4sg.jpg" title="I GOOGLED MY SYMPTOMS. TURNS OUT I JUST NEED A VACATION." alt="I GOOGLED MY SYMPTOMS. TURNS OUT I JUST NEED A VACATION.">

Of all the books in the world, the best stories are found between the pages of a passport.

                                    <img src="http://dantravels.org/wp-content/uploads/elementor/thumbs/Of-all-the-books-in-the-world-the-best-stories-are-found-between-the-pages-of-a-passport.-oakma828uf4rmy1j8c7omv3n29ft57mn7nqw61l3wg.jpg" title="Of all the books in the world, the best stories are found between the pages of a passport." alt="Of all the books in the world, the best stories are found between the pages of a passport. funny travel quotes. funny travel quotes">

Traveling solo does not mean traveling alone. Most often, you meet awesome people along the way and make connections that last a lifetime.

                                    <img src="http://dantravels.org/wp-content/uploads/elementor/thumbs/TRAVELING-SOLO-DOES-NOT-MEAN-TRAVELING-ALONE.-MOST-OFTEN-YOU-MEET-AWESOME-PEOPLE-ALONG-THE-WAY-AND-MAKE-CONNECTIONS-THAT-LAST-A-LIFETIME.-oaj5esvtc1hp9qv9vkoxh6opsv5u2b6dili2uft3wg.jpg" title="TRAVELING SOLO DOES NOT MEAN TRAVELING ALONE. MOST OFTEN, YOU MEET AWESOME PEOPLE ALONG THE WAY AND MAKE CONNECTIONS THAT LAST A LIFETIME." alt="TRAVELING SOLO DOES NOT MEAN TRAVELING ALONE. MOST OFTEN, YOU MEET AWESOME PEOPLE ALONG THE WAY AND MAKE CONNECTIONS THAT LAST A LIFETIME. funny travel quotes">

Physically I’m here. Mentally, I’m in a pool in Bali ordering my third mojito.

                                    <img src="http://dantravels.org/wp-content/uploads/elementor/thumbs/Physically-Im-here.-Mentally-Im-in-a-pool-in-Bali-ordering-my-third-mojito.-oaj4g8dhze62a12zqmqvrwqfapjuz1xrfhr7g32cqo.jpg" title="Physically I’m here. Mentally, I’m in a pool in Bali ordering my third mojito." alt="Physically I'm here. Mentally, I'm in a pool in Bali ordering my third mojito.">

My friends don’t ask ‘How are you?’, they ask ‘Where are you?’

                                    <img src="http://dantravels.org/wp-content/uploads/elementor/thumbs/MY-FRIENDS-DONT-ASK-HOW-ARE-YOU_-THEY-ASK-WHERE-ARE-YOU_-oaj3vlt009xji31m6prm244a0b7w261t9edmbhnda8.jpg" title="MY FRIENDS DON’T ASK ‘HOW ARE YOU_’ THEY ASK ‘WHERE ARE YOU_’" alt="MY FRIENDS DON'T ASK 'HOW ARE YOU?' THEY ASK 'WHERE ARE YOU?' funny travel quotes">

Go to work. Open computer. Scroll for plane tickets for 6 hours. Close computer. Go home.

                                    <img src="http://dantravels.org/wp-content/uploads/elementor/thumbs/GO-TO-WORK.-OPEN-COMPUTER.-SCROLL-FOR-PLANE.-TICKETS-FOR-6-HOURS.-CLOSE-COMPUTER.-GO-HOME.-1-oaiovjn9b2movnifr9sbgea2yh3tiq1sccmfw6egao.jpg" title="GO TO WORK. OPEN COMPUTER. SCROLL FOR PLANE. TICKETS FOR 6 HOURS. CLOSE COMPUTER. GO HOME." alt="GO TO WORK. OPEN COMPUTER. SCROLL FOR PLANE. TICKETS FOR 6 HOURS. CLOSE COMPUTER. GO HOME.">

On my flight home, I’m already planning my next trip.

                                    <img src="http://dantravels.org/wp-content/uploads/elementor/thumbs/on-my-flight-home-Im-already-planning-my-next-trip-oaio9vh7qkyp7azoawjyyv5hwnx61y0kp35fkij7r4.jpg" title="on my flight home I’m already planning my next trip" alt="on my flight home I'm already planning my next trip funny travel quotes">

Packing tip: Never unpack so you’re already packed to go next time.

                                    <img src="http://dantravels.org/wp-content/uploads/elementor/thumbs/packing-tip_-never-unpack-so-youre-already-packed-to-go-next-time.-oaing7ok2scyua2pi2zsaclv2y475s9hya1ue6ig3k.jpg" title="packing tip_ never unpack so you’re already packed to go next time." alt="packing tip_ never unpack so you're already packed to go next time. Funny travel quotes">

The hardest part about traveling is saying goodbye to friends you’ll probably never see again.

                                    <img src="http://dantravels.org/wp-content/uploads/elementor/thumbs/The-hardest-part-about-traveling-is-saying-goodbye-to-friends-youll-probably-never-see-again.-oaklsqadnf6nk7gbdrzn8a0t23nvw06hh2nkmnivpc.jpg" title="The hardest part about traveling is saying goodbye to friends you’ll probably never see again." alt="The hardest part about traveling is saying goodbye to friends you'll probably never see again. funny travel quotes">

SproutGigs Review (2026): I Tried Small Tasks Online — Here’s What I Earned

🤔 What is SproutGigs?

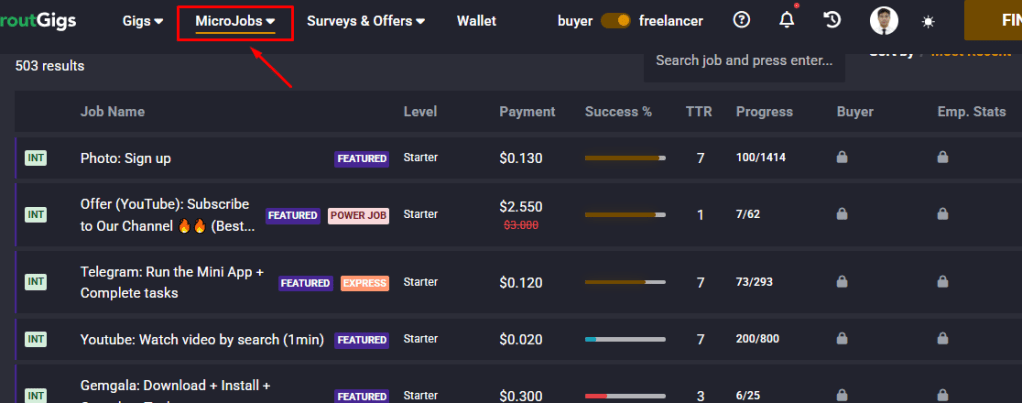
SproutGigs (formerly Picoworkers) is a microtask platform where you can earn money by completing small online tasks.

These tasks include:

  • Signing up for websites
  • Watching videos
  • Testing apps
  • Social media interactions

👉 Most tasks are simple — but pay is small.

💡 Quick Answer (My Experience)

I tried SproutGigs as another way to earn online as a beginner.

  • Tasks were easy to complete
  • No special skills required
  • Payments were real

👉 But…

Earnings were small per task

This is where I also earned small amounts online:

Try SproutGigs here

It’s simple tasks — but don’t expect high income

✅ Is SproutGigs Legit?

Yes — SproutGigs is a legitimate platform.

  • Tasks are real
  • Payments are processed
  • Many users worldwide use it

👉 You need to follow instructions carefully, or your work may be rejected.

💰 How Much Can You Earn on SproutGigs?

Here’s the honest truth:

  • $0.05
  • $0.10
  • $0.20

👉 Some higher-paying tasks exist, but are less common.

💡 Real example from my experience:

I earned small amounts by completing simple tasks daily.

👉 It’s not a full-time income, but it’s a good starting point for beginners.

🌍 If you live in a country where the US dollar has higher value, these small earnings can go further.

👉 It can help cover basic expenses like food, mobile data, or daily needs.

Available MicroJobs at SproutGigs (formerly Picoworkers)
My first earning at Picoworkers (now SproutGigs) way back 2019
My first earning at Picoworkers (now SproutGigs) way back 2019. I no longer access PayPal at the moment
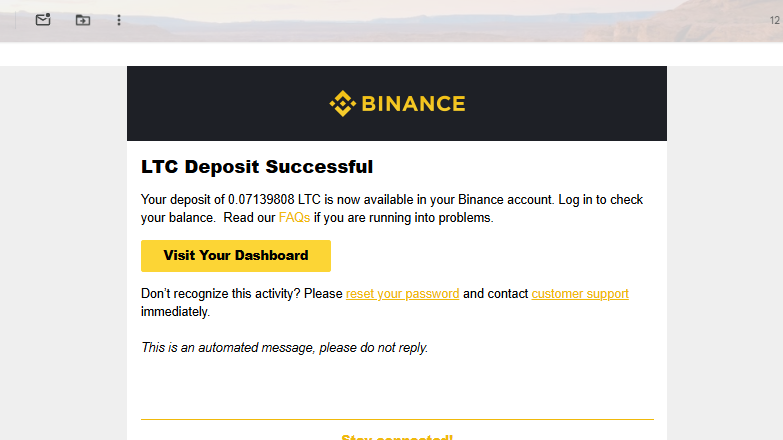
My recent Crytocoin withdrawal this year (via Binance App)

👉 This showed me that even simple online work can generate income.

💸 Payment Methods (My Experience)

SproutGigs offers several payout methods such as:

  • Payoneer
  • PayPal
  • Cryptocurrency (e.g., Litecoin)

Availability depends on your country and account.

In my experience:

  • Before (Picoworkers): I used PayPal
  • Now (SproutGigs): PayPal not available
  • Currently: I use crypto

👉 Some methods require KYC verification and extra setup.

⚠️ Honest insight:

Withdrawing can take more effort than earning — especially for beginners.

🧠 Pros and Cons of SproutGigs

👍 Pros

  • Beginner-friendly
  • No experience required
  • Easy tasks
  • Many available jobs
  • Responsive customer support

👎 Cons

  • Low pay per task
  • Task rejections happen
  • Time-consuming
  • Withdrawal can be inconsistent

👉 In my experience, support tickets were answered relatively fast compared to similar platforms.

🧭 My Experience Using SproutGigs

When I started:

  • No expectations
  • Just testing if it works

👉 I completed tasks daily

👉 Some approved, some rejected

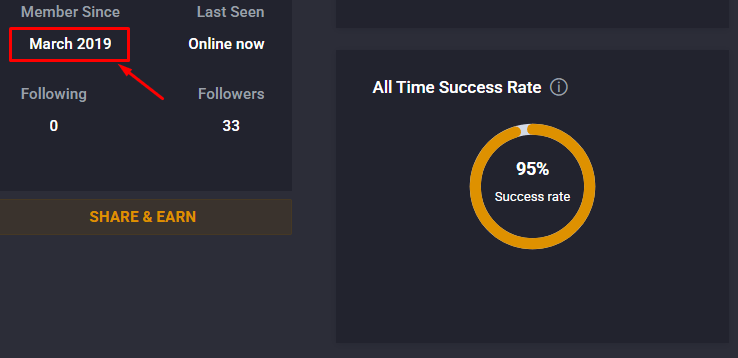
My success rate is 95% at SproutGigs
My success rate is 95% at SproutGigs since 2019
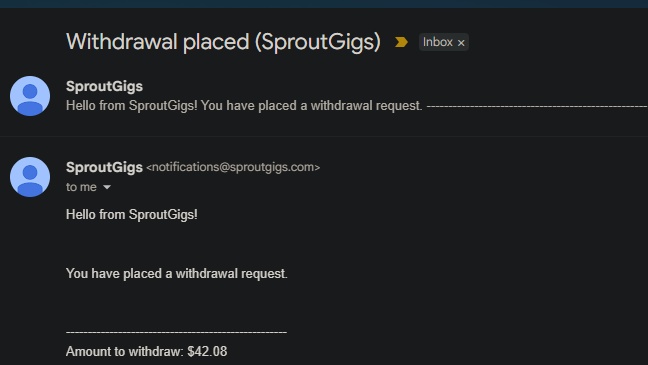
Another Withdrawal from SproutGigs this year!

The earnings are small — but consistent if you keep doing tasks.

📝 How to Get Started on SproutGigs

  1. Go to the SproutGigs website 👉 You’ll see two options:
    • Hire freelancersBrowse gigs
    • 👉 Click “Browse Gigs” to find jobs.
    👉 “Hire freelancers” is NOT for earning.
  2. Create an account
  3. Browse tasks (either Microjobs or Gigs)
  4. Follow instructions carefully
  5. Submit proof (usually a screenshot) and wait for approval

This platform helped me get started while I was still figuring things out before I finally quit my corporate to job to travel and earn online.

Read also: My blog on how I started earning online at GoTranscript.

💻 Is SproutGigs Worth It?

  • ✅ Yes — for beginners
  • ✅ Yes — if dollar value benefits you
  • ❌ No — if you want high income

💡 What I Learned

👉 You can earn online with simple tasks

👉 But not all online work pays well

🧠 Final Verdict

SproutGigs is legit, beginner-friendly, but low-paying.

👉 Good starting point

👉 Not ideal for long-term income

5 Best FREE Penpal Sites / Language Exchange Sites in the World

I have been traveling abroad for the past four years and have met some incredible people through penpal and language exchange sites. In fact, I started making international friends online long before I ever set foot outside my home country.

In this blog, I’m sharing the best free penpal and language exchange platforms that have worked for me!

I remember back in 2013, my first penpal was Chisako from Fukuoka, Japan. She even sent me some of her beautifully sketched anime drawings!

Also, check out: The countries I have visited so far!

From my Japanese Penpal way back in 2015.
My Japanese penpal sent me her hand-drawn sketches!

I’ve had several “snail mail” penpals over the years. Snail mail means corresponding through handwritten letters, stamps, and the post office. There’s something so exciting about finding a physical letter in your mailbox!

If you’re looking for something more modern to learn about new cultures, languages, and traditions, these five websites and apps are the best free options available today.

TOP 5 FREE PENPAL & LANGUAGE EXCHANGE SITES

1. SLOWLY (The Digital Snail Mail)

Slowly is perfect for those who find instant messaging too overwhelming. It brings the traditional penpal experience to your smartphone. The “letters” take time to arrive depending on how far away your penpal lives! It’s a great way to have meaningful, long-form conversations.

2. INTERPALS

Interpals is one of the oldest and largest communities on the web. It’s fantastic for finding travel buddies or locals who can show you around their city. Meeting someone from another country gives you a unique perspective on their culture through the eyes of a friend.

Interpals is the site where my Japanese penpal and I first chatted.

3. PENPAL WORLD

PenPal World is highly focused on safety and privacy. All initial interactions happen through their internal messaging system, so your personal information stays hidden until you’re ready to share it. It’s a very clean, straightforward site for finding international matches.

4. MY LANGUAGE EXCHANGE

If your goal is specifically to practice a new language, My Language Exchange is the go-to. You can search for partners by city and country, allowing you to find a native speaker of the language you’re learning while helping them with yours in return.

5. GLOBAL PENFRIENDS

Global Penfriends is excellent for both email and traditional snail mail. They have a family-friendly environment and a “virtual smile” feature to break the ice. It’s a very active community with members of all ages.

A QUICK SAFETY TIP

While meeting people online is a great way to prepare for travel, please stay cautious. I’ve mostly used Interpals and PenPal World, and occasionally you’ll run into “fake” profiles. Never share sensitive financial information or your home address until you have built a solid foundation of trust.

Good luck finding your new friends! If there’s a site I missed that you think belongs in the Top 5, let me know in the comments below!

Malaysia to Thailand: Crossing border at Padang Besar (KL-BKK)

By Dan Forteza

This post may contain affiliate links which means if you purchase something through that link, I will make a small commission at no additional cost to you. Think of it as buying a cup of coffee for me on someone else. Thanks & enjoy!

Heading from Malaysia to Thailand soon? If you are considering going on to this route via Padang Besar border, then keep reading! In this blog, I will be sharing my detailed experience of how I managed to cross the border at Padang Besar coming from Kuala Lumpur, Malaysia.

My final destination in Thailand is actually Bangkok! It may be excruciating to some but for me, it is an adventure of a lifetime! Are you ready?

Please note that I crossed this border on August 2022 (post-covid) wherein borders are already open!

Padang Besar is a border town on the Malaysia-Thailand border. It’s the only border that has a direct rail link between Malaysia and Thailand, so travelers prefer crossing this land border. Besides that, it also has a road crossing between the two countries.

Town of Padang Besar on Thailand's side
Town of Padang Besar on Thailand’s side | Dantravels.org

FUN FACT: The last time I crossed a border was in 2019: the Georgia-Armenia border! Fast forward to 2022, here I am crossing another border: the Malaysia-Thailand border.

DO YOU NEED A VISA TO ENTER THAILAND?

First thing’s first. Before entering any country, you should be aware of whether you would need a visa or not. If you are from a country that doesn’t require a visa going to Thailand, no problem then. Feel free to check out the list here if you are in doubt.

As a Filipino citizen, I can enter Thailand visa-free for 30 days as a tourist.

ANY COVID-RELATED REQUIREMENTS TO ENTER THAILAND?

As of August 2022 (when I crossed the border), I was only required to show my vaccine certificate.

Travelers actually need to upload the proof of vaccination online and I wasn’t actually aware of this! But there were locals who are willing to do that for you for a small tip! I paid 2 MYR for that. You’ll meet those local Thais upon entering the Immigration site.

Once they uploaded your vaccine info, they’ll ask you to take a photo of a certain QR code which then you will show to the personnel inside the building. Then personnel will put a sticker on your passport that says “fully vaccinated” after scanning your QR code.

PS: I myself was inoculated 3 times (including the booster.)

After that, I proceeded to the line to finally get my entry stamp. More info here for the entry stamp.

MY ROUTES FROM MALAYSIA TO THAILAND (KUALA LUMPUR TO BANGKOK)

ROUTE 1: TRAIN – KUALA LUMPUR TO PADANG BESAR (MALAYSIA)

1. Buying the ticket at KL Sentral, Kuala Lumpur

  • A day before my trip, I went to KL Sentral train station to buy my ticket first. KL Sentral can easily be reached by metro trains if you’re within Kuala Lumpur. Once you’re there, just look for the KTM ticket counter. Here is the timetable of the train schedule.
  • I took the earliest train that departs at 07:08 AM and arrives at Padang Besar (Malaysian side) at 12:41 PM. Padang Besar is the last station of this trip. It costs me 107 MYR for the ticket.
Train ticket booth of KTM at KL sentral in Kuala Lumpur | Dantravels.org

2. Be at the gate 10 minutes before the departure time

  • Look for your designated gate at KL Sentral station. It is also indicated on your ticket. In my case, it is Gate B.
KTM train Gate B going to Padang Besar
KTM train Gate B going to Padang Besar | Dantravels.org

3. Enjoy the 6-hour train ride

  • Yes, it is a 6-hour ride! And in case you get hungry, there is also a food bar inside the train. I bought sandwiches and a cup of coffee during my trip there.
KTM's food bar
Food bar inside the train | Dantravels.org

4. Arriving at the Padang Besar station (Malaysian side)

  • As I get off the train, I basically just followed the mass of people exiting as well.
  • There are cars and taxis waiting at the exit of the building. I took one of those cars to take me to the Malaysian Immigration to receive my exit stamp. I paid 10 MYR for the car (Note: I was sharing the car with another person.)
  • The Malaysian Immigration is in fact walking distance according to my Google map but I took the car anyway.
The Padang Besar train station
The Padang Besar train station | Dantravels.org

5. Getting the Exit Stamp from the Immigration (Malaysian side)

  • The driver pointed the building to where I need to get my exit stamp. So then I walked a bit and stood on the queue where people are already lining up.
  • After getting the exit stamp, I walked for 10 minutes to get to the actual border
Malaysian Border Gate at Padang Besar
Malaysian Border Gate at Padang Besar | Dantravels.org
Malaysian Immigration at Padang Besar
Malaysian Immigration at Padang Besar | Dantravels.org
This is the exact moment as I cross the Malay-Thai border
This is the exact moment as I cross the Malay-Thai border | Dantravels.org
Thailand's Custom border house in Padang Besar
This is the first building you will see on Thailand’s side once you cross the border | Dantravels.org

ROUTE 2: VAN – PADANG BESAR TO HAT YAI (THAILAND)

NOTE: There is a railway train at Padang Besar (Thailand side) but locals told me that it is best to go to Hat Yai, the nearest Thai city, to take the train or any other means of transportation. From what I understood, it will take a couple of hours or so for the train to arrive.

NOTE 2: There is also a van going to Hat Yai at the exit of the building of Thailand immigration, but I went ahead and walk to the town to find a money exchange shop first.

1. Getting the Entry Stamp from the Immigration (Thailand side)

  • So I am officially in the land of smile, Thailand! But before anything else, getting the entry stamp is a must!
  • There are local Thais there who are welcoming travelers at the Immigration entrance site. But they are actually those people who asked for a small fee to process your COVID vaccine certificate online (as mentioned here). I paid 2 MYR, not bad.
  • Then I lined up for the immigration queue. But when the Immigration officer found out I am a Filipino, she asked me to go to her supervisor’s office. I believe Filipinos are subject to interrogation due to the rising numbers of Filipinos working there without proper documentation. The supervisor guy asked me about my intention of coming to Thailand–which I replied purely for tourism purposes. Then he gave me a visa-free stamp for 30 days.

2. Finding a Money Exchange Shop at Padang Besar (Thailand side)

  • After getting the entry stamp, I walked for another 10 minutes heading to Padang Besar town (Thailand side) to find a Money Exchange shop since I still have a couple of Malaysian Ringit banknotes with me. I found this Chop Thai Saeree shop (as pictured below).
  • The shop is opposite the Krung Thai Bank, refer to this map location.
Money Exchange shop at Padang Besar, Thailand side
Money Exchange shop at Padang Besar, Thailand side | Dantravels.org

3. Heading to Hat Yai, the nearest Thai city from the border

  • There is a van terminal, within walking distance from the Money Exchange shop. Here is its map location.
  • I paid 60 THB for this trip.
  • The drop-off is at Hat Yai terminal.
Van terminal at Padang Besar going to Hat Yai
Van terminal at Padang Besar going to Hat Yai | Dantravels.org

ROUTE 3: VAN – HAT YAI TO BANGKOK (THAILAND)

1. Heading to Bangkok from Hat Yai

  • There are different means of transportation going to Bangkok from Hat Yai: train, bus, or van. But I took the van since it is the one that is leaving the soonest.
  • I paid 925 THB for this trip. And it took around 14 hours for its arrival in Bangkok! That’s a lot but I did enjoy the ride.
  • The drop-off is at Mo Chit Bus Terminal in Bangkok.

IN SUMMARY:

  1. Train: Kuala Lumpur to Padang Besar
    • 107 MYR (price)
    • almost 6 hours
  2. Van: Padang Besar to Hat Yai
    • 60 THB (price)
    • 1 hour
  3. Van: Hat Yai to Bangkok
    • 925 THB (price)
    • 14 hours

And there you have it! Did you find this blog useful? I hope it did!

Anyhow, have a safe trip to Thailand wherever you may be! =)

How COVID-19 Ended My Travels and Had Me Stuck 2 Months in Bangkok

By Dan Forteza

I was on a personal journey to travel to Northern Africa with a long-term travel plan in mind last March 2020. But my supposedly long-term travel plan was unfortunately short-lived.

Out of the growing fear of the coronavirus (COVID-19) pandemic, everything has changed quickly and unexpectedly.

Before I go further, let me give you a quick background of my travels last year:

Five months after quitting my job last April 2019, I embarked on a quest to do solo backpacking abroad. I was lucky enough to travel to 9 more countries from September 2019 to December 2019, summing up to 30 countries since 2015.

I went back to the Philippines in December 2019 to spend the Christmas holidays with family and in order to plan ahead my next journey abroad which I scheduled March 2020.

Yep, there is more to it.

I plan to travel for 3 weeks in Egypt (my 31st country.) Then fly to Morocco and stay there for a month or two. I might even go to the US or further south of Africa if my travel budget lets me.

I really tried to plan it out as much as I can. My flight itineraries to both Egypt and Morocco were already booked before February 2020.

But then the pandemic happens…

The global coronavirus pandemic is an obvious crisis. Some news articles even said that this is way worse than the post-world wars! It’s possible and I’m not going to argue about that.

So what I am about to share with you here is my own experience and struggles while traveling abroad, far from home, amidst the coronavirus outbreak.

Sad to say, but the timeline below is how COVID-19 ended my travel plans and left me locked in Bangkok, Thailand for almost two months.

MY TRAVEL TIMELINE:

Allow me to tell my story in a timeline manner so you’ll get a better picture and understanding of each scenario and how they correlate in sequence.

In other words, you may consider this as my COVID-19 travel diary.

  • March 6

From Manila, Philippines, I was able to leave my country for Egypt.

During my first week in Egypt, it still felt normal. I was even able to perform my 4-day budget itinerary for Cairo, Egypt.

Day 4: The Pyramid of Khafre.
The Pyramid of Khafre in Giza, Egypt | Dantravels.org

Back then, there were only 3 reported cases of COVID-19 in Egypt.

But day by day, it was getting worse.

  • March 11

The COVID-19 viral disease had swept into at least 114 countries and killed more than 4,000 people by this time and was now officially a pandemic as announced by the World Health Organization (WHO).

That was not a piece of good news to start off the day. I felt like the time is chasing after me.

My gut was telling me to cancel my flight to Morocco and get back to Southeast Asia or the Philippines where I myself would feel safer. I know it was crucial to make a quick decision before it was too late. But another part of me was telling me to wait…

I know, I know.

This coronavirus pandemic has affected everybody’s way of living.

That’s when I knew I really need to always look after my safety first and not just for the sake of fulfilling travel goals.

From that time on, I kept myself updated with the latest news and became more vigilant.

  • March 12

The Philippines, my home country, will be in community quarantine (or lockdown as they say it) from March 15 until April 14.

Domestic air, land, and sea access to the 17 cities/districts of Metro Manila would be suspended during that period.

International flights in and out of the country would also be limited.

No matter how I condition my mind that this pandemic will just die out in the next few days, it just won’t. This is something out of my control.

  • March 16

The Egyptian authorities have announced the suspension of flights in and out of Egypt effective March 19 until March 31.

Morocco has done the same by canceling flights from/to European countries including Egypt which had almost 100 cases by now, the highest number of cases in all of Africa.

At this point, all I thought about was getting out of Egypt as soon as possible, or at least before my Egyptian visa expires which is due the first week of April.

Luckily, I was able to book a direct flight from Cairo, Egypt to Bangkok, Thailand scheduled March 18, one day before the flight suspension was to take effect.

Phew, I thought I was going to be trapped in Egypt thinking of nowhere else to go!

Thanks to Kayak’s flight search engine that I was able to quickly browse and book the cheapest ticket I can find from Egypt to Southeast Asia!

Later that day, I canceled my flight to Morocco with a heavy heart.

  • March 18

While most of the countries in Europe and other parts of the world were suspending international flights and restricting land-border crossing, I was able to safely arrive in Bangkok, Thailand.

However, because of the lockdown imposed by the Philippine government, I was not able to immediately find a direct flight back to Manila, Philippines. Flights via AirAsia and Cebu Pacific were only available April 15 onwards.

That would mean I had to stay for almost a month in Bangkok, Thailand!

  • March 31

I keep checking flight restriction details from time to time due to this COVID-19 pandemic. And it looks like ALL Southeast Asian countries have imposed flight and border-crossing restrictions. A few of them have exemptions for foreigners, like Cambodia, but only if you can present a medical certificate, medical insurance, etc.

Since my free-visa entry in Thailand only allows me to stay in the country for 30 days, I decided to book a flight going to Manila scheduled on April 16. Just in time before my free visa expires on April 17.

  • April 4

In the hope to spend less, I decided to move to another hostel in Bangkok on this day. The hostel was cheaper compared to my previous hostel and was just a walking distance to Don Mueng International Airport.

It’s my 17th day in Bangkok and the first time from that period I’ve seen the city again as I have been staying most of my day at my hostel.

Social Distancing measures in BTS Bangkok, Thailand
Social distancing measures in BTS metro seats | Dantravels.org
How covid-19 pandemic stopped me from traveling
An empty street near Phaya Thai BTS station | Dantravels.org

From that day onward, I was counting down the days before I head back to the Philippines.

  • April 7

The Philippine government has just announced that they are extending the enhanced community quarantine (ECQ) period in Metro Manila and Luzon until April 30.

On the same day, AirAsia, my flight carrier to Manila, canceled my Bangkok-Manila flight (scheduled April 16) due to this directive. The said airline has canceled all domestic and international flights to/from the Philippines until April 30.

Oh well…change of plan, then.

  • April 8

The Prime Minister of Thailand signed the plan to grant automatic visa extensions for foreigners currently in Thailand to April 30.

This means that I don’t need to worry about my visa expiring on April 17.

But still, since the community quarantine (ECQ) in Metro Manila / Luzon has also been extended to April 30, I have no choice but to extend my visa so I’ll be able to stay in Thailand beyond April 30.

  • April 13

I have rescheduled my flight to May 15. Since it’s the airline that has canceled my flight, it’s free to reschedule the flight on or before October 31 including unlimited flight changes as per airline’s official statement.

Some people I talked to also advised me to reschedule it to May 1 and just pay for a one-day overstay fine costing to 500 THB per day in comparison to a 30-day visa extension costing to 1,900 THB.

Although that is feasible, I don’t think it is safe to assume nothing will change. I fear that the lockdown in Manila might again be extended beyond April. So I’d rather go for a 30-day visa extension!

Wooh! So I initially thought I’d be only stuck in Thailand for a month but it’s going to be two months?

And here another reason I probably should mention: it’s been my tradition to spend my birthday away from home (I just preferred that way haha). My birthday is sometime in May, so I might as well stay a little longer until May and wait until the situation improves.

When exactly is my birthday? Keep reading.

  • April 21

A second automatic visa extension for foreigners in Thailand was approved by the Thai authorities. This is to prevent long queues at immigration centers and stem the spread of the coronavirus.

Foreigners whose visas had expired since March 26 will be permitted to stay until July 31 without having to apply for an extension.

Thus, I don’t have to worry about lining up to the immigration center to have my visa stamped and extended nor spending more money for the visa fee.

What a relief!

  • April 25

Meanwhile in the Philippines, the enhanced community quarantine (ECQ) over places considered to be COVID-19 high-risk areas, such as Metro Manila was AGAIN extended until May 15 as per announced by the authorities.

So I would again expect that the flight I rescheduled May 15 will be canceled.

And it did. The next morning I got an email from AirAsia suspending my flight to Manila, Philippines.

  • May 1

F*ck it! You know what, I’ve made my decision to stay here in Thailand (or jump to another country in Indochina) until September for safety purposes.

This is also to round up a gap year of nomadism that I started September 2019!

I don’t think it’s safe to go back home to the Philippines while the COVID-19 cases are getting worse there.

I must also commend Thailand and its authorities for taking the fight to COVID-19 outbreak so seriously that they were able to flatten the curve against the disease.

  • May 10

Up to this day, I’m still in Bangkok and in a new hostel. And surprise…it’s my 30th birthday!

All those ‘I-wanna-travel-to-the-fullest-before-I’m-30’ sentiments I’ve said on this blog: do they end today?

Maybe…But one thing I’ll do for sure is to keep the adventure going!

So let me end this travel diary of mine here and enjoy the rest of the day.

WHERE DID I STAY?

My Room Accommodations:

Lobby of Sleep BKK hostel in Bangkok
The lobby at Sleep BKK hostel in Bangkok.

Just like everyone else, I was also practicing social distancing while staying in the hostel.

There are only 3 or 4 guests in the hostel, so it’s not that hard to self-isolate myself from the rest.

Sleep BKK hostel's lobby.
Sleep BKK hostel’s lobby.

I usually hang out at the hostel’s lobby.

With their free coffee or tea while I do some blogging works on my laptop–that is all need to keep my day productive.

Not to mention, the hostel has a good connection of high-speed internet which is perfect to stream a movie or do video calls when boredom strikes.

The nearby food stall where I get my food.
The nearby food stall where I usually get my food. Only takeout is allowed as per Thai authorities directives due to the pandemic.

I only go out when getting food, withdrawing cash, and doing the laundry.

I know I am stuck but I feel alright and safe.

This is what I have been eating most of my day in Thailand.

On to my second hostel: Diamond and Rust Hostel, here is the video I captured while showing the lobby and my bed in the dormitory room.

I usually book my room accommodations through Agoda or Booking.com. Room accommodation ranges from cheap hostels to luxury hotels. Book hostels through booking.com as they have free cancellation or pay-at-the-hotel option.

Or you can also try AirBnB. I have used Airbnb on some of my other trips and I loved it!

Book AGODA here

Book BOOKING.com here

Get AIRBNB $43 free credit

WHAT’S NEXT FOR ME AND MY TRAVELS?

To be honest, I really don’t know.

I don’t know when I’ll be able to travel again. It seems very uncertain at this moment in time.

Even my travel blog that I was hoping to back up my travel savings was also greatly affected by the pandemic itself.

My website traffic started to crash in February 2020 since people became less and less interested in searching for travel-related articles. Thus, my Google AdSense and affiliate earnings have crashed as well.

My Google Adsense earning January vs February 2020
My Google Adsense earnings: January 2020 vs February 2020

I understand things are crazy right now.

But there will come a time in the near future where things get back to a “new normal”. A normal that’s similar to how things were before.

People will search for things that they’ve always searched for.

Restaurants will be full.

Football games will be sold out.

The travel industry will prosper again.

So yeah, things are far from normal now. But we can use this time to get ready for when they are.

9 Of The Best Places in Chiang Mai Old City, Thailand

By Dan Forteza

This post may contain affiliate links which means if you purchase something through that link, I will make a small commission at no additional cost to you. Think of it as buying a cup of coffee for me on someone else. Thanks & enjoy!

If you look at the city of Chiang Mai on Google Map, you’ll see the square-looking area called the old city moat surrounded by massive walls and water gates. Yep, that is the downtown of Thailand’s Chiang Mai, often called the Old City of Chiang Mai!

In this blog, I will be mainly focusing on the best places to see in this historic Old City of Chiang Mai. I have listed my top 9 favorite places in this article which I’m sure will be worth your while as well.

But before we get started, let me pin those 9 places on the map. You may refer to the image below.

chiang mai old city tourist map

HOW TO GET AROUND CHIANG MAI OLD CITY?

There are several ways to get around the Old City of Chiang Mai such as songthaew, tuk-tuk, buses, taxis, and of course Grab! However, despite being a popular tourist city, the public transport here isn’t quite convenient to the level you may expect.

I would however suggest just going on foot since the places are not far apart from each other. If it tires you along the way, go ride with Grab bike or motor-taxi!

So install that Grab App as well as it might save you in times you need a quick and convenient ride.

If you know how to drive a motorbike, you can rent one. Just inquire with your hotel/hostel. I’m sure they know where to point you.

If you’re going as a group or you’re a solo traveler wanting to be in a group tour, I suggest you book a group city tour through Viator! Check out the button below.

Tours via Viator

Now let’s get started!

9 BEST PLACES IN CHIANG MAI OLD CITY

1. WAT LOK MOLI

wat lok moli

If you’re staying on the north side of the old city (like the Nimman area,) this should be your first stop!

The color of Wat Lok Moli’s temple is very distinctive – with ivory white and reddish roofs giving the temple an eye-catching marvel. The details in the wood are also very appealing adding to the temple’s distinctive look. Its chedi (tower) is one of the biggest in Chiang Mai.

2. WAT CHIANG MAN

wat chiang man chiang mai

Wat Chiang Man is the oldest known Buddhist temple in Chiang Mai, so this is totally a must-visit for all history buffs out there!

The most striking part of this temple is the murals inside. Beautifully painted and colorful, they enliven the inside and are a joy to look at. Be sure to exit through the back of the temple to see more buddha statues around the perimeter and the lovely chedi (tower) in the back, supported by elephant statues.

3. THE THREE KINGS MONUMENT

three kings monument chiang mai

The Three Kings Monument, situated close to the center of the Old City, is one of the famous and important landmarks of Chiang Mai. It is actually considered the “symbol” of Chiang Mai that’s why this monument should not be missed when you’re in the city.

PS: This sculpture is of the founding fathers of Chiang Mai Kings Mengrai, Ramkamhaeng, and Ngam Muang.

4. WAT PHAN TAO

wat phan thao

Located beside Wat Chedi Luang (number 5 on this list), Wat Phan Tao served as a throne hall for one of Chiang Mai’s Kings of Lanna Kingdom. You’ll immediately notice the beauty of the exquisite Lanna-style wooden temple upon your entrance. It has a beautiful and elegant grace yet it’s simple at the same time.

At the back of the wooden temple, there is a very ornate golden pagoda with a lot of yellow Buddhist flags around it.

5. WAT CHEDI LUANG

wat chedi luang

The main attraction here is the chedi (tower) which is in the center of the compound – a giant stone structure sits in the center of a stone-paved square and just dominates its surroundings. Visitors might be surprised to know that the top 100ft is missing, fell by an earthquake in the 16th century.

The compound is large with a number of beautiful other temples and buildings within.

6. WAT PHRA SINGH

Located on the western side of the old city, it is a major Buddhist temple complex originally built in 1345 and has since gone several restorations throughout time.

Two of its most popular and stunning buildings are the Golden Pagoda and the main temple which enthrones the Golden Buddha statue. The temple gets its name from the Lions or Singh guarding the complex.

7. BUAK HAAD PUBLIC PARK

buak haad public park chiang mai

This is Chiang Mai’s oasis in the middle of the hustle and bustle of the city. It has a nice green space in the Old City and has a very peaceful park set on a small lake with nice landscaping and multiple areas to enjoy the shade, have a picnic, and just chill. There is a spot to feed the fish as well.

8. WAT SRI SUPHAN

wat sri suphan

Another temple complex in Chiang Mai that stands out from the rest includes the temples painted with silver. Truly a must-visit in Chiang Mai, not only for religious purposes but admiring the skills of people who created all their creative works for this place.

Unfortunately, women are restricted from entering the silver-looking temple, but there are other temples inside the complex that women can.

9. THA PHAE GATE

tha phae gate chiang mai

This is the Eastern gate of the walled city and the most known among the four gates. You can’t come to Chiang Mai and not see this!

It is a good place to end your Old City tour as it leads to the lively and buzzing nightlife of Chiang Mai. There is also the Tha Phae Walking Street and also a lot of coffee shops and restaurants nearby.

30 Useful Thai Expressions For Travelers To Survive Thailand

By Dan Forteza

Are you visiting Thailand anytime soon? If you are, learning a few basic Thai expressions or phrases can immensely help you when traveling around Thailand. Take it from me! As of this writing, I’ve been here for more than a year and have been enjoying my time especially those moments when I interact with the local people. When you try to speak their language, most locals will appreciate the effort and may even have a friendly giggle at your pronunciation.

Although English is widely spoken in touristy areas, having a few Thai words ready in your pocket can surely help.

In this blog article, I am going to walk you through 30 useful Thai expressions that will definitely help you enjoy your trip.

Read also: my one-day tour itinerary in Chiangrai, Thailand.

one of my most used thai expressions is anne tao rai which means how much is this
This is me buying street food in Bangkok, Thailand

30 BASIC THAI EXPRESSIONS (with GRAMMAR TIPS and AUDIOS)

In this list, I have also included grammar and pronunciation tips to help you speak like a local! It would also help if you listen to each of the audio to help you guide on the pronunciation. Those audios were recorded by a Thai friend of mine.  So good luck or I should say susu na krap!

1. sàwàdee (kráp/kâ)

Translation: Hello! 

TIP 1: In Thai language: if you’re a male, you add “kráp” at the end of each expression to make it sound more polite. If you’re a female you add “kâ” instead. Usually, local men would just drop the “r” in “kráp” sounding it more like “káp” or “háp.”

Sàwàdee is basically the usual Thai greeting. So it can also be used when saying “Good morning, Good afternoon, Good evening, or even Good bye.”

TIP 2: When you’re greeting an elderly, a teacher, or basically someone you respect, the “wai” greeting is usually paired with the word “sàwàdee”, thereby making it a greeting and also a way in which to show someone respect. The “wai” consists of a slight bow, with the palms pressed together in a prayer-like fashion.

Nakhon Nayok Bamboo Tunnel
All of us doing the “wai” sign with our local Thai guide in the middle

2. sàbaaidee măi (kráp/kâ)?

Translation: How are you?

Reply: sàbaaidee (kráp/kâ) [means: I’m well.]

TIP 3: The word “măi” has no literal translation in English. When “măi” is added at the end of an expression, it makes the expression a question.

Sàbaai literally means “relaxed” while dee means “good”. So the expression “sàbaaidee măi” literally means “Are you good?” or something like “You good?” And most of the time the Thai word for “You” is omitted in either a question or a response.

Sometimes I hear Thai people say “dee dee dee” which means “good good good.” Haha!

3. chai/mâi chai (kráp/kâ)

Translation: Yes / No

Don’t be confused “mâi” with “măi”. Each has actually different pronunciation and meaning. When mâi is added before a word, it becomes”negative” or meant the opposite.

TIP 4: Another way of saying “yes” is kráp or . When you understand and agree with one’s statement, instead of replying “yes” or “right”, you can say kráp (for male) or (for female.)

TIP 5: And another way of saying “no” is “plao”.

4. kòp kun (kráp/kâ)

Translation: Thank you.

The Thai word “kun” means “you” but it could also translate to Mr. or Ms. So “Kun Daniel” would mean Mr. Daniel. Please note that last names in Thailand have only been in used for the last 50 years so it is common for Thai people to call me Kun Daniel.

5. mâi pen rai (kráp/kâ)

Translation: No worries or Not an issue.

This is the usual response to “Thank you.”

TIP 6: It is common to pronounce the “r” sound in Thai like an “l” sound. I personally feel like I am more understood by the locals when I pronounce “r” as “l”.  So instead of saying “mâi pen rai”, I’d say “mâi pen lai.”

Before we continue with the list, let me just introduce first the two basic pronouns in Thai.

  • Pom/ChanPom and Chan both mean “me”, “myself”, or “I”. Take note that Pom is only used by men. Chan is used by both men and women. I personally use pom though.
  • Kun – As I’ve explained in #3, this means “you” and could also mean “your”.

6. róo/mâi róo (kráp/kâ)

Translation: I know/I don’t know

In this expression, ” róo” means “know”.

TIP 7: Local Thais usually omit personal pronouns Pom or Chan when saying this but you can also say it as “Pom róo/Chan róo and “Pom mâi róo/Chan mâi róo.

7. mi/mâi mi (kráp/kâ)

Translation: I have/I don’t have

I used this expression a lot when buying something at 7-11. Upon payment, the cashier would ask me “All Member mi krap/ka?” (Do you have All-Member card?), so I just simply respond by saying: “mâi mi kap” (I don’t have.)

8. dâai/mâi dâai (kráp/kâ)

Translation: Possible/Not possible

This can also mean “I can” or “I can’t”

9. kun pôod phasăa ang-grìt dâai măi?

Translation: Can you speak English?

So we’re now in the point where we’ve learn a couple of Thai words and where we can mix and match them to create phrases of different meaning. In this expression, the literal translation word-by-word is:

  • kun – you
  • pôod – speak
  • phasăa ang-grìt – English or English language (phasăa means language)
  • dâai măi – can?/can you?

Reply:

  • Pom pôod phasăa ang-grìt dâai krap. [I can speak English.]
  • Pom pôod phasăa ang-grìt mâi dâai krap. [I can’t speak English.]
  • Pom pôod phasăa ang-grìt dâai nidnoi krap. [I can speak English a little.]

NOTE: When someone asks me if I can speak Thai, I’d normally say “Pom pôod phasăa thai dâai nidnoi krapor just simply nidnoi (meaning a little.)

10. leaw kun la (kráp/kâ)?

Translation: And yourself?

If you want to ask someone back with the same question, you can say this expression.

To put it into perspective, so here is a sample dialogue in Thai.

  • A: kun pôod phasăa ang-grìt dâai măi? [Can you speak English?]
  • B: dâai. leaw kun la krap? [Yes, I can. And yourself?]

In the next five sentences, I’ll be using the Thai word “na“. In a nutshell, adding “na” makes the expression “softer” and it adds the sense of sincerity when you use it.

11. kŏr tôht na (kráp/kâ)

Translation: Sorry.

12. tôht na (kráp/kâ)?

Translation: Excuse me.

I used this expression quite a lot, too. I used this whenever I want to ask politely for something or I might do something that might affect someone like me getting through a crowded place.

13. susu na (kráp/kâ)

Translation: Fighting! or Good luck!

This is one of my personal favorite Thai expressions. Whenever you wish someone a piece of good luck and just a word of encouragement, you can say “susu!” or “susu na k’ap!

14. laa gòn na (kráp/kâ)

Translation: Good bye.

TIP 8: Another way of saying goodbye is “jer gan.” It literally means “see you”. I believe this is more colloquial and common to say goodbye.

15. àrai na  (kráp/kâ)?

Translation: What did you say? or Say that again, please.

The Thai word for “what” is “àrai“. And when you add the word “na”,you are basically politely asking someone to repeat what he/she said because you didn’t get it the first time.

TIP 9: There is another way of saying this but only with your closed friends. You can say “àrai wa?” which literally translates to “what the heck?” or to some extent “what the f*ck?” This is a bit rude if you are talking to someone you don’t know or someone superior to you.

Now in the next expressions, I’ll be introducing to you the equivalent WH-question words. I won’t be covering them all but the common ones are:

  • àrai – what
  • têe năi – where
  • tâo rài – how much / how many
  • mue rài – when
  • tham mai – why
  • yàang-rai – how

These normally appear in the end of a Thai sentence. Refer to the next sample expressions.

16. kun chêu arai (kráp/kâ)?

Translation: What’s your name?

The Thai word for “name” is “chêu“. Again, you can omit the pronoun “kun” and simply say “chêu alai kap?”

17. kun maa jàak tee năi (kráp/kâ)?

Translation: Where do you come from? /  Where are you from?

The Thai word for “come” is “maa” while the Thai word for “from” is “jàak“. Simple as that. =)

18. hông náam yòo têe năi (kráp/kâ)?

Translation: Where is the toilet?

The Thai word for “toilet” is “hông náam” which literally translate to “water room” (hông is room; náam is water.) Yòo is some sort of an article like “at” or “on”.

19. an née tâo rài (kráp/kâ)?

Translation: How much is this?

This is another Thai expression that I used very often. When you’re at the market and you see a fruit you want to buy for instance, then you point it out and you say “an née tâo rài kap“? The Thai word for “this” or “this one here” is “an née”.

20. phasăa thai … pôod wâa yàang-rai (kráp/kâ)?

Translation: How do you say … in Thai?

This is the longest expression in this list but you’ll need this in case you’re now in the stage where you want to learn more vocabulary. So you can simply ask a Thai local and say “phasăa thai an née (this one) pôod wâa yàang-rai (kráp/kâ)? Wâa is some sort of an article connector.

21. chai măi?

Translation: Right? or Correct?

Another favorite expression of mine and I used this all the time! I normally mixed it up with an English expression and then ending it by saying “chai măi?” So basically you’re asking the person you’re talking to if your statement is correct. Say for example: “You’re a student here, chai măi?” If he/she agrees he/she would simply say “chai” (meaning yes.)

22. khâo jai măi?

Translation: Do you understand?

This is useful when you can’t express something in Thai and while you’re saying it in English, you want to make sure you pause and ask them if they indeed understood you so you say “kun khâo jai măi?” or simply remove “kun” and say “khâo jai măi?”

23. jing ná? / jing jing?

Translation: Really? / Seriously?

I think this is a good one. I like using this Thai expression as well. It’s like I’m blending in so much!

24. yin dee têe dâi róo jàk.

Translation: Pleased to meet you. / Nice to meet you.

25. neung, song, sam, see, ha, hok, jet, paed, gao, sip

Translation: one, two, three, four, five, six, seven, eight, nine, ten

These counting numbers are very useful in a normal Thai conversation. And most importantly when you’re at the grocery store, you’ll be aware of how much you’re going to pay for!

Counting in Thai language is easy. You basically just need to mix and match the numbers from one to ten and you’re all set! For example:

  • Twelve: Sip song (10 and 2)
  • Thirty: Sam sip (3 and 10)
  • Eighty five: Paed sip ha (8, 10, and 5)

There are two exceptions though:

  • you don’t use “neung” in saying “eleven” (or other tens ending by one. Instead, you use “ed.” So eleven would be “sip ed” and thirty one would be “sam sip ed.”
  • also, you don’t say “song sip” for “twenty”, instead you say “yi sip.” So twenty one would be “yi sip ed

26. pai!

Translation: go!

I know this is just a word but if you use it together with other Thai words you just learned, then this is going to be one heck of a relief. If you’re telling a taxi driver to go to “Sukhumvit 55th st., you can say “pai Sukhumvit soi ha sip ha” (soi means street.)

27. kun gin arai?

Translation: What did you eat?

Now we knew “kun” is “you” and “arai” is “what”. The new word here is “gin” and it means “eat.”

28. aroi mak!

Translation: Very delicious!

You’ll be using this so much when you’re complimenting how delicious food is! The Thai word for “delicious” is “aroi” and for “very” or “extremely” is “mak“. 

With the word “mak“, you can basically partner this to any word. Say for example; instead of saying “kob kun krap,” you can say “kob kun mak krap” to say “thank you very much.”

29. mâi phet / phet mak

Translation: Not spicy / Very spicy

I bet most of us want to go to Thailand for a food trip, chai măi? I gotta tell you though that Thai food is quite known for being spicy! So if you want to say you don’t want to have something spicy, you can say “mâi phet.” The Thai word for spicy is “phet.” Phet mak on the other hand means “very spicy”.

30. sai krong  dâai măi?

Translation: Can you put it in a container?

From the previous list, we knew “dâai măi” means “can you”. The Thai word for “put” is “sai“. This Thai expression is useful when you want to take out food. Krong is a sort of a food container.

TIP 10: Or if you want to say like: “Can you put it in a plastic bag?”, you can just change “krong” to “tong” (the word for plastic bag.)

FINAL THOUGHTS

Well, what can I say… Thai can be a difficult language to learn as it is a tonal language. One word can have multiple meanings depending on how it is pronounced.

You are most definitely going to make mistakes, but don’t let that put you off. Personally, I love learning this language because I love getting wide grins and chuckles from locals when I say something unexpected in their language.

Anyway, please let me know what is your favorite Thai expression. I would love to hear you’re thoughts on this! Kob kun mak krup!

How To Get Disabled Instagram Account Back [My Experience: SOLVED]

By Dan Forteza

How would you feel if an Instagram account so dear to you got disabled? If this recently happened to you, I’m sorry; I felt the same way when it happened to me. So if you’re here to find out how to get disabled Instagram account back, or you just simply want to know what I went through to have it back, then you’re in the right place. I’ll share everything you need to know in this blog.

But first, here is my Instagram (@iamdantravels) account that got disabled.

My instagram account that got disabled
My Instagram account that got disabled

Through series of appeals to Instagram, I got it back in 15 days!

Yes, it took me 15 days!

If you’re now worried about your disabled account, don’t be! Your account will be back EVEN IF you really did something to violate Instagram’s terms and conditions. But the problem is we don’t know when it will be reactivated by Instagram. Time will tell.

So I will just ask you to wait patiently after following the appeal procedures! I can attest to this. And don’t you ever fall for hackers who claimed they can get it back. I’ll explain it later in the HELPFUL TIPS section.

JUST MY TWO CENTS: I feel like our disabled accounts are being held captive by Instagram and will be reactivated in due time depending on the gravity of our violations. Some say, in as quick as 24-hour, they got their accounts back. Most people got it back in 2 weeks’ time. If this is the first time your account got disabled, it is rare that you’ll have to wait for months to have it back.

So in case you got it back, don’t do anything stupid again haha. It would be harder to get it back the second or third time around.

If you really did NOTHING wrong and your account really was deactivated by mistake, then more reason to not worry. I believe it will be back in less than a week.

UPDATE: After a few days, I have another Instagram account that got disabled and this time around it was disabled REALLY by mistake. I was accused for “pretending to be someone else.” After I filled out the form to appeal my case, Facebook instantly (like 10 minutes after I sent the appeal form) sent me a message saying “my account was deactivated by mistake. You see? It’s that quick!

A BIT OF BACKSTORY:

Just like every millennial, I am also fond of sharing loads of content on my social media accounts, especially on Instagram. I mainly use Instagram to post travel-related content especially now that I am backpacking abroad and, hear this… during a pandemic! That being said, wouldn’t it be nice to have Instagram by your side to share what’s happening around you or simply vent out what you feel?

Read also: How COVID-19 had me stuck in Bangkok, Thailand.

So when my Instagram got disabled, my stress level was through the roof! It was both painful and heartbreaking.

Hear me out: I’ve been using Instagram since 2012. It’s my personal account. It is so dear to me as it contains a lot of memories in a span of almost 9 years. Those posts, stories, and messages are just too precious to let go. I know you would understand. In addition, it also had 6,000+ followers before it got disabled.

NOTE: You’ll know when your Instagram account is disabled when each time you log in a notification would pop up that says: “Your account has been disabled for violating our terms. Learn how you may be able to restore your account.”

Also, when your account is disabled, you are NOWHERE to be found on Instagram!

WHY WAS IT DISABLED?

There are different reasons why Instagram disables an account. Refer to this page from Instagram Help Center if you want to review their terms in full detail.

But in a nutshell, you violate the terms if you use Instagram for:

  • impersonating someone;
  • illegal activities;
  • hate speech / fake news;
  • nudity;
  • graphic violence;
  • collecting artificial likes or follows (or automating it);
  • spams.

In my case, my account got disabled because I was using a third-party app to automate people to unfollow. In my defense, there are so many people on Instagram who follow you (in the hope that you follow them back), and then later on, they will unfollow you!

So I decided to download an app so I can automatically track and mass unfollow those people who unfollowed me. So yeah, because I prefer not seeing them on my timeline if they are no longer following me! You get me?

HOW TO GET DISABLED INSTAGRAM ACCOUNT BACK (STEP-BY-STEP with TIMELINE)

Day 0 (April 4, 2021):

So while using this automating app, I suddenly got kicked out of Instagram. When I try to open the app, it asked for my number to verify my identity. I put in my phone number and then Instagram texted me a 6-digit code. After keying in the code, I got this notification:

“Thanks for Providing Your Info. We’ll review your info and if we can confirm it, you’ll be able to access your account within approximately 24 hours.” (see also screenshot below)

Instagram saying thank you for providing your info
Day 0: Instagram saying thank you for providing your info

If this happens to you, you need to worry a bit! Because most probably you’ll get your Instagram account disabled after 24 hours! I say 90% probability according to some blogs I’ve read.

Day 1 (April 5, 2021): THE APPEAL PROCEDURE

I couldn’t count how many times I logged in but ended up with the same “Thank you…” notification. Then exactly 24 hours had passed, my account is now DISABLED! It’s horrifying, I know. The pop-up notification now says:

“Your account has been disabled for violating our terms. Learn how you may be able to restore your account.” (see also screenshot below)

Instagram saying that my account has been disabled for violating the terms
Day 1: Instagram saying that my account has been disabled

STEP1: When this appears, click ‘Learn More’ and it will lead you to another page specifying what kind of violation you did.

In my case it says:

“Some of the things we don’t allow include artificially collecting likes, followers or shares, posting repetitive content…” (refer to the snapshot below to see the full statement)

Disabled instagram due to "collecting likes and follows"
Day 1: Is this really how my Instagram got disabled?

So this is why I got the impression that it has to do with the third-party app I was using to automate mass unfollow!

STEP 2: This is when we need to APPEAL to Instagram to get our account back. We’ll need to let them know that it was a mistake (even though your violation is slightly true? haha.) So click “let us know” and it will lead us to the appeal page!

The appeal page will ask you if your account is a business account, just choose “NO”. Then proceed filling up the form with your:

  • full name;
  • Instagram username;
  • email address, and;
  • country.

Remember, ALWAYS put that you’re in the US (they kind of prioritized your case if you’re in America.)

You can also access the same page on your computer. Let’s call this page FORM 1.

STEP 3: In a few minutes, you will receive an email asking you to take your photo holding a piece of paper with a 5-digit code in it including your full name and your Instagram username. Here is the screenshot of the email I received.

Day 1: The first email response from Facebook asking for your photo with a code

So do it right away!

Here is the photo I took. I look mad and frustrated. Haha!

Day 1: My photo holding a paper with 5-code
Day 1: My photo holding a paper with 5-digit code

It is rare that you will not receive this first email response. BUT in case you didn’t, there are other forms to fill up:

  • FORM 2 – VERY similar to FORM 1, except it doesn’t ask which country you’re from. You also have to state the reason why Instagram should not permanently disable your account. Just simply say you didn’t do anything wrong or it might have been hacked and then eventually got disabled.

You’re basically talking to a “BOT” so don’t hurt yourself explaining too much!

  • FORM 3 – You’ll need to submit your government-issued photo ID here.
  • FORM 4 – VERY similar to FORM 2, the only difference is that it’s from Facebook Help Center. (Instagram is owned by Facebook in case you haven’t heard.)

Day 2-3 (April 6-7, 2021):

Our goal is to get that email (asking for our photo with a code) once a day until we receive a response from either Instagram or Facebook.

With that in mind, on the second day, I filled up FORM 2 and also receive the same email with a different code. The same thing I did on the 3rd day but I filled up FORM 3! I received the same email again with a new code.

So basically, I’ve been sending that photo with a code for 3 straight days!

Day 4-10 (April 8-14, 2021):

On the 4th day, I filled up FORM 4, but unfortunately, I didn’t receive the email. I also filled up FORM 1-3 one at a time but still, I am no longer receiving the same email!

I repeat filling up each of the forms per day from Day 5 to Day 10 but again, NO EMAIL! I have the feeling that Instagram max it to only 3 email responses per email address. I tried a different email add to fill out FORM 1and I finally received the same email response from Facebook! But of course, we wanted Instagram/ Facebook to know that the email in question is the email linked to our Instagram account. So I didn’t bother continuing the appeal process using a different email.

So from Day 5 to Day 10, I tried several other ways to contact Facebook and Instagram. I have listed those on the HELPFUL TIPS section below.

Day 11-14 (April 15-19, 2021):

On the 11th day, I almost gave up. I stopped filling up the forms.

I created a NEW Instagram account, too =(. I told myself: at least the posts on my Instagram have synced into my Facebook page. So somehow I still got the memories.

Basically, I just left it in the hands of GOD! If Instagram will give it back then I’d be very grateful. If not, then that’s fine. I already accepted the fact that it might not be recovered. Huhu!

On the 14th day, I received this email stating that my account is fixed?

The email message reads:

“We just investigated your report and it looks like this is NO longer an issue. If this comes up again, just reply to this message and let us know…” (refer to the screenshot below)

Day 14: The second email response I received from Facebook

So I tried logging in BUT still the same “Your account has been disabled…” notification.

This email was a HUGE relief to me though! I believe Instagram is in the process of reactivating it. So I replied to the email asking them to help me since I am still getting the same error.

Day 15 (April 20, 2021):

FINALLY, on the 15th day, I received a new email from Facebook saying that my Instagram account has been reactivated.

AND IT WORKED!!!!

Day 15: The third email response I received from Facebook stating my account is BACK!

The first thing I did after recovering my account was to switch it to PRIVATE. I feel like from this time onwards, I am going to protect this personal account of mine and refrain from doing any sort of violations. Haha!

HELPFUL TIPS (OTHER WAYS):

When I stopped receiving those email responses from Facebook on the 4th day, I started looking for other workarounds to contact Facebook and Instagram.

Here are some of the useful tips I could give you! I’ll explain each as per my experience.

TIP 1: ACCESS THE FACEBOOK SUPPORT CHAT

You can access the Facebook live chat if you have a Facebook business account after running an ad in it. Since I already have a Facebook business account with ads in it, I can easily access it and get help regarding my Instagram account. BUT NO! I couldn’t find the live chat.

After watching a couple of YouTube videos, I learned that Facebook has temporarily stopped this kind of support somewhere in March 2021. Maybe it has to do with the pandemic? I’m not sure.

TIP 2: CALL FACEBOOK NUMBER

I came across another YouTube video claiming that calling the Facebook landline number had helped her in recovering her disabled Instagram account. The number is:

  • 1-650-543-4800 (US landline number)

Since this number is in the US, I used my SKYPE Credit to call this number. Please note that you won’t be speaking with an actual person. Instead, you will have to explain everything as quick as you can probably in less than 40 seconds (as it will cut you off) AFTER THE TONE! Also, you’ll need to spell out your name, Instagram username, and email address.

TIP 3: MESSAGE ACTUAL FACEBOOK/INSTAGRAM EMPLOYEES

This is another option. What you’ll need to do is head to LinkedIn and find Instagram (see snapshot below). Then click “See all XX,XXX employees on LinkedIn.”

Instagram LinkedIn page

You’ll be able to find the list of real employees working on Instagram. You can also filter the employees by location, say for example employees in California. And with their names, find them on either Facebook or Instagram then message them! I messaged like 15 people! There are two people who responded but only advised me to check out the HELP Center instead. Not really the response I am looking for! But at least I tried.

You could do the same thing with Facebook employees on LinkedIn.

TIP 4: DON’T EVER FALL FOR CYBER HACKERS

Now this one is interesting. When I posted about my situation asking for help to Instagram on Twitter, a person who claimed he is a professional hacker messaged me. Apparently, this is common on Twitter wherein they would claim they can help you get your account back. There are a lot of these people on Twitter (and even in YouTube comment sections of most of the videos I’ve watched.)

Below is the message I received from Twitter:

Thank God I didn't fall for this hacker!
Thank God I didn’t fall for this hacker!

Don’t listen to these people! Just trust the process!

As an example, I got this message from someone who hired a hacker to get her account back. Turns out, the hacker is scamming her for what else…her money!

Apparently, the hacker created a fake account of her into thinking they had the details.

I feel sorry for this gal. Hope she can still get her account back.

LET’S WRAP THIS UP:

I can understand your frustration and pain. Because I’ve personally experienced this myself.

But the good news is that it isn’t too complicated to get back your disabled account. The only frustrating part is we have to wait for God knows HOW LONG!

It might take a few days but that’s nothing compared to the months or years of photos and videos that you uploaded to your Instagram account!

So don’t lose all the hope. You will get it back! =)

4-Day Cairo, Egypt Itinerary With Guide + Budget (Pinoy Solo Traveler)

By Dan Forteza

This post may contain affiliate links which means if you purchase something through that link, I will make a small commission at no additional cost to you. Think of it as buying a cup of coffee for me on someone else. Thanks & enjoy!

No trip to Egypt is complete without a stay in its capital city of Cairo. While the Pyramids are on every traveler’s bucket list, those are just one of Cairo’s many stunners, and I finally got a chance to see them in person this year! Thus, allow me to share my 4-day Cairo, Egypt itinerary with you complete with my actual day-to-day expenses in this blog.

So get yourself ready! =)

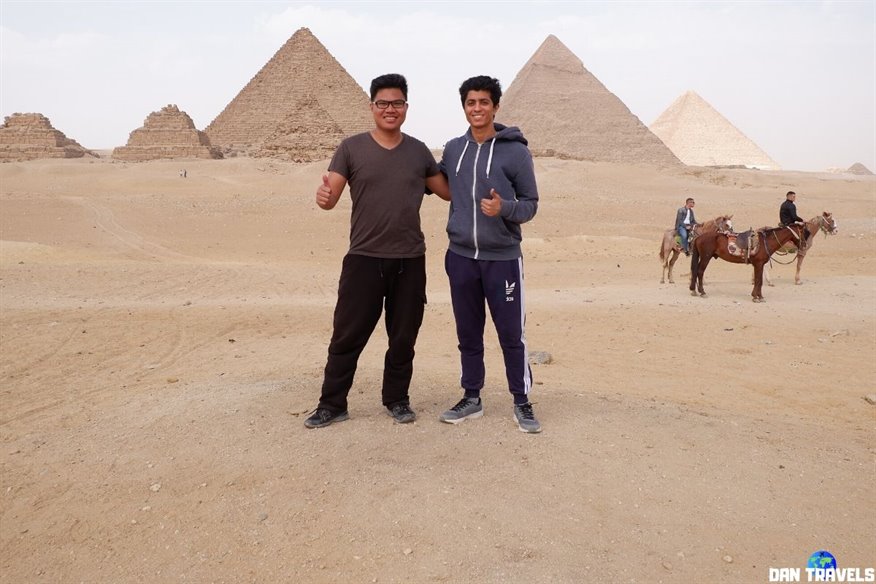
Ebrahim and I went together to Giza Pyramids!

Hi there! First of all, I am Daniel – a solo backpacker from the Philippines. If you don’t know my story yet, feel free to read this article where I talked about how I quit my job in order to travel. This article was also featured on TripZilla Philippines.

But honestly, it’s not just really because of the Great Pyramids of Giza why I wanted to visit Egypt this year. If you’ve been following me for quite a while, you know I am a geek when it comes to Geography.

Personally, visiting Egypt officially marks the fifth continent I set foot into: Africa. There are seven of them in the world. And that would mean I only have two more continents to go: North America and Antarctica.

It is my ULTIMATE travel goal to conquer all seven!

Don’t get me wrong though, seeing beforehand the Great Pyramid of Khufu–the sole surviving ancient wonder of the world has always been in my big travel bucket list. I mean who doesn’t?

DO YOU NEED A VISA?

First things first–do you need a visa to travel to Egypt?

If you’re also a Philippine Passport holder, you need to secure an Egyptian tourist visa first.

Read: my blog on how to get your Egyptian tourist visa with your Philippine passport.

If you’re from another country, you might want to check first the visa policy of Egypt to verify whether you need a visa or not.

EGYPT 🇪🇬

Language: Arabic (Egyptian dialect)
Capital City: Cairo
Currency: Egyptian Pounds (EGP)
Int’l Airports in this trip: CAI
Preferred mode of transportation: Subway / Bus
Time Zone: GMT +2

HOW I GOT TO EGYPT

Finding a cheap flight ticket going to Egypt from the Asia-Pacific region is easy when using Trip.com flight search engine. I got my economy flight tickets from Manila via Cebu Pacific + Flynas going to Cairo (self-transfer in Dubai.) Then I returned to Southeast Asia (in Bangkok) via EgyptAir.

NOTE: For Philippine Passport holders who will go through flight transfer at Dubai International airport (DXB), you DO NOT need any sort of UAE visa as long as you stay within the airside area of the airport. Even if your next flight is on another terminal, you can transfer with ease using DXB’s terminal-to-terminal transport buses.

Here were my flight itineraries with costs:

  • Manila (Philippines) – Dubai (UAE) [$65.51]
  • Dubai (UAE) – Cairo (Egypt) [$143.08]
  • Cairo (Egypt) – Bangkok (Thailand) [$331.92]
  • Subtotal: $540.51

If you’re also coming from the Philippines (or wherever in the world actually), I suggest you check Trip.com as they usually offer cheap fare rates compared to other booking sites. Per my experience, they’re the best!

HOW TO GET AROUND CAIRO?

  • Subways / Metro
    • Subway or Metro is the best way to get around Cairo especially for first-time travelers. Inexpensive and efficient.
    • Signages are both in Arabic and English.
    • Tickets cost between 3 to 5 EGP ($0.2 to $0.32) depending on the distance.
  • Buses / Minivans
    • Another cheap transport network serving the metropolis.
    • Signages are in Arabic only, so don’t be shy to ask locals where the bus is going!
    • Airport to metro station: 4 EGP ($0.25).
    • Downtown Cairo to Giza: 2.5 EGP ($0.16).
  • Uber Taxi
    • Operates in Cairo and is often much cheaper than standard taxis.
    • Hostel to airport: 100 EGP ($6.35).
  • Other Transport Travel Tips
    • Use offline map apps like Google Maps or Maps.me.
    • Remember to walk a little more! As I mentioned in my budget travel tips blog“walk as much as you can!”

NOTE: I have only listed the transport services I used per my experience during my Egypt itinerary travel.

WHERE DID I STAY IN CAIRO, EGYPT

My Room Accommodation:

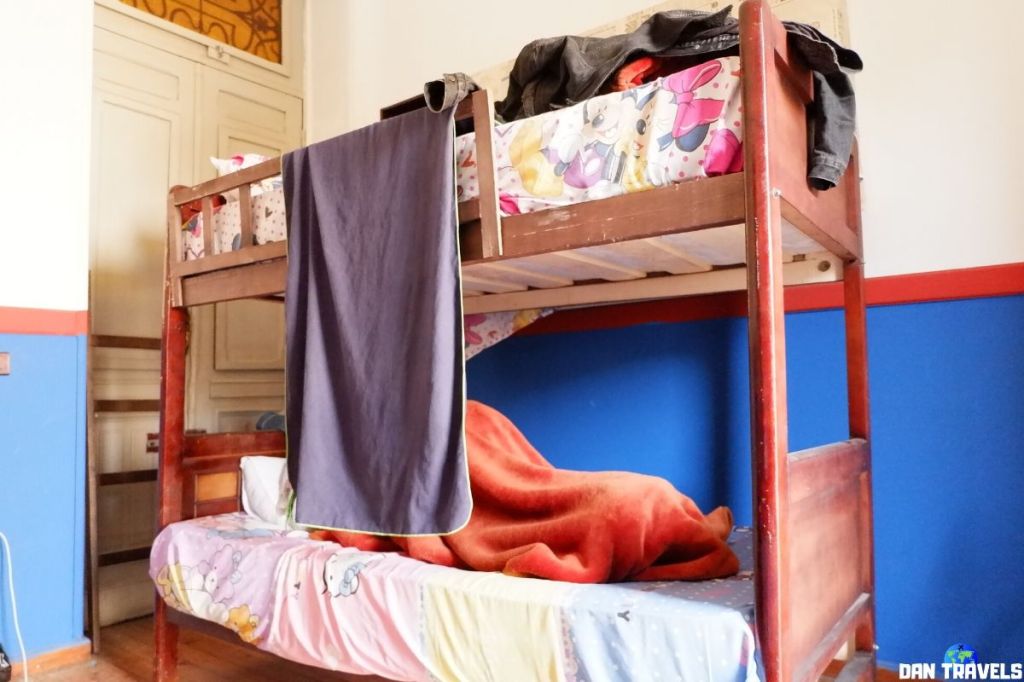
Bella Casa Hostel
Bella Casa Hostel

You can book a room through Agoda or Booking.com. I usually use Booking.com as they have free cancellation or pay-at-the-hotel options. If a hotel isn’t to your liking, try Airbnb for a more local feel!

If you’re new to AirBnB, then you can get up to $43 USD free travel credit by signing up via this link.

Book AGODA here

Book BOOKING.com here

MY 4-DAY CAIRO, EGYPT ITINERARY with EXPENSES

My 4-day trip to Cairo happens one week before things get crazy on the coronavirus outbreak. I actually intend to travel and see more of Egypt but I ended up taking another week in Cairo just basically staying at my hostel in the hope that the virus will just die out.

However, day by day it was getting worse. I ended up canceling my flight to Morocco and instead I booked a flight to Bangkok, Thailand. I don’t want to be stuck in northern Africa while countries are closing borders and declaring lockdowns. So I decided to seek my refuge in Thailand until the situation improves.

I left Egypt one day before the Egyptian authorities suspend all international flights in and out of the country. So I guess I was lucky that I was even able to get back to Southeast Asia!

Anyway…enough of that! Let’s get back to my detailed day-to-day Egypt itinerary. See below:)

DAY 0: ARRIVAL at CAIRO AIRPORT

Arrival Cairo
Day 0: I arrived at Cairo Airport at around 8:00 AM
  • EGP 4 – Bus: Bus terminal to El Shams Club station, see note 1
  • EGP 7 – Metro: El Shames station to Attaba station
  • EGP 88 – Hostel (Nile Plaza Hostel): 1-Night stay
  • EGP 45.5 – Food: McDonald’s Meal
  • Subtotal: EGP 144.5 [$9.17]

NOTES:

1 – A guy named Ahmed (in the photo above) helped me with directions. He even paid for my bus fare because the bus conductor didn’t have change for my 200-EGP banknote!

DAY 1: DOWNTOWN & COPTIC CAIRO

Downtown
Day 1: The beautiful architecture of downtown Cairo
  • USD 21.39 – Hostel (Bella Casa Hostel): 4-Night stay
  • EGP 3 – Metro: Opera station to Mar Girgis station
  • EGP 10 – Food: Sandwich Bread
  • EGP 10 – Softdrink Miranda
  • EGP 5 – Metro: Mar Girgis station to Mohamed Naguib station
  • EGP 12 – Food: 4x Instant Noodles
  • Subtotal: EGP 377 [$23.9]

NOTES:

Old Cairo (Coptic Cairo) is easily reachable through metro at Mar Girgis station. Mohamed Naguib or Sadat station are the nearest metro stops for Bella Casa Hostel.

DAY 2: MOSQUES OF IBN TULUN & SULTAN HASSAN, AND CAIRO’S CITADEL & MUSEUM

Ibn Tulun Mosque
Day 2: Ibn Tulun Mosque is the largest mosque in Cairo in terms of land area.
  • EGP 12.75 – Food: 3x Croissant Bread
  • EGP 9.25 – Food: 1-kg Rice
  • EGP 9 – Softdrink: Miranda
  • EGP 4 – Bus: El Sayeda Aysha terminal to El Tahrir Square
  • EGP 200 – Entrance Fee: Egyptian Museum of Antiquities
  • EGP 80 – Top-up internet 3 GB data
  • Subtotal: EGP 347 [$22]

NOTES:

I walked almost 3 km to reach Ibn Tulun Mosque from my hostel. Later that night, I met Ebrahim (who I met via a language exchange site); he let me use a spare SIM card, which was a huge help for data!

DAY 3: MOSQUES OF SULTAN AL MU’AYYAD, AL AZHAR, & CAIRO’S AL-MUIZZ LI-DIN ALLAH ST.

Zuwayla Gate
Day 3: Zuwayla Gate
  • EGP 16 – Food: Bread and Coffee
  • EGP 5 – Metro: El Geish station to Mohamed Naguib station
  • EGP 6 – Food: 4x Eggs
  • EGP 20 – Food: Koshary (the national dish!)
  • Subtotal: EGP 56 [$3.56]

NOTES:

Cairo’s Al-Muizz li-Din Allah Street is oozing with fine medieval buildings. It’s free to enter many of these mosques, though be wary of anyone trying to charge you an “entrance fee” while you’re already inside—I had a funny run-in with someone at Sultan al Mu’ayyad and just walked away! Haha.

AL-MUIZZ LI-DIN ALLAH STREET GALLERY

Mausoleum
Mausoleum of As-Saleh

DAY 4: THE GREAT PYRAMIDS

Ebrahim asking for directions
Day 4: This was Ebrahim asking for the minivan route to the Pyramids
  • EGP 20 – Food: Koshary
  • EGP 2.5 – Minivan: Charles De Gaulle St to downtown Giza
  • EGP 5 – Minivan: Downtown Giza to Pyramids entrance
  • EGP 200 – Pyramids Entrance Ticket (Main gate)
  • EGP 33 – Food: Koshary (again!)
  • EGP 9 – Return Minivans to downtown Giza and Cairo
  • EGP 13 – Food: Canned Tuna
  • Subtotal: EGP 282.5 [$17.94]

NOTES:

Visiting Hours are typically 8:00 AM – 4:00 PM. I didn’t use a horse or camel; I walked the whole complex! The best view is from ‘the Panorama’ dunes. If you walk, just be mindful of scammers—ask if something is free before agreeing to a photo, as typically nothing is free there! Haha.

And there you have it! Including the flight costs, here is the overall total of my expenses in Egypt for 4 days:

TOTAL: $540.5 (flights) + $76.6 (on the ground costs)

OVERALL TOTAL: $617.10

RECOMMENDED TOUR PACKAGES

If you have more days to spend in Egypt, you might consider these cool package tours:

Search More Tours on Viator

BOOKING ESSENTIALS

  • Accommodation: Booking.com is my go-to for hostels with free cancellation.
  • Flights: Trip.com usually has the cheapest rates from the Philippines and Asia.
  • Local Experiences: Viator is the best resource for booking guided tours in advance.

7-Day Japan Itinerary With Guide + Budget (Pinoy Solo Traveler)

By Dan Forteza

This post may contain affiliate links which means if you purchase something through that link, I will make a small commission at no additional cost to you. Think of it as buying a cup of coffee for me on someone else. Thanks & enjoy!

I don’t know about you guys but for me, Japan is one of the best countries in the world!

When I visited this East Asian country in February, there were no dull moments and everything was spectacular following my 7-day Japan itinerary which I’ll be writing about in this blog. If both Tokyo and Sapporo are on your bucket list amongst Japanese cities to visit, then this blog perfectly made for you!

I have also included my detailed day-to-day expenses which I’m sure budget travelers will find very helpful to estimate their overall travel cost when traveling to Japan. Because let’s face it, this country has one of the highest costs of living in the world.

Yokohama's skyline | Dantravels.org
Yokohama’s skyline | Dantravels.org

Hi there! First of all, I am Daniel – a solo backpacker from the Philippines. If you don’t know my story yet, feel free to read this article where I talked about how I quit my job in order to travel. This article was also featured on TripZilla Philippines.

DO YOU NEED A VISA?

First things first–do you need a visa to travel to Japan?

If you’re also a Philippine Passport holder, you need to secure a Japanese tourist visa first.

Read: my blog on how to get your Japanese tourist visa with your Philippine passport.

If you’re from another country, you might want to check first the visa policy of Japan to verify whether you need a visa or not.

JAPAN 🇯🇵

Language: Japanese
Capital City: Tokyo
Currency:  Japanese Yen (JPY)
Int’l Airports in this trip: NRT, CTS
Preferred mode of transportation: Subways / Trams
Time Zone: GMT +9

HOW I GOT TO JAPAN

Finding a cheap flight ticket to Japan from the Asia-Pacific region is easy breezy. In my case, I got my economy flight tickets from Cebu Pacific and Jetstar Airlines. Here were my flight itineraries with costs:

  • Manila (Philippines) – Tokyo (Japan) [$65.80]
  • Tokyo (Japan) – Sapporo (Japan) – Tokyo (Japan) [$89.30]
  • Tokyo (Japan) – Manila (Philippines) [$73.80]
  • Subtotal: $228.9

If you’re also coming from the Philippines (or wherever in the world actually), I suggest you check Trip as they usually offer cheap fare rates compared to other booking sites. Per my experience, they’re the best! Refer to Trip’s widget below.

HOW TO GET AROUND JAPAN?

  • Intercity Flight
    • Flying is the quickest way you can travel from one city to another (e.g., Tokyo to Sapporo). As mentioned above, you can book using Trip.com to get yourself the best flight deals available. Most economy flights are even cheaper than traveling by train!
  • Subways / Trains in Tokyo and Sapporo
    • Subways are the best way to get around big cities in Japan like Tokyo and Sapporo. But as I mentioned in my budget travel tips blog – “walk as much as you can!
  • Trams or Streetcars in Sapporo
    • Sapporo’s tram network is one of the city’s more unique transportation methods. With only about seven minutes between each streetcar, it is one of the fastest ways for you to get around some areas of town.
  • Other Transport Travel Tips
    • Buses are also one of the best transport services in Japan but aren’t really recommended for short-term visitors.
    • A prepaid Suica card is the BEST way to pay for transport which both can be used in Tokyo and Sapporo. You can buy a Suica card online at GoVoyagin.com for pickup at Narita or Haneda airport.
    • Your navigation would be much easier if you are using Google Maps. In Japan, it is very reliable and accurate. If you’re looking for travel directions, it will give you all different options and even how much it will cost for each option. You can either buy a sim card here or rent a pocket wifi here for pick-up at various airports

NOTE: I have only listed the transport services I used per my experience during my 7-day Japan itinerary travel.

WHERE DID I STAY IN JAPAN

You can book a room at any hotel in Japan through Agoda or Booking.com. I usually book my room accommodations through booking.com. Room accommodation ranges from cheap hostels to luxury hotels. Book hostels through booking.com as they have free cancellation or pay-at-the-hotel option.

If hotel isn’t to your liking, try AirBnb. Airbnbs are immersed in neighborhoods, condos, and townhomes. There is a feeling you get when you stay in an Airbnb that makes you feel like you belong in that city or town. Since it is someone’s home, there is a certain amount of pride you feel while staying there. I have used Airbnb on some of my other trips and I loved it!

If you’re new to AirBnB, then you can get up to 43 USD free travel credit by signing up via this link

Book AGODA here

Book BOOKING.com here

Get AIRBNB $43 free credit

My Room Accommodations:

  • Tokyo, Japan
    • Name (1): Hotel Owl Tokyo Nippori
    • Name (2): Hostel Waqwaq Tokyo
    • Room type: Bunk Bed in Mixed Dormitory Room
    • Cost: included the day-to-day expenses below
  • Sapporo, Japan
    • Name: Capsule Inn Sapporo
    • Room type: Capsule Room (for Male only)
    • Cost: included the day-to-day expenses below
Hotel Owl Tokyo Nippori
Hotel Owl Tokyo Nippori | Dantravels.org

MY 7-DAY JAPAN ITINERARY with EXPENSES

NOTE: I created a more detailed itinerary and guide of my trips to Tokyo and Sapporo, each has a separate blog but unfortunately has no cost breakdown. Click here for Tokyo and here for Sapporo.

DAY 0: NARITA AIRPORT TO DOWNTOWN TOKYO

Day 0: Train from Narita Airport to downtown Tokyo
Day 0: Train from Narita Airport to downtown Tokyo | Dantravels.org
  • JPY 3,300 – Sim Card
  • JPY 1,030 – Train: Narita station to Nipporo station (Keisei Main Line)
  • JPY 8,500 – Hostel (5-Night Stay)
  • Subtotal: JPY 12,830

DAY 1: TOKYO’S TAITO (ASAKUSA), SUMIDA, & ARAKAWA (NIPPORI)

Day 1: Tokyo Skytree viewed from Sumida Park
Day 1: Tokyo Skytree viewed from Sumida Park with the Kototoi Bridge | Dantravels.org
  • JPY 210 – Train: Nippori station to Tokyo Skytree station
  • JPY 170 – Train: Asakusa station to Minami Senju station
  • JPY 121 – Food: 7-11 Noodles (ahaha!)
  • JPY 160 – Train: Minami Senju station to Nippori station
  • Subtotal: JPY 661

NOTE: In my hostel in Tokyo, there is an available free water + juice drink dispenser. I normally carry a bottle filled with any of those drinks to keep me through the day. I also brought some Oreos from the Philippines so I don’t buy too much food in Tokyo.

Later in the afternoon, I grabbed a strolling map pamphlet (for Nippori area) at my hostel lounge. I really didn’t expect to see much in my hostel area at first but by following the recommended places in the pamphlet–there are a lot to see!

Day 1: Nippori-Yanaka strolling map
Day 1: Nippori-Yanaka strolling map | Dantravels.org

DAY 2: OFF TO YOKOHAMA, MT. FUJI & THEN TOKYO TOWER + SHIBUYA CROSSING

Day 2: The amazing Skyline of Yokohama City | Dantravels.org
  • JPY 550 – Train: Nippori station to Yokohama station
  • JPY 210 – Train: Nihon odori station to Yokohama station
  • JPY 260 – Train: Yokohama station to Yamato station
  • JPY 200 – Bus: Yamato to Tomei Yamato bus stop
  • JPY 1,050 – Bus: Tomei Yamato to Gotemba
  • JPY 240 – Food: Bread with Coffeemilk
  • JPY 84 – Food: Choco Bread
  • JPY 500 – Train: Gotemba station to Matsuda station
  • JPY 780 – Train: Shin-matsuda station to Shinjuku station
  • JPY 210 – Train: Shinjuku station to Shibuya station
  • JPY 280 – Train: Shibuya station to Akabanebashi station
  • JPY 280 – Train: Onarimon station to Nippori station
  • Subtotal: JPY 4,644

NOTE: Yokohama, a city south of Tokyo, is almost an hour train ride from Nippori, Tokyo. I even went further south to Gotemba to hopefully get a closer look of Mt. Fuji that day. But unfortunately, Mt. Fuji is covered by huge thick clouds and thus unseeable even from afar.

Later in the evening, my Japanese friend took me to the famous Shibuya crossing. While chillin’ at Shibuya’s Starbucks, we’ve witnessed tons of people crossing Shibuya in action. It’s unbelievable and surreal!

Day 1: My friend, Hayato, took me to the Tokyo Tower as well | Dantravels.org

DAY 3: TOKYO’S CHIYODA, SHIBUYA, & SHINJUKU

Day 3: Tokyo station building | Dantravels.org
  • JPY 160 – Train: Nippori station to Tokyo station
  • JPY 500 – Food: McDonald’s meal
  • JPY 200 – Train: Nijubashimae station to Harajuku station
  • JPY 396 – Food: KitKat Chocolate (pasalubong) at Takeshita St.
  • JPY 130 – Train: Sangubashi station to Shinjuku station
  • JPY 180 – Train: Shinjuku station to Tochomae station
  • JPY 180 – Train: Tochomae station to Shinjuku station
  • JPY 200 – Train: Shinjuku station to Nippori station
  • Subtotal: JPY 1,946

DAY 4: TOKYO’S KOTO (ODAIBA), TAITO (UENO)

Day 4: My college classmate, Jomark at Odaiba | Dantravels.org
  • JPY 320 – Food: Bento Box (breakfast)
  • JPY 200 – Train: Nippori station to Shinjuku station
  • JPY 200 – Train: Shinjuku station to Shinbashi station
  • JPY 320 – Train: Shinbashi station to Daiba station
  • JPY 160 – Train: Daiba station to Shinbashi (via Tokyo Station)
  • JPY 170 – Train: Shinbashi station to Shinjuku station
  • JPY 200 – Train: Shinjuku station to Nippori station
  • JPY 280 – Train: Nippori station to Ueno station
  • JPY 140 – Train: Ueno station to Nippori station
  • Subtotal: JPY 1,990

NOTE: In this day, I met my college classmate who works in Tokyo and he took me to Odaiba. He also took me for a lunch treat! =) There are even travel hacks he showed me where one can travel by train the cheapest!

Later in the evening, I met my Japanese friend again and he took me to Ueno Park where cherry blossoms (sakura) have started to show up as early as in February! We also took a stroll to Nezu shrine.

DAY 5: DOWNTOWN SAPPORO (ODORI PARK & TV TOWER)

Day 5: Sapporo Capsule Inn | Dantravels.org
  • JPY 1,240 – Train: Nippori station to Narita (via Sky Access)
  • JPY 1,030 – Bus: Airport to Sapporo downtown
  • JPY 500 – Food: Mcdonald’s Meal
  • JPY 5,000 – Hostel: Capsule type room (2-Night Stay)
  • JPY 230 – Food: McFlurry Oreo
  • JPY 500 – Food: McDonald’s Meal
  • Subtotal: JPY 8,500

DAY 6: SAPPORO’S CLOCK TOWER, FUSHIMI INARI SHRINE, & MT. MOIWA

Day 6: Inside Sapporo's tram | Dantravels.org
Day 6: Inside Sapporo’s tram | Dantravels.org
  • JPY 244 – Food: Bread and Coffee Milk
  • JPY 200 – Tram: Tanukikuji station to Ropeway Iriguchi station
  • JPY 200 – Tram: Ropeway Iriguchi station to Tanukikuji station
  • JPY 210 – Food: Bread and Coffee Milk
  • JPY 200 – Tram: Susukino station to Denshajigyoshomae station
  • JPY 200 – Tram: Denshanjigyosjomae station to Susukino station
  • Subtotal: JPY 1,254

DAY 7: REST, BACK TO TOKYO, & AKIHABARA

Day 7: Hostel Waqwaq in Ueno Asukusa | Dantravels.org
  • JPY 1,030 – Bus: Sapporo downtown to CTS Airport
  • JPY 278 – Food: Ramen cup noodles
  • JPY 213 – Food: Chocolates (pasalubong)
  • JPY 160 – Drink: Bottled Tea
  • JPY 1,240 – Train: Narita station to Ueno station (via Sky Access)
  • JPY 500 – Food: McDonald’s Meal
  • JPY 110 – Drink: Cofee Milk
  • JPY 210 – Train: Asakusa station to Akibahara station
  • JPY 140 – Train: Akibahara station to Ueno station
  • Subtotal: JPY 3,881

DAY 8 (LAST DAY): BACK TO MANILA

  • JPY 258 – Food: Bread and Coffeemilk
  • JPY 1,240 – Train: Ueno station to Narita station (via Sky Access)
  • Subtotal: JPY 1,498

And there you have it!

Including the flight costs, here is the overall total of my expenses in Japan for one week:

TOTAL: $228.9 (flights) + $338.97 (JPY 37,204 , daily costs)

TOTAL: $567.87

RECOMMENDED TOUR PACKAGES

I hope that you find this 7-DAY JAPAN ITINERARY with GUIDE + BUDGET blog useful!

If you have more days to spend in Japan, you might consider these cool package tours:

(you may choose one or more tours that may suit your travel needs.)

More Tours Here

BOOKING ESSENTIALS

  • Hotel / Hostel
    • Booking.com. I usually book my hostel accommodation at booking.com. Thus, I recommend you guys trying it as well for your Japan Itinerary. Room accommodation ranges from cheap hostels to luxury hotels. Book hostels through booking.com as they have free cancellation or pay-at-the-hotel option.
    • Airbnb. Try Airbnb in finding comfy and cozy rooms for your Japan itinerary! I have used Airbnb on some of my other trips and I loved it!

Have you tried Airbnb? Sign up with my link and you will get up to 43 USD (2,200 Php) off your first stay. Click this link to get that discount.

  • Flights
    • TRIP. All of my flight bookings are all from TRIP.com. Trip is one of the world’s leading travel search engines and searches hundreds of travel sites.

I suggest you check Trip (click HERE) as they usually offer cheap fare rates compared to other booking sites.

  • Other Package tours in Japan
    • Viator. Viator is the world’s leading resource for researching, finding, and booking the best travel experiences worldwide. Perfect for your Japan itinerary!

Click here to find the best Viator deals in Japan.

CHECK OUT ALSO MY YOUTUBE VIDEO ABOUT JAPAN!