Someone once told me that ‘traveling the world is a rite of passage every human being should take’. While I firmly agree with his statement, unfortunately, the access to this privilege is predetermined by which country we are born in and the passport we were given.
I was born in the Philippines, a third world country. With the power that my weak passport holds, I accepted the fact that I can’t just easily enter and hop-in country to country.
My Philippine passport is ranked 68th on the Passport Index with 36 countries visa-free, 39 visa-on-arrival and 123 countries visa required. In comparison to European passports which ranked 2-10 on the Passport Index. You can obviously see the difference.
For us Filipinos, one of the most important deciding factors when it comes to choosing an international travel destination is visa requirements. I’m sure you agree.
One of the visa-free countries for Filipinos is Peru | Dantravels.org
HOW AIRLINES CHECK VISA REQUIREMENTS
Have you ever wondered how the airline crews determine what documentation you need upon checking in for your international flight?
The moment you give them your passport and tell them your destination, a slew of questions are directed at you. They usually raised questions like:
Do you have a visa copy, sir?
Do you have an onward ticket, sir?
Do you have a return ticket, sir?
Did you know that you may be refused upon entry if you don’t have an onward or return ticket? It’s true and that’s why they asked. You’ll understand why in the additional information below.
But how do they know what to ask? With this question in mind, I did some research.
And it turns out, they have a software called TIMATIC. This tells them in detail the passport and visa requirements for different nationalities for entering a foreign country.
Why do they have this? Well, because if you are deported from a foreign country due to documentation issues, the airline that got you there will have to pay hefty penalties. So airlines are extra cautious about ensuring that you have everything you need to enter the country you are flying to.
Unfortunately for us, travelers, TIMATIC is not available in the public domain. TIMATIC is proprietary software of the International Air Travel Association (IATA) and is a paid subscription service used by Airlines and Travel Agents.
WEBSITES TO CHECK IF YOU NEED A VISA
I have started my first foreign trip in 2015 in Southeast Asia. Fast forward to 2019, I was fortunate enough to visit 30 countries (and counting) including Australia, Russia, and as far as Peru in South America.
A lot of people are asking ‘Daniel, how do you check if you need a visa to enter this specific country?‘ ‘Do you need a transit visa during your layover or connecting flight?‘
True enough–if you add stuff like layovers and transit visas to the equation, your mind will probably start exploding.
That’s why IATA Travel Center and Emirate’s Before You Fly are there as my reliable website source. The sites tell me in detail what are the visa regulations applicable to Filipinos and for any other citizens in the world, actually.
1. IATA TRAVEL CENTER
The IATA travel center is a tool by IATA (the same guys who own TIMATIC) that will tell you everything you need to know about your passport and visa requirements for your international trip.
To my knowledge, this is the most accurate public database there is with respect to Visa Regulations. Many Travel Agents too use this to help their clients.
The only thing I don’t like about this tool is that it asks too much information–from the exact arrival date to the name of your airline carrier. Thus, it takes a lot of time even in filling up information.
2. BEFORE YOU FLY (BY EMIRATES)
Before You Fly by Emirates is my favorite tool in checking my visa requirements. Emirates is one of the world-renowned airline carriers, so you can count on Emirate’s Before You Fly as your trusted, centralized source for the latest international travel requirements.
Not only that it is simple and easy to use, but the result information it provides is also as detailed as that of IATA Travel Center.
LET’S GET THEM BOTH TO WORK!
Let’s say I am a Philippine passport holder traveling to New Zealand (in Auckland) with a connecting flight in Australia (in Sydney.) Refer to the ticket itinerary details below taken from Kayak.
Ticket itinerary sample MNL – SYD – AKL | Dantravels.org
IATA Travel Center
Go to their website and fill out your travel information accordingly.
Once done, tick the ‘I agree’ box and click the next page.
Add your personal information this time.
Type in the Captcha code and click the next page.
Then voila! You now have the result.
RESULTS: 1 – A visa is required in New Zealand 2 – A visa (transit) is also required even just connecting to Sydney, Australia
Please make sure to NOT ignore additional notes on the results especially the “Warning” and “Visa Exemptions”. When I was planning my trip to Georgia, I found out from Before You Fly site that having a valid US Visa exempts me from getting a Georgian eVisa.
In addition, I have also learned that I could be denied upon entry if I don’t have an onward ticket prior to checking-in to my flight to Georgia.
Here are the exact words from the Georgian visa results page:
“Visa Exemptions: Passengers with a visa issued by an EEA Member State , Bahrain, Bermuda, Canada, Cayman Isl., Falkland Isl. (Malvinas), Gibraltar, Israel, Japan, Korea (Rep.), Kuwait, New Zealand, Oman, Qatar, Saudi Arabia, Switzerland, Turks and Caicos Isl., USA, United Arab Emirates or Virgin Isl. (British) for a maximum stay of 90 days.”
“Warning: Visitors not holding return/onward tickets could be refused entry.”
To me, this information is a total relief!
MY FINAL SAY
If it is your dream to travel the world but has a third world passport, don’t fret. I’m sure there are other visa-free countries out there that you haven’t visited yet. You should first prioritize them. It is also your chance to build up your travel history. This is what I did to get my US tourist visa which is known as a difficult one to get.
And at the end of the day, we still should be grateful for what we have. Right?
I hope that I have made your travels easier by using these tips and tools on how to check if you need a visa, may they be transit or entry visa concerns. So next time you want to know visa requirements for your next trip, you can get it right from the horse’s mouth.
These tools should give you the comfort and confidence that you have taken care of all your documentation before you board the flight.
So quench your travel thirst and don’t forget to get that CHEAP plane tickets only at Kayak!
This post may contain affiliate links which means if you purchase something through that link, I will make a small commission at no additional cost to you. Think of it as buying a cup of coffee for me on someone else. Thanks & enjoy!
Visiting the Great Pyramids in Egypt is definitely one of my travel goals this year. That’s why as early as January, I have already been researching on how to get the Egypt tourist visa for Filipinos. And I successfully managed to get one at the Egyptian Embassy in Manila, Philippines!
In this blog post, I’ll be giving you the step-by-step guide, a list of the requirements, my experience throughout the whole application process, and other tips to help you get your Egypt tourist visa!
But again, just like in other visa application blogs I’ve written, no one can give you the guarantee of your Egyptian tourist visa’s approval – not me, not even a lawyer or a travel agent. If anyone does, is most likely a scammer!
As a travel blogger, what I can offer you here is just a guide with helpful tips to increase your chances of getting that Egypt tourist visa.
Anyway, enough of that and let’s get started!
REQUIREMENTS FOR EGYPT TOURIST VISA
Duly filled-up Visa Application Form; You can download the application form here. (Note: This is the universal form accepted by the Manila Embassy).
Two (2) pieces 2×2 size recent colored picture (with white background); I actually used only one (1) 2×2 photo which was pasted on my application form. But it wouldn’t hurt if you bring an extra photo.
Valid Passport which must have remaining validity of more than six months; You might not be required to submit your passport on the day of your first visit to the Embassy. Most of the time, the Embassy will take and review your requirements without your passport. The review might take up to 15 days and the Embassy will let you know its decision via phone call.
Bank Certificate, preferred to be one-week-old;
Employment Certificate with compensation / Business Registration if applicable; I’ll be honest. I actually did not exactly provide this because I quit my job to travel long term. Thus, I provided an Employment certificate from the previous company I worked for.
Travel Tour Itinerary; I can provide you a copy of mine if you like. It is a one-week long tour itinerary. Just leave a reply on the comment section below.
Copy of Philippine residency/ visa / Immigration ID Card (for foreign national applicants only).
Marriage Certificate / Birth Certificate, if traveling with family members.
Add a cover letter stating the purpose of your trip even if it’s not a requirement I think this should be a must especially if you have a case like mine that one requirement is not fully met. Thus, I prepared myself a visa cover letter personally explaining my situation, my capacities, and my hunger to travel.
Plane Tickets. This is NOT required but I submitted this anyway because I already have this. I had a plane ticket from Manila to Dubai and I intend to book my next flight from Dubai to Cairo (in Egypt) if my visa is approved. I suggest you check Kayak (use the widget below) as they usually offer cheap fare rates compared to other booking sites.
WHEN AND WHERE TO APPLY
WHEN: Application should be made at least one month prior to your intended departure. Please note that there is a waiting time (up to 15 days) in case the embassy needs to fully review the requirements you submitted.
💡 DAN’S PRO-TIP: CHECKING YOUR STATUS If you haven’t heard back after 10 working days, don’t hesitate to send a polite follow-up email to embassy.manila@mfa.gov.eg. Include your Full Name and Submission Date in the subject line to help the secretary find your records quickly!
📅 HOLIDAY NOTICE: The Embassy observes both Philippine and Egyptian holidays. If you are applying around this time, expect potential closures and factor in extra processing days!
WHERE: Visa application must be submitted personally to the Embassy during consular working hours from Monday – Wednesday from 9:00 A.M. till 12:00 P.M. except holidays. Please take note of the Egyptian holidays, too.
Prepare ALL the abovementioned requirements. Proceed to the Embassy of the Arab Republic of Egypt in the Philippines at 7th Floor, G.C Corporate Plaza Bldg., 150 Legaspi St., Legaspi Village, Makati City to submit these documents.
STEP 2: WAIT FOR THE EMBASSY’S CALL
Once submitted, wait for the call with the Embassy’s decision. If your visa is approved, then they will contact you to submit your passport (for the visa sticker) and payment.
You can also do a follow up by calling their contact number I indicated above. No worries, the Filipino Secretary (I think her name is Marian) is very accommodating and friendly.
💡 HOW TO GET “INSTANT” APPROVAL: While the standard wait is 15 days, I managed to get mine the same day! The secret? A rock-solid cover letter explaining my travel history and status as a digital nomad. It pays to be honest and detailed!
STEP 3. SUBMIT YOUR PASSPORT & PAY THE VISA FEE
What I like about this Embassy is they do not charge the visa processing fee unless and until your visa is approved. Yes, you heard it right! There is absolutely no risk in getting this visa! If your visa is approved, submit your passport and pay the visa fee.
The Egypt tourist visa fee costs 1,500 PHP. Then, the Secretary will give your receipt with date of when to claim your passport with visa.
⚠️ IMPORTANT UPDATE (2026): According to recent traveler reports, the Egypt tourist visa fee at the Manila Embassy has increased from 1,500 PHP to approximately 4,000 PHP. It is highly recommended to bring extra cash to your appointment as fees are subject to change without prior notice.
STEP 4. CLAIM YOUR PASSPORT WITH VISA STICKER
Finally, pick up your passport with visa sticker and congratulations on successfully getting your Egypt tourist visa!
My Egypt Tourist Visa
VISA SUMMARY
Type: Tourist Visa
Visa Validity: 6 months from the day of approval
Maximum Stay: 30 days within validity
No. of Entry: Single Entry
Visa Fee: 1,500 PHP (30 USD)
Visa Fee: 1,500 PHP (30 USD)
UPDATE (2026): The fee is now around 4,000 PHP
MY EXPERIENCE
When I arrived at the Embassy at around 10:00 AM, there were already 6 to 8 people in the waiting room. Some of them are still filling up the visa application form.
From that, I can tell that the Egyptian Embassy is informal and chill. You just need to turn off your mobile phone before entering the office.
Remember: Prior to entering the building, your bags will be checked and will require you to leave one government valid ID at the lobby, so bring one!
The Secretary then collected our documents and left the room. She probably handed it over to the Egyptian Consul (in another room) to review the documents.
She went back to the waiting room and announced those people who can now pay the visa fee. Please note that if you pay the visa fee, it means your visa is approved.
I was lucky that steps 1-3 all happened in one day! So I submitted my passport and paid the visa fee, all in 30 minutes! I saved one Makati trip. I met other applicants in the room who has to go and wait up to 15 days for approval and went back to the Embassy 3 times.
They did not tell me the reason why my visa was approved instantly, but I have a strong feeling it has to do with my travel history, capacity to travel, and my very personalized cover letter. I even mentioned in my cover letter about quitting my day job just to travel long term. As they say, honesty is the best policy =)
NOTE that I applied Monday and claimed my passport (with visa) Friday of the same week. So it only took four (days)! I was just so happy to save the step where you have to wait up to 15 days for the Embassy’s decision.
Now that your visa is (hopefully) on its way, here are a few essentials I recommend packing for your Egyptian adventure:
🇪🇬 QUICK EGYPT PACKING LIST: • Modest Clothing: Respectful attire (covering shoulders and knees) for visiting mosques and local areas. • Sun Protection: A wide-brimmed hat, high-SPF sunscreen, and quality sunglasses—the desert sun is no joke! • Universal Power Adapter: Egypt uses Type C and Type E wall plugs. • Comfortable Walking Shoes: You’ll be doing a lot of walking around the Giza plateau and ancient temples!
RECOMMENDED PACKAGE TOURS
In case you’re also looking for package tours to justify your tourism activity in Egypt for visa purposes, I highly recommend booking tours through Viator which is perfect for your Egypt itinerary. See tours and packages I personally handpicked for you:
This post may contain affiliate links which means if you purchase something through that link, I will make a small commission at no additional cost to you. Think of it as buying a cup of coffee for me on someone else. Thanks & enjoy!
I visited Kyrgyzstan in October 2019 and managed to get my Kyrgyzstan visa on arrival with no issues at Manas International Airport (in Bishkek). The beautiful and hospitable Central Asian country has been growing in popularity for tourists, and the government has made the visa on arrival so simple so more people can visit the country. So without further ado, here is my guide on how to get a visa on arrival for Kyrgyzstan.
Hi there! First of all, I am Daniel–a solo backpacker from the Philippines. If you don’t know my story yet, feel free to read this article where I talked about how I quit my job in order to travel. This article was also featured on TripZilla Philippines.
Ala-Archa National Park in Kyrgyzstan | Dantravels.org
DO YOU NEED A VISA TO VISIT KYRGYZSTAN?
First things first, do you need a visa to visit Kyrgyzstan? Well, depending on your nationality, you may or may not need a visa. See the information below which category you fall in.
Free-Visa Countries
Holders of passports issued by the following 69 nations are not required to obtain a visa for Kyrgyzstan up to the length of stay mentioned below:
A. Indefinite stay: Armenia, Azerbaijan, Belarus, Cuba, Georgia, Kazakhstan, Moldova, North Korea, Russia, Tajikistan
B. 90 days: Mongolia, Serbia, Ukraine
C. 60 days: European Union citizens (except Bulgaria, Cyprus, and Romania), Andorra, Argentina, Australia, Bahrain, Bosnia and Herzegovina, Brazil, Brunei, Canada, Chile, Iceland, Japan, Kuwait, Liechtenstein, Monaco, Montenegro, New Zealand, Norway, Oman, Qatar, San Marino, Saudi Arabia, Singapore, South Korea, Switzerland, United Arab Emirates, United States, Uzbekistan, Vatican City
D. 30 days: Malaysia, Turkey
Visa on arrival
Citizens of the following countries and territories are eligible to obtain a visa on arrival valid for a maximum stay of 30 days at Manas International Airport:
Albania, Andorra, Argentina, Brazil, Bulgaria, Chile, Cyprus, Indonesia, Israel, Mexico, Montenegro, North Macedonia, Oman, Philippines, Romania, San Marino, South Africa, Thailand, Venezuela
Citizens of the following countries and territories are eligible to obtain a visa on arrival valid for stays longer than 60 days at Manas International Airport:
European Union citizens (except for Cyprus, Bulgaria, and Romania), Australia, Bahrain, Bosnia and Herzegovina, Brunei, Canada, Iceland, Kuwait, Liechtenstein, Monaco, New Zealand, Norway, Qatar, Saudi Arabia, Singapore, South Korea, Switzerland, United Arab Emirates, United States, Uzbekistan, Vatican City
eVisa
From 1 September 2017, citizens of all countries and territories may apply for tourism, business and group tourist types of visas for 30 or 90 days online through the eVisa system.
As a Philippine passport holder, I am both eligible of Kyrgyzstan e-Visa and Visa on arrival.
However, with my recent rejection of Armenian e-Visa (but had no problem getting approved for Armenian visa-on-arrival), I went for Kyrgyzstan visa-on-arrival without a second thought. Please note that Kyrgyzstan visa-on-arrival is ONLY obtainable at Manas International Airport (in Bishkek). In my case I had to fly from Almaty airport, Kazakhstan to Bishkek airport, Kyrgyzstan.
WHAT YOU NEED TO GET A KYRGYZ VISA ON ARRIVAL (AT MANAS AIRPORT)
There are two things you need to prepare in order to successfully apply for a visa on arrival at Manas International Airport:
Cash. I had 100 USD with me.
Take note that they DON’T accept payment by debit or credit cards but only by cash in either USD or KGS. Plus, there are no ATMs within the airside of the airport. So you better bring some cash!
The cost depends on whether it’s a single or multiple entry visa or one-month or three-month valid. I paid 50 USD for a single-entry, one-month valid visa.
Confirmed hotel booking. I have only booked my first-night stay in a cheap hostel I found on Booking.com.
You will need this information (such as your hostel’s address and its contact number) to fill up the visa form. So make sure you have it prepared.
You can book a room at any hotel in Bishkek through Agoda or Booking.com. I usually book my room accommodations through booking.com. Room accommodation ranges from cheap hostels to luxury hotels. Book hostels through booking.com as they have free cancellation or pay-at-the-hotel option.
GET YOUR KYRGYZSTAN VISA ON ARRIVAL IN 4 EASY STEPS
STEP 1: GO TO THE VISA COUNTER
Once you get off the flight, you will walk down the hallway and come across the visa section office directly in front of you in the main hall, it is on the left side. On the right side is the immigration or passport control gate, so make sure you process your visa first before lining up there.
Kyrgyz visa counter is on the left side | Dantravels.orgKyrgyz visa window at Manas International Airport | Dantravels.org
STEP 2: FILL UP THE FORM
Ask the personnel for VOA (visa-on-arrival) and he/she will hand you a form to complete basic information, mostly about your personal details and your room accommodation in Kyrgyzstan.
The Kyrgyz visa application form | Dantravels.org
STEP 3: PAY THE VISA FEE
Once you have the form filled up, just give it to the visa officer together with your passport. You will be asked what type of visa you’re applying for whether it’s a tourist visa or single-entry vs. multiple-entry or one-month vs 3-month valid. The amount of the visa fee you’ll be paying will depend on them.
Then pay your visa fee accordingly. I paid 50 USD for a tourist visa, single-entry, and valid for a month.
My 50-dollar bill payment | Dantravels.org
STEP 4: GET YOUR PASSPORT WITH VISA STICKER!
Then you’ll have to wait for about 5-10 minutes. Once your name is called, you’re basically done. Get your receipt and pick up your passport with its Kyrgyz visa sticker! Then, you can now proceed and line into immigration.
NOTE: It only took me 15 minutes to finish the whole visa process, I guess it depends on how many people are on queue. During my application, there were only two of us applying.
My Kyrgyztan visa sticker on my Philippine passport | Dantravels.org
SUMMARY:
Visa Type: Tourist Visa
Visa Validity: 30 Days
Visa Fee: USD 50.00
Now you’re ready to go and explore Kyrgyzstan. I’m sure you’ll love it as much as I did! If you have any additional questions, don’t hesitate to post your comment below!
RECOMMENDED PACKAGE TOURS
I hope that you find this HOW TO GET A KYRGYZSTAN VISA ON ARRIVAL (TOURIST VISA GUIDE) blog useful! I highly recommend booking tours through Viator:
This post may contain affiliate links which means if you purchase something through that link, I will make a small commission at no additional cost to you. Think of it as buying a cup of coffee for me on someone else. Thanks & enjoy!
I visited Iran in September 2019 and managed to get my Iran visa on arrival with no issues at Imam Khomeini International Airport (in Tehran). The beautiful and hospitable Middle Eastern country has been growing in popularity for tourists, and the government is making it simpler for people to visit. Here is my guide on how to get a visa on arrival for Iran.
Holders of normal passports traveling as tourists can obtain a visa on arrival for a maximum stay of 30 days (extendable) at major international airports. Note: As of 2026, eligibility is subject to the latest MFA regulations, and most nationalities (including the Philippines) remain eligible for VOA.
Bandar Abbas International Airport
Isfahan International Airport
Kish International Airport
Mashhad International Airport
Qeshm International Airport
Shiraz International Airport
Tabriz International Airport
Imam Khomeini International Airport (Tehran)
Mehrabad International Airport (Tehran)
Visa Policy Map in Iran | Wikipedia.org
IMPORTANT RESTRICTIONS
Visa on arrival is NOT applicable to nationals of the following countries, who must obtain a visa in advance:
Afghanistan, Bangladesh, Canada, Colombia, Iraq, Jordan, Pakistan, Somalia, UK, and USA.
Escort Requirement: UK, Canadian, and US citizens are required to be escorted by a government-approved guide at all times. Independent travel for these citizens is not permitted.
Israel: Citizens of Israel are banned from entry. Passports containing Israeli stamps (issued within the last year) will result in denied entry.
WHAT YOU NEED FOR AN IRAN VOA (TEHRAN)
Have these items printed rather than just on your phone:
Onward Transport: A confirmed flight ticket out of Iran. Airlines at your departure point (like Oman Air) often check this before boarding.
Accommodation: A confirmed booking for at least your first night. I recommend HostelWorld for Iran, as Booking.com and Agoda often don’t list Iranian properties.
Travel Insurance: Must explicitly mention coverage for “Iran.” If yours doesn’t, you can buy it at the airport for approximately 15-20 EUR.
No Stamping Policy: To ease concerns about US sanctions, Iran no longer stamps passports or affixes physical stickers. Your visa is handled digitally/electronically.
GET YOUR IRAN VISA IN 5 EASY STEPS
STEP 1: GO TO THE VISA SECTION
After landing, head to the “Visa Section” before immigration. Tip: Women must wear a headscarf upon exiting the plane, and long pants are preferred for all genders.
STEP 2: PURCHASE INSURANCE
If you don’t have a printed insurance policy that mentions Iran, buy one at the counter. As of 2026, the fee is roughly 18-20 Euro.
STEP 3: FILL OUT THE FORM
Complete the basic info (Address in Iran, occupation, etc.). Pro-tip: If you are a blogger, consider listing your formal profession (like Engineer) to avoid unnecessary questions.
STEP 4: PAY THE FEE
Pay the fee in Cash (Euros or USD). For Philippine passport holders, the fee is approximately 65 USD (inclusive of bank commission). Remember: Foreign debit/credit cards do not work in Iran.
STEP 5: WAIT FOR YOUR NAME
Wait 20-30 minutes for processing. Once called, you will receive your passport back. Since there is no stamp, you can proceed directly to immigration.
This post may contain affiliate links which means if you purchase something through that link, I will make a small commission at no additional cost to you. Think of it as buying a cup of coffee for me on someone else. Thanks & enjoy!
If you’re planning to visit Sri Lanka and looking for a guide on how to apply for a Sri Lanka e-Visa or e-Tourist Visa, then you’re in the right place. With Sri Lanka’s tropical climate, sandy beaches and scenic train rides, I’m sure no one can say no in skipping this beautiful South Asian country on their travel bucket list!
Kandy to Ella Train: The Most Scenic Train Ride in Sri Lanka
WAYS IN OBTAINING SRI LANKA’S TOURIST VISA
Apply e-Visa / ETA online – This is the online visa application process that I’ll be discussing on this blog. Moreover, visitors are STRONGLY urged to use the online system to avoid lengthy delays at the port of entry. e-Visa costs USD 35(please see update below). An application can be done either as an individual or as a group.
Get Visa on Arrival/VOA – Visitors with tourism purposes may visit Sri Lanka with a Visa on Arrival for up to 30 days. There is a counter at Bandaranaike International Airport (CMB) for people who arrive without a visa, although you’ll have to wait with the other visa-less masses which can take several hours and then pay a higher fee: USD 40(please see update below).
You can also obtain visas at Sri Lankan embassies abroad. This is not very convenient though.
NOTE: If you’re a citizen from these 21 countries*, unfortunately, you’re not eligible to get an e-VISA or VOA but instead are required visa in advance from one of Sri Lankan diplomatic missions.
*Afghanistan; Cameroon; Republic of the Congo; Democratic Republic of the Congo; Cote d’Ivoire; Gabon; Ghana; Guinea; Guinea-Bissau; Kenya; Liberia; Mali; Myanmar; Nigeria; North Korea; Sierra Leone; Sudan; Syria; Uganda.
UPDATE as of July 31, 2019: Tourism Minister John Amaratunga says tourists or those visiting for business purposes could get their FREE visa on arrival or by applying online. The measure will be effective for six months, starting August 1, 2019.
WHAT IS SRI LANKAN EVISA?
e-Visa, also known as Electronic Travel Authorization (ETA), is an official authorization for a Short Visit to Sri Lanka and is issued electronically. The ETA is introduced with the intention of providing an efficient, reliable and simplified service to those who visit Sri Lanka. ETA holders will be issued a 30 day Short Visit visa at the port of entry in Sri Lanka. The ETA has taken effect since January 1, 2012.
NOTE: If you’re a citizen of Maldives, Seychelles, and Singapore, you do NOT need a visa to enter Sri Lanka (per basis of reciprocity). How lucky!
But don’t you worry! Getting an e-Visa is not that complicated. I received my ETA document attached via email on the same day I applied! The process is fast, simple and straightforward.
But again, just like in other visa application blogs I’ve written, no one can give you the guarantee of your Sri Lankan e-Visa’s approval – not me, not even a lawyer or a travel agent. If anyone does, is most likely a scammer.
As a travel blogger, what I can offer you here is just a guide with helpful tips to increase your chances of getting that e-Visa. =)
GET YOUR SRI LANKA E-VISA IN 4 EASY STEPS
STEP 1: GET YOUR ROOM ACCOMMODATION READY
When filling up the application form online, you need to indicate your Address in Sri Lanka under the “Contact Details” section. if you’re not visiting a family or friend, fill it in with the address of your hostel/hotel.
Contact Details section from Sri Lanka’s e-visa website | Dantravels.org
You can book a room at any Sri Lanka hotel through Agoda or Booking.com.
I usually book my room accommodations through booking.com. Room accommodation ranges from cheap hostels to luxury hotels. Book hostels through booking.com as they have free cancellation or pay-at-the-hotel option.
Use my link to book your hostel and you’ll get 10% of your booking back after your stay. Click this link to get that discount.
If hotel isn’t to your liking, try AirBnb. Airbnbs are immersed in neighborhoods, condos, and townhomes. There is a feeling you get when you stay in an Airbnb that makes you feel like you belong in that city or town.
Since it is someone’s home, there is a certain amount of pride you feel while staying there. I have used Airbnb on some of my other trips and I loved it!
If you’re new to AirBnB, then you can get up to 42 USD free travel credit by signing up via this link.
STEP 2: APPLY AT SRI LANKA’S e-VISA WEBSITE
For you to be able to facilitate your application ONLINE, just follow the through the below steps:
Go to www.eta.gov.lk and select your preferred language (English for me!)
Click the “Apply” tab and under “Submission of ETA application by the applicant”, click the “Apply” link.
If you are applying as a group, there is an appropriate link for that in the next section below it.
From Sri Lanka’s e-visa website | Dantravels.org
Then it will lead you to the terms and conditions page, just choose “I Agree”.
Under Tourist ETA section, select the option that applies to you. Since I was applying as an individual, I clicked on “Apply for an Individual”.
From Sri Lanka’s e-visa website | Dantravels.org
Complete the requested information under sections:
Applicant Information;
Child information in parent’s passport (if applicable);
Travel Information;
Contact Details – Add here your hotel name and its address from Step 1.
Declaration
Then confirm that the information you provided are correct before click the “next” button.
From Sri Lanka’s e-visa website | Dantravels.org
4. On the next page – Review your information. Make sure your email is correct since your ETA will be sent to you via email. Then confirm to proceed with your payment.
From Sri Lanka’s e-visa website | Dantravels.org
REMEMBER: Once you proceed, you can NO longer change any of the information, so make sure you’ve got everything right.
STEP 3. PAY THE VISA FEE
You will then be directed to the next page to provide your payment.
Pay the relevant ETA processing fee using your electronic payment cards (credit card/e-commerce enabled debit cards) and submit the application. Only Visa, Master and American Express Cards are accepted.
NOTE: Payment is non-refundable & non-transferable.
UPDATE as of July 31, 2019: Tourism Minister John Amaratunga says tourists or those visiting for business purposes could get their FREE visa on arrival or by applying online. The measure will be effective for six months, starting August 1, 2019. This is Sri Lanka’s latest effort to revive the island nation’s lucrative tourism industry, which was badly hit by the Easter bomb attacks.
I submitted my e-visa application on Aug 1, 2019 and thus, I did not pay anything. It’s totally FREE!
Acknowledgment page from Sri Lanka’s e-visa website | Dantravels.org
The acknowledgment page prompts you with notification – “Your ETA application to visit Sri Lanka has been received. You will receive a response to your application within 24 hours.“
However, there was no confirmation email that your application has been received so just be patient for the next 24 hours.
STEP 4. WAIT FOR THE RESULTS OF YOUR APPLICATION
After you completed the whole online application process, you just have to wait for the result of your e-Visa application.
In my case, I submitted my application at around 8:30 AM (GMT+8) and then I received an email at around 2:40 PM (GMT+8), the same day, that my e-Visa application status is APPROVED!
Once approved, print out your e-visa approval confirmation. Upon arrival, it is advisable for you to bring a copy of the ETA approval notice along with you.
My e-Visa / ETA notice sent via email | Dantravels.org
See how easy it is to apply for Sri Lanka e-Visa? I hope this blog helps you in any way. If you have any questions, feel free to leave a reply in the comment section below. I’ll reply as soon as I can.
With all that said, I wish you all the best on your Sri Lanka e-Visa application!
SUMMARY:
Visa Type: ETA / e-Visa
Visa Validity: 30 Days from your initial arrival
Entry type: Double Entry
Visa Fee: FREE
BOOKING ESSENTIALS
Hotel / Hostel
Booking.com. I usually book my hostel accommodation at booking.com. Thus, I recommend you guys trying it as well. Room accommodation ranges from cheap hostels to luxury hotels. Book hostels through booking.com as they have free cancellation or pay-at-the-hotel option.
Use my link to book your hostel and you’ll get 10% of your booking back after your stay. Click this link to get that discount.
Airbnb. Try Airbnb in finding comfy and cozy rooms! I have used Airbnb on some of my other trips and I loved it!
Have you tried Airbnb? Sign up with my link and you will get up to 42 USD (2,200 Php) off your first stay. Click this link to get that discount.
Flights
KAYAK. All of my flight bookings are all from KAYAK. Kayak is one of the world’s leading travel search engines and searches hundreds of travel sites.
I suggest you check Kayak (click HERE) as they usually offer cheap fare rates compared to other booking sites.
Travel Insurance
World Nomads. If you don’t have travel insurance when times get tough, basically you are screwed. Traveling always comes with inherent risks attached. Whether you are trekking in the Nepalese mountains or wandering the streets of Colombo, unforeseen events can suddenly upend your world.
Generally speaking, travel insurance covers you for the following:
Medical Costs – hospital visits, emergencies, evacuations;
Property Loss – luggage and their contents;
Travel Issues – accommodation and transportation expenses.
Thus, I highly recommend you guys getting a travel insurance. I bought one from the World Nomads (available in 130+ countries) where most travelers get their travel insurances.
Go to this link to get to your World Nomads travel insurance.
This post may contain affiliate links which means if you purchase something through that link, I will make a small commission at no additional cost to you. Think of it as buying a cup of coffee for me on someone else. Thanks & enjoy!
Get your US Tourist B1/B2 Visa ready because you’re going to see what the United States has to offer! Though I understand US visa is probably one of the hardest visas in the world to get but it is all worth it. In this post, I’ll be giving you a step-by-step guide, a list of the requirements, my experience throughout the whole application process, interview questions, and other tips to help you get your US tourist visa!
Photo by Patrick Tomasso on Unsplash | Dantravels.org
But again, just like in other visa application blogs I’ve written, no one can give you the guarantee of your US tourist visa’s approval – not me, not even a lawyer or a travel agent. If anyone does, is most likely a scammer!
I know you must have heard tons of horror stories from people regarding their denied US visa applications. Because of the huge number of Filipino illegal immigrants, the US Government is very strict about its immigration laws.
It’s alright to feel nervous. I was nervous, too! But for now, let’s set aside those negative thoughts. Let’s be positive so that that positive energy will radiate to the people around you.. even to the interviewer! =)
Anyway, enough of that and let’s get started!
US VISA B1/B2 FOR TOURISTS
The B1/B2 visitors visa is for people traveling to the United States temporarily for business (B1) or for pleasure or medical treatment (B2)
B1 visa is for attending business conventions and educational conferences
B2 visa is for tourism, visiting friends or relatives, medical treatment
To be granted a US tourist visa, you must be able to prove that:
your visit is only temporary
you have enough money to cover all your expenses during your stay
you have binding ties that ensure your return to your country
WHEN AND WHERE TO APPLY
WHEN: Application shall be made at least 2 months prior to your intended departure. But since I was on a hurry, I did it all in a month! =) Here is my application timeline:
Day 1: Read Blogs
Day 5: Book Hostel Accommodations (I need this information prior to submitting the Application form online).
Day 6: Get myself an ID picture both digital and hardcopy
Day 8: Pay for the Visa Fee
Day 9: Submit Application Form Online (I am rushing, I know!)
Day 9: Schedule Interview Appointment. Note that I chose the earliest available date which is 21 days away!
Day 30: Day of Interview. On this day, you’ll immediately know whether you’re approved or not.
WHERE: Application and personal appearance interview will take place at the U.S. Embassy in the Philippines at 1201 Roxas Boulevard Manila, Philippines 1000. Please be at the Embassy gate 30 minutes prior to your interview
GET YOUR US TOURIST VISA IN 5 EASY STEPS
STEP 1: PAY THE VISA FEE
There are 2 ways to pay US Visa Application Fee:
Online via BPI website or Bancnet website
Directly at the BPI Bank Branches
In my case, I chose to pay it directly to the BPI Bank Branches.
Go to the visa info page of the US Embassy website. As of April 2019, the visa fee is USD160. This is the costliest visa fee I’ve ever paid!
Then go to this page. Download and print your $160-deposit slip. Or click HERE to download directly the slip.
US Tourist Visa Cash at Bank Payment Option | Dantravels.org
NOTE: There is an expiration date on the deposit slip. Ensure that you pay it before it expires!
US Tourist Visa Bank Deposit Slip | Dantravels.org
NOTE: Visa Fee are non-refundable & non-transferable. After you have paid the visa application fee, keep the BANK receipt for your records. It cannot be replaced if it is lost. You will not be able to schedule an appointment without your receipt number.
STEP 2: FILL UP THE VISA APPLICATION (DS-160) FORM
If you are a solo backpacker like me, you need to book first your room accommodation. You will need this information to answer the form of where you’ll be staying.
TIP: I usually book my hostel accommodation at booking.com. Thus, I recommend you guys trying it as well. Room accommodation ranges from cheap hostels to luxury hotels. Book hostels through booking.com as they have free cancellation or pay-at-the-hotel option.
Use my link to book your hostel and you’ll get 10% of your booking back after your stay. Click this link to get that discount.
Or try Airbnb in finding comfy and cozy rooms! I have used Airbnb on some of my other trips and I loved it!
Have you tried Airbnb? Sign up with my link and you will get up to 42 USD (2,200 Php) off your first stay. Click this link to get that discount.
To start filling up your own form, click this link (DS-160 Form). You can access a DS-160 form sample in this link as your reference.
NOTE: Prepare also your 2″x2″ digital photo. This will be uploaded on your application form.
US Tourist Visa DS-160 Form | Dantravels.org
TIP: Be brutally honest when filling up the application form. The interviewer will base his/her questions on your filled up form. So when he/she caught you lying from something that you wrote in the form, you’re dead! =(
The confirmation number generated after filling up the form is needed to set up appointment. Shown below is my confirmation page, please print this as you’ll be needing this during the day of your appointment.
Confirmation Page | Dantravels.org
STEP 3. SCHEDULE APPOINTMENT
After making payment (step 1) and completing the DS-160 Form (step 2), you can now schedule your appointment. Prepare these 3 info: Passport Number, Paid Receipt Number, and Confirmation Number. Go to this SITE to schedule your appointment.
US Visa Appointment Site | Dantravels.org
Once done, save and print you appointment letter. The appointment letter should look like this – see below.
STEP 4. PREPARE OTHER SUPPORTING DOCUMENTS
Once you’re done setting up your appointment online and while waiting for your appointment day, you need to prepare supporting documents. In order to support your answer during the interview, the interviewer will most likely ask for proof of documents. Here are the set of documents I’ve prepared:
Old Passport – To prove your travel history. Your travel history will most likely be asked during your interview like ‘Have you traveled before?, Where and When?’.
Hostel Booking – I usually book my hostel accommodation at booking.com. They have free cancellation options.
Have you tried Airbnb? Sign up with my link and you will get up to 42 USD (2,200 PHP) off your first stay. Click this link to get that discount.
Itinerary of planned tourism activities
I can provide you a copy of mine if you like. Just leave a reply on the comment section below.
Latest Income Tax Return (ITR), Certificate of Employment, Payslips, Bank Passbook / Bank Certificate.
Travel Insurance – I highly recommend getting travel insurance from World Nomads.
STEP 5: GO TO THE EMBASSY AND KILL THE INTERVIEW!
Visit the U.S. Embassy on the date and time of your interview. Bring a printed copy of your Appointment confirmation, DS-160 confirmation page, One recent 2″x2″ photo ID, and all passports. NOTE: Applications without all of these items will not be accepted.
There are also things NOT allowed inside the Embassy such as mobile phones. Interview proper is next. I created a separated blog post from experience during the interview. Click HERE to read.
After the interview, you’ll know immediately if your visa is approved or denied. By the way, I was approved and got my 10-year multiple entry US visa after 3 days! So I wish you all the best! =)
My US Visa | Dantravels.org
SUMMARY:
Visa Type: B1/B2 (Business/Tourism)
Visa Validity: 10 Years
Entry type: Multiple Entry
Visa Fee: USD160.00
RECOMMENDED PACKAGE TOURS
I highly recommend booking tours through Viator which is perfect for your U.S. itinerary:
This post may contain affiliate links which means if you purchase something through that link, I will make a small commission at no additional cost to you. Think of it as buying a cup of coffee for me on someone else. Thanks & enjoy!
Visiting Australia is one of the most memorable trips of my life. The Bondi beach, the Opera House, the scenic Harbor bridge area, the 12 Apostles, etc. Without a doubt, Australia is definitely worth visiting! If you’re here looking for a guide on how to apply for your Australian Tourist Visa or what commonly known as the ‘Visitor Visa’ (subclass 600), then you’re in the right place.
But before I give you the details, I’d like to start off by saying that no one can give you the guarantee of your Australian visa’s approval – not me, not even a lawyer or a travel agent. If anyone does, is most likely a scammer.
As a travel blogger, what I can offer you here is just a guide with helpful tips to increase your chances of getting that Australian tourist visa. =)
WAYS TO GET YOUR AUSTRALIAN TOURIST VISA
Now, there are two ways to get your Australian tourist visa:
via VFS Global
via ImmiAccount (Australia’s Department of Home Affairs’s online services).
VFS Global is a third party agency that handles visa application for Australia and other countries. However, I do not find applying to VFS Global convenient as you will be paying their Service Fee on top of the actual visa fee. You also need to submit printed copies of your documents.
In this blog, I will only be particular on applying directly ONLINE via ImmiAccount. If your visa is approved, your visa will be sent to you via email as a letter-sized paper. It can either be 3-month or 1-year valid. I got mine with 1-year validity and with multiple entry as well.
Anyway, enough of that and let’s get started!
WHEN TO APPLY via IMMIACCOUNT
I suggest you apply at least 6 weeks before your intended flight. The processing time could be up to 4 weeks after submittal! Some have gotten their results as early as 2 days (wow!). I got mine 16 days after submitting my application.
GET YOUR AUSTRALIAN TOURIST VISA IN 5 EASY STEPS
STEP 1: CREATE AN IMMIACCOUNT
Go to this link. Click the ‘Create ImmiAccount’ button at the left bottom corner to start creating your account.
STEP 2: CREATE NEW APPLICATION
Once you have created your account and you’re logged in, simply click NEW APPLICATION, and then look for VISITOR VISA (600).
It will direct you to the online form application. You need answer it truthfully. Put N/A if the item is NOT applicable to you.
STEP 3: UPLOAD THE REQUIRED DOCUMENTS
Next stage of the application is attaching and uploading the documents. There are two sections – REQUIRED and RECOMMENDED. Sometimes, the required and recommended documents can vary from one applicant to another. So you gotta really pay attention to what is required and recommended for you.
REQUIRED:
1. Photo – A passport size photo, save it as jpg format.
2. Travel Document – This is basically just a scanned page of your passport’s bio page. Save it as pdf format.
3. Evidence of applicant’s previous travels – scanned pages of your passport with stamps to show your travel history; include also your old passport if you have one. Save it as pdf format.
RECOMMENDED:
4. Family register and composition form – We Filipinos do not have this one but it is recommended to attach the NSO birth certificate.
You can request an original copy of this through online via PSA website. I got mine home-delivered after three (3) working days. Click HERE for the link.
5. Evidence of planned tourism activities in Australia – I included my day-to-day itinerary, confirmed flight tickets, and hostel bookings.
I can also share my day-to-day itinerary template, just leave a comment below and I can send it via email.
TIP: I usually book my hostel accommodation at booking.com .
Use my link to book your hostel and you’ll get 10% of your booking back after your stay. Click this link to get that discount.
Or try Airbnb in finding comfy and cozy rooms!
Have you tried Airbnb? Sign up with my link and you will get up to 42 USD off your first stay. Click this link .
NOTE: I also included travel insurance.
Go to this link to get your World Nomads travel insurance.
6. Evidence of financial status and funding for visit – attach Bank Certificates, passbooks, ITR, insurances, investments, etc.
7. Evidence of current employment or self employment – attach your COE, payslips, ID, business permit, SEC or DTI registration.
8. Exceptional reasons for extended stay in Australia – ignore this if you’re not staying more than 12 months.
TIP: Use CAMSCANNER app if you don’t own a scanner.
STEP 4: PAY THE VISA FEE
Review your application form and attached documents thoroughly. Then pay the visa fee of AUD 140 via Credit Card or Paypal.
STEP 5: WAIT AND PRAY!
Once you’re done with uploading and payment, it is time for the waiting game. Result of your visa application will be emailed to you.
MY EXPERIENCE:
Waiting for my visa got me so frustrated. Imagine I have to wait up to a month without certainty whether it is approved or not.
On the 16th day from the day I submitted my application online, I finally received an email visa notification.
My application status is GRANTED!
SUMMARY:
Visa Type: Visitor Visa (600) Visa Validity: 1 Year Entry Type: Multiple Entry Visa Fee: 140 AUD
RECOMMENDED PACKAGE TOURS
In case you’re also looking for package tours in Australia, I highly recommend booking tours through Viator .
This post may contain affiliate links which means if you purchase something through that link, I will make a small commission at no additional cost to you. Think of it as buying a cup of coffee for me on someone else. Thanks & enjoy!
So you wanna go to Turkey? That’s right. Turkish tourist visa is the first thing you need to be concerned about in order to set your foot on the Turkish land.
In this blog, I will show you the step-by-step guide on how to get your tourist visa based on my experience. If you want to know the questions thrown at me during the interview, I created a separate blog post about that.
Click HERE to read the post so you’ll get an idea of what questions you’ll be facing during your interview.
Please note that I will only be discussing here the tourist visa, so if you’re looking for another type of visa other than the tourist visa, then this blog is not the right one for you.
But first, I’d like to start off by saying that no one can give you the guarantee of your Turkish visa’s approval – not me, not even a lawyer or a travel agent. If anyone does, is most likely a scammer.
As a travel blogger, what I can offer you here is just a guide with helpful tips to increase your chances of getting that Turkish visa.
There are two (2) ways to get a Turkish Tourist visa.
(1) If you have a valid visa or residence permit from any one of the Schengen countries, or you have a valid US, UK or Ireland visa, then you may course your application online at www.evisa.gov.tr . This is the E-Turkish Visa.
The time I applied for my Turkish Visa, I have none of the above and thus I was not eligible, so what I will explain further in this blog is the “long process”.
(2) If you are NOT eligible with (1), then you should prepare your requirements, apply for pre-application via Turkish Consular website, schedule your appointment, personally go to the Turkish embassy and return on the release date of your passport/visa. That is why I call this the “long process” and I have personally experienced this. More details of this application process will be discussed below.
STEP-BY-STEP PROCEDURE TO APPLY FOR REGULAR TURKISH TOURIST VISA
PART I: Pre-Visa Application And Scheduling An Appointment
(1) Gather all your documents and scan them. Group them into seven (7).
1 – 2”x2” Biometric photo with white background scanned in jpg;
2 – Proof of Income scanned in pdf, I included ITR, Bank Certificate, and Passbook copies;
3 – Flight reservation scanned in pdf; (you may search Trip below for cheap flights in and out of Turkey)
4 – Hotel Booking scanned in pdf;
NOTE: I booked all my hostel accommodation at booking.com .
Book hostels through booking.com as they have free cancellation or pay-at-the-hotel option.
Or try Airbnb in finding comfy and cozy rooms! I have used Airbnb on some of my other trips and I loved it!
Have you tried Airbnb? Sign up with my link and you will get up to 42 USD (2,200 Php) off your first stay. Click this link to get that discount.
5 – Proof of commitment to return. Certificate of Employment will do just fine.
6 – Passport Copy scanned in pdf. I also included my old passport.
I included not only my passport bio page but also all the passport pages that have stamps
7 – NSO Birth Certificate – NSO original scanned copy in pdf.
You can request an original copy of this through online via PSA website. I got mine which was home delivered after three (3) working days. Click HERE for the link.
Here is the snapshot from the Turkish embassy website informing applicants that they should have those required documents prepared first before continuing with the pre-application online. | Dantravels.org
(2) Go to visa.gov.tr . Complete ALL the required fields on Nationality and Visa Details, Personal Info, Contact Info, and Travel Info. There is a portion there that will send the reference number to your personal email. Just follow through and when done, proceed to the document upload.
From the visa.gov.tr website | Dantravels.org
(3) Upload those seven files. Woo hoo! By the way, ensure that each file is 2MB or less! Then proceed!
How I grouped my files | Dantravels.orgThis is how it looks when you successfully uploaded your files | Dantravels.org
(4) Review your info first, download your pre-application form, and click submit.
The e-file version of my application form | Dantravels.org
Then you will be prompted to make an appointment.
IMPORTANT: You can expect that the earliest available appointment date is one month after your pre-application date! (At least per my experience.)
(5) You’re done! Screenshot and print your appointment details and show it to the guard on duty on your date of appointment.
Snapshot of my appointment details | Dantravels.org
After one month…
PART II: Document Filing And Interview At The Turkish Embassy
WHERE: 2268 Paraiso Street, Dasmarinas Village Makati City, Metro Manila 1222 Philippines
OFFICE HOURS: Mondays – Fridays; 9:30 AM – 12:30 PM (morning only for visa application)
(1) Make sure that you have printed all the required documents prior to your Interview at the Turkish Embassy, including your passport, a copy of your passport’s data page, and two pieces of 2″x2″ ID photo. Otherwise, your documents will be rejected and you’ll be asked to come back once your documents are complete.
Print out also your day-to-day itinerary in case you were asked by the interviewer. I can send you mine — just let me know in the comment section below.
Printed copies of my application documents | Dantravels.org
IMPORTANT: Bring also a copy of your travel insurance. Please make sure to get one because this is often asked by the interviewer on top of your basic requirements. I bought one from World Nomads where most travelers get their travel insurance.
Go to this link to get to your World Nomads travel insurance.
UPDATE: World Nomads is no longer covering residents of the Philippines and the link above was now looped to another travel insurance in the Philippines. Although I was told by World Nomads that they are working their best to get the insurance back in the country, I would suggest for now to go for Safety Wing (this is now my insurance while traveling abroad.) Click here .
(2) Your documents will be collected by the Consular Officer, and he/she may ask you a few questions regarding your trip and financial capacity.
I created a separate blog about my experience during the day of my appointment and interview at the Turkish Embassy.
Click HERE so you’ll know what questions were thrown at me during the interview and how I answered them.
After this, you may pay the visa fee which is 60 USD for a single-entry tourist visa.
NOTE: Please have an exact amount of 60 USD for your payment. Paying in PHP is not accepted.
(3) Then you will be given a claim stub with the date of your passport/visa release. Just wait for it and claim your passport on the scheduled date. This usually takes one to four weeks.
(4) You need to return on the date of your passport release. I do hope by that time, you have a Turkish visa sticker on your Philippine Passport!
WHAT DOES A TURKISH VISA LOOK LIKE?
Here is a single-entry Turkish tourist visa. VISA APPROVED!
My Turkish Tourist Visa | Dantravels.org
SUMMARY:
Visa Type: Tourist Visa Validity: One (1) month Entry Type: Single Entry Visa Fee: 60 USD (USD cash only is accepted)
RECOMMENDED PACKAGE TOURS
In case you’re also looking for package tours to justify your tourism activity in Turkey for visa purposes, I highly recommend booking tours through Viator which is perfect for your Turkey itinerary. See tours and packages I personally handpicked for you:
(you may choose one or more tours that suit your travel needs)
BOOKING ESSENTIALS
Hotel / Hostel
Booking.com. I usually book my hostel accommodation at booking.com . Thus, I recommend you guys trying it as well. Room accommodation ranges from cheap hostels to luxury hotels.
Airbnb. Try Airbnb in finding comfy and cozy rooms! I have used Airbnb on some of my other trips and I loved it!
Have you tried Airbnb? Sign up with my link and you will get up to 42 USD (2,200 Php) off your first stay. Click this link to get that discount.
Flights
TRIP. All of my flight bookings are from TRIP. Trip is one of the world’s leading travel search engines and searches hundreds of travel sites.
I suggest you check Trip.com (click HERE ) as they usually offer cheap fare rates compared to other booking sites.
Travel Insurance
World Nomads. Please make sure to get travel insurance because this is often asked by the interviewer on top of your basic requirements. I bought one from World Nomads where most travelers get their travel insurance.
Go to this link to get your World Nomads travel insurance.
UPDATE: World Nomads is no longer covering residents of the Philippines. Although I was told by World Nomads that they are working their best to get the insurance back in the country this year, I would suggest for now to go for Safety Wing (this is now my insurance while traveling abroad.)
This post may contain affiliate links which means if you purchase something through that link, I will make a small commission at no additional cost to you. Think of it as buying a cup of coffee for me on someone else. Thanks & enjoy!
The Turkish Embassy is located at Dasmariñas Village (Dasma for short), Makati City. It is an exclusive village so you need to go to Dasma Village front gate (near Magallanes MRT Station) and wait for the shuttle going to the Embassy. Look for the guard on duty, show you appointment details, and he would require you first to log in on the logbook as it is a ‘first-log first-ride-to-shuttle basis’! Then I keep asking myself – ‘am I ready for my Turkish visa interview?’
Your first stop is the Dasma Village Office Hall where you’ll pay 150 pesos for the shuttle fee.
Please note that it is not allowed to bring bag or mobile phones inside the embassy building. Leave it to the guard station once you arrived. Once you’re inside the building (yeah that building in the below photo!), you’ll be logging in again.
On my appointment day, there was only one Consular Officer (a Turkish guy) so it took me a while to wait! Also, the AC is down inside the building so bear with the heat!
When I was called, I greeted the Consular Officer and gave him the hardcopies of my pre-application documents. Here’s an excerpt of how the interview went on:
INTERVIEWER: Purpose?
ME: I’ll be traveling to Istanbul. Here is my day-to-day itinerary. (*handed over to him a piece of paper*). *Blah blah blah*…*Also mentioned going to Russia after Istanbul*
INTERVIEWER: You’re staying for 4 days. Ok. What is your work?
ME: I am a Mechanical Engineer.
INTERVIEWER: What company?
ME: *States the Company*. My employment certificate is right here in these papers. Let me find it. *Give to him my Certificate of Employment*
INTERVIEWER: *Stares at my employment certificate and writes something down on my application form*. Do you have birth certificate?
ME: Yes. *I pointed him to last page of the hardcopies I gave him*
INTERVIEWER: Flight and Hotel reservations are also right here?
ME: Yes. *Blah blah blah*
INTERVIEWER: Do you have 60 dollars?
ME: I do. *hands over to him my 60USD cash*
Phew….
That’s it! Then he gives the claim stub. I was scheduled to return after two weeks.
But wait! There is more!
After 13 days…
A lady phoned me a day before the scheduled release date of my passport/visa. She scheduled another interview prior to the release of my Turkish tourist visa. She did not give me any details. It was unexpected but I hurriedly went to Dasma Makati again to check what’s going on.
You can see my conversation with her below. Her name is Gladdy (not sure if it spells correctly) and she was quite strict. Sabe sa ibang blogs masungit daw siya, so I tried my best to be composed and look confident as possible during my interview with her:
INTERVIEWER: Why Turkey?
ME: Ma’am, I love traveling. I’ve been to 14 countries. And I believe Turkey is one of the best countries to visit next (not sure if that’s the exact words I’ve said).
INTERVIEWER: Are you traveling alone?
ME: Yes.
INTERVIEWER:Wala dito Employment Certificate mo… (she can speak Tagalog, I was told she was half Filipino).
ME:Nandyan Ma’am. Binigay ko kay Sir on the day of my first interview. Pero bigyan na lang po kita copy . Do you need the original copy?
INTERVIEWER: Yes, please. I also need the original copies of your Birth Certificate and Bank Certificate.
ME: Here. *gives the original copies*
INTERVIEWER: Do you have travel insurance?
ME: Yes. *gives the travel insurance copy*
So I guess I gave her a good impression of my intention to travel to Turkey!
I really thought the interview was enough during the day of my submittals because I know I have completed the requirements and I know they should be reviewing the completeness of the documents too prior to filing them. It was the consulate guy (Turkish national) who interviewed me before. Now it turns out one of the documents was missing and it is the lady consulate who’s interviewing me this time. She requested the original copies of some of the documents. Glad I brought them all!
It is also good to note that the interviewer would likely ask for “travel insurance”, I actually have this (thanks to the blogs I have been reading!) and I intend to show this document only when asked.
Thus, I highly recommend you guys to get a travel insurance. I bought one from the World Nomads where most travelers get their travel insurances. Get yours NOW from the below widget.
Or you can also go to the World Nomads link, click HERE.
UPDATE: World Nomads is no longer covering residents of the Philippines and the link above was now looped to another travel insurance in the Philippines. Although I was told by World Nomads that they are working their best to get the insurance back in the country, I would suggest for now to go for Safety Wing (this is now my insurance while traveling abroad.) Click here .
Unfortunately, the release date of my visa has been pushed a week more. 😦
After a week, I came back to the Turkish Embassy and…
VISA APPROVED! The long wait is over! Haha. Got my single-entry Turkish Tourist visa that day! It took me almost 2 months from the day I submitted my pre-application online. Hoorray!
This post may contain affiliate links which means if you purchase something through that link, I will make a small commission at no additional cost to you. Think of it as buying a cup of coffee for me on someone else. Thanks & enjoy!
You should totally go to Russia! Yes, you! See the beautiful Red Square perhaps, explore the downtown Moscow City, or even drink some cold bottles of vodka. I mean why not? Getting a Russian Tourist Visa is not that hard to get, in fact, it is the easiest tourist visa I have applied for.
For us Philippine passport holders, application for Russian tourist VISA application requires only five (5) documents:
A. DULY ACCOMPLISHED VISA APPLICATION FORM
B. VALID PASSPORT
C. ONE PASSPORT-SIZED PHOTO
D. TRAVEL VOUCHER / CONFIRMATION
E. CONFIRMED FLIGHT TICKETS
This is the shortest list of requirements I’ve ever seen in my entire life!
Although they require the silly ticket reservations, kudos for not requiring the Certificate of Employee, Bank Certificate, Income Tax Return, detailed itinerary..and the list goes on and on. That’s a relief to most of us.
But before I give you the details on how to apply, I’d like to start off by saying that no one can give you the guarantee of your Russian tourist visa’s approval – not me, not even a lawyer or a travel agent. If anyone does, is most likely a scammer!
As a travel blogger, what I can offer you here is just a guide with helpful tips to increase your chances of getting that Russian tourist visa.
So let’s get started.
GET YOUR RUSSIAN TOURIST VISA IN 4 EASY STEPS!
STEP 1: PREPARE THE DOCUMENTS REQUIRED
Now that we know the required documents, let’s break them down.
A. Visa Application Form – Go to this link to start your application. Make sure you read all the instructions before proceeding. Fill up the form completely ONLINE. You basically need to fill up your visa details, personal details, passport details, visit details, and your appointment details. When you get to the Visit Details page, you will need to provide the confirmation number on your Travel Voucher/Confirmation. More details on how to get your voucher on section D.
Note: Even your application form is not yet finished, you can save it and retrieve when you’re ready to edit again. Just make sure you save your Application ID code.
B. Valid Passport – This is an easy one. Just make sure your passport is valid not less than six months from the date of your departure from Russia.
C. One Passport Sized Photo – This is an easy one, too. This photo will be glued on your printed application form.
D. Travel Voucher / Confirmation – Now, this is probably the trickiest one.
What exactly is a Travel Voucher/Confirmation? This is probably the trickiest item in the list so I look for further explanation on some travel blogs and travel forums around. In simple terms I can put it, this is just a certificate being requested from a certified Russian travel agency in partnership with hotels or any lodging accommodation. It contains the dates of your arrival and departure in Russia, your hotel name and address as well as your personal information.
There are a couple of Russian travel agencies or websites which do offer this and you’ll find them over the web. During my application, I tried one at www.moscow-hotels.net. Good news is it’s FOR FREE! Provided that you’ll either book hotel accommodations at their website (*which I find very expensive by the way*) or at booking.com using only the link from their site. By using the link, the moscow-hotels receives a small commission from Booking.Com due to referrals. I do prefer using booking.com link because I can find a lot of cheaper accommodation there.
Go to this link to get to the page on the snapshot below (please read the full instruction in their page). Just click that circled link and it will lead you to Booking.com. From there, book your hotel/hostel accommodation and pay it in full.
Booking.com via Moscow-Hotels.net
Yes, you have to pay it in FULL, otherwise your voucher will not be processed. After booking your accommodation on Booking.com, you will receive a confirmation email with a booking number. And so by following the next step, you just need to provide your personal and travel information including the booking number to complete your visa support request from Moscow-Hostels.
I submitted my voucher request at 1:00 PM then at around 9:00 PM on the same day, I got an email with my travel voucher attached. Woo hoo!!
E. Flight Tickets – Yes, this should be booked prior to your application. The dates (arrival and departure) here should be the same as in the confirmation and application form. This will also be the date of validity on your visa if approved. (You may search Kayak below to find the cheapest flight in and out of Russia.)
STEP 2: SUBMIT THE ABOVE-MENTIONED DOCUMENTS TO THE RUSSIAN EMBASSY
Please print the documents and head to the Embassy of the Russian Federation in the Philippines to submit your Russian tourist visa application.
Where: Room 402 A, 4 fl., RCI Building, 105 Rada Street, Legazpi Village, Makati City.
Working hours: Monday – 08:00 AM – 5:00, Tuesday, and Friday – 08:00AM – 4:00PM
Take note: The application typically opens at 10:00AM until 1:00PM. So please get there in the morning. Get there as EARLY as 6:30AM if you want to be the first in line. It is a ‘first-log-in, first served’ basis.
RCI Building with my Application | Dantravels.org Documents
STEP 3: PAY FOR THE VISA FEE
Once done submitting, you’ll be given a deposit slip to be paid at UCPB. The Embassy does not accept cash. The nearest UCPB branch is Herrera branch shown below.
Regular processing fee costs PhP3,612.00 in two weeks time to claim.
Once payment is done, you need to come back to the Embassy to get your Claim Slip.
Paying Russian Visa fee at UCBP Herrera Branch | Dantravels.org
STEP 4: WAIT. RETURN. CLAIM YOUR PASSPORT/VISA
Typically, the Embassy will schedule you to come back in 2 weeks time after your application. The Embassy will give you a claim slip when you finished the application process.
This post may contain affiliate links which means if you purchase something through that link, I will make a small commission at no additional cost to you. Think of it as buying a cup of coffee for me on someone else. Thanks & enjoy!
You should totally go to Russia! Yes, you! See the beautiful Red Square perhaps, explore the downtown Moscow City, or even drink some cold bottles of vodka. I mean why not? Getting a Russian Tourist Visa is not that hard to get, in fact, it is the easiest tourist visa I have applied for.
For us Philippine passport holders, application for Russian tourist VISA application requires only five (5) documents:
A. DULY ACCOMPLISHED VISA APPLICATION FORM
B. VALID PASSPORT
C. ONE PASSPORT-SIZED PHOTO
D. TRAVEL VOUCHER / CONFIRMATION
E. CONFIRMED FLIGHT TICKETS
This is the shortest list of requirements I’ve ever seen in my entire life!
Although they require the silly ticket reservations, kudos for not requiring the Certificate of Employee, Bank Certificate, Income Tax Return, detailed itinerary..and the list goes on and on. That’s a relief to most of us.
But before I give you the details on how to apply, I’d like to start off by saying that no one can give you the guarantee of your Russian tourist visa’s approval – not me, not even a lawyer or a travel agent. If anyone does, is most likely a scammer!
As a travel blogger, what I can offer you here is just a guide with helpful tips to increase your chances of getting that Russian tourist visa.
So let’s get started.
GET YOUR RUSSIAN TOURIST VISA IN 4 EASY STEPS!
STEP 1: PREPARE THE DOCUMENTS REQUIRED
Now that we know the required documents, let’s break them down.
A. Visa Application Form – Go to this link to start your application. Make sure you read all the instructions before proceeding. Fill up the form completely ONLINE. You basically need to fill up your visa details, personal details, passport details, visit details, and your appointment details. When you get to the Visit Details page, you will need to provide the confirmation number on your Travel Voucher/Confirmation. More details on how to get your voucher on section D.
Note: Even your application form is not yet finished, you can save it and retrieve when you’re ready to edit again. Just make sure you save your Application ID code.
B. Valid Passport – This is an easy one. Just make sure your passport is valid not less than six months from the date of your departure from Russia.
C. One Passport Sized Photo – This is an easy one, too. This photo will be glued on your printed application form.
D. Travel Voucher / Confirmation – Now, this is probably the trickiest one.
What exactly is a Travel Voucher/Confirmation? This is probably the trickiest item in the list so I look for further explanation on some travel blogs and travel forums around. In simple terms I can put it, this is just a certificate being requested from a certified Russian travel agency in partnership with hotels or any lodging accommodation. It contains the dates of your arrival and departure in Russia, your hotel name and address as well as your personal information.
There are a couple of Russian travel agencies or websites which do offer this and you’ll find them over the web. During my application, I tried one at www.moscow-hotels.net. Good news is it’s FOR FREE! Provided that you’ll either book hotel accommodations at their website (*which I find very expensive by the way*) or at booking.com using only the link from their site. By using the link, the moscow-hotels receives a small commission from Booking.Com due to referrals. I do prefer using booking.com link because I can find a lot of cheaper accommodation there.
Go to this link to get to the page on the snapshot below (please read the full instruction in their page). Just click that circled link and it will lead you to Booking.com. From there, book your hotel/hostel accommodation and pay it in full.
Booking,com via Moscow-Hotels.net
Yes, you have to pay it in FULL, otherwise your voucher will not be processed. After booking your accommodation on Booking.com, you will receive a confirmation email with a booking number. And so by following the next step, you just need to provide your personal and travel information including the booking number to complete your visa support request from Moscow-Hostels.
I submitted my voucher request at 1:00 PM then at around 9:00 PM on the same day, I got an email with my travel voucher attached. Woo hoo!!
E. Flight Tickets – Yes, this should be booked prior to your application. The dates (arrival and departure) here should be the same as in the confirmation and application form. This will also be the date of validity on your visa if approved. (You may search Kayak below to find the cheapest flight in and out of Russia.)
STEP 2: SUBMIT THE ABOVE-MENTIONED DOCUMENTS TO THE RUSSIAN EMBASSY
Please print the documents and head to the Embassy of the Russian Federation in the Philippines to submit your Russian tourist visa application.
Where: Room 402 A, 4 fl., RCI Building, 105 Rada Street, Legazpi Village, Makati City.
Working hours: Monday – 08:00 AM – 5:00, Tuesday, and Friday – 08:00AM – 4:00PM
Take note: The application typically opens at 10:00AM until 1:00PM. So please get there in the morning. Get there as EARLY as 6:30AM if you want to be the first in line. It is a ‘first-log-in, first served’ basis.
RCI Building with my Application | Dantravels.org Documents
STEP 3: PAY FOR THE VISA FEE
Once done submitting, you’ll be given a deposit slip to be paid at UCPB. The Embassy does not accept cash. The nearest UCPB branch is Herrera branch shown below.
Regular processing fee costs PhP3,612.00 in two weeks time to claim.
Once payment is done, you need to come back to the Embassy to get your Claim Slip.
Paying Russian Visa fee at UCBP Herrera Branch | Dantravels.org
STEP 4: WAIT. RETURN. CLAIM YOUR PASSPORT/VISA
Typically, the Embassy will schedule you to come back in 2 weeks time after your application. The Embassy will give you a claim slip when you finished the application process.
My PAID Claim Slip is shown below.
My Russian Visa Claim Slip | Dantravels.org
MY PERSONAL EXPERIENCE:
I must say that reading blogs really helped a lot from the very start of my application. After getting all my document ready and printed, time to head to the Embassy! I was guided by the blogs that I need to go the Russian Embassy Consular Office EARLY in order to log on to the applicants’ list as it is a ‘first log, first serve’ basis.
By the way, do not be confused with the Russian Embassy Main Office at Dasmariñas Village, Makati. All visa application shall be made at 4th Fl., RCI bldg. in Rada St, Legaspi Village, Makati – the Consular Section is located here. So I walked about 15 minutes from Ayala MRT station to the location. Google map is always a friend you can depend on!
I arrived at the Russian Embassy Consular Office at around 6:30AM and I am the second person to log. The Office opens at 10:00AM, so imagine how much time you need to wait. Patience is the key! You can tambay muna sa 7-11 store (back of the RCI building) if you want.
At about 9:15am, we were told by the guard to proceed to the 4th floor and wait. The waiting room is small with about 15 seats only. But it was not that crowded, see photo below. The time the window opens at 10:25 AM, the guard orderly organized the queue. Releasing first then Application next.
Waiting Area for Visa Applicants | Dantravels.org
When it was my turn, I just handed over my documents to the Consular officer at the transaction window. He checks them then asks me if ‘Regular’ or ‘Fast’. ‘Regular’ processing costs P3,612.00 in two weeks time to claim. I choose ‘Regular ‘ and he gives me the claim stub that needs to be paid to the UCBP bank – the Herrera branch which is a few blocks away. Once paid, I returned to the Consular office and show the ‘paid’ stamped slip. The slip is yours for claiming so keep it! Finally, I was done at around 11:30AM.
Moreover, I was told by one applicant there (I think she works in a tour agency since she has these tons of passports and other documents with her) that Releasing is only done in the morning and so is the Application. The Consular office is closed normally in the afternoon, she added. Again, important to take note of: the Consular office is only open M-Tu-F as they have different working days!
Then after two weeks…
I returned to the Embassy. Same process as before: RELEASING process first then APPLICATION process next. I patiently waited till my passport is handed over to me. When my name was called, the Consular guy happily gave me my passport with an APPROVED VISA!
Woo hoo! Again, I believe as long as you have completed the requirements, you have a big chance of approval!
My Passport with Russian Visa Sticker | Dantravels.org
Visa Validity: Per confirmed travel dates and flight tickets
Entry type: Single Entry
Visa Fee: PhP3,612.00 (Regular Processing)
RECOMMENDED PACKAGE TOURS
In case you’re also looking for package tours to justify your tourism activity in Russia for either visa purposes or simply jumpstarting your actual itinerary, I highly recommend booking tours through Viator which is perfect for your Russian itinerary. See tours and packages I personally handpicked for you:
(you may choose one or more tours that suit your travel needs)
BOOKING ESSENTIALS
Hotel / Hostel
Moscow-hotels.net via Booking.com. Use the link I shared above to book your hostel.
Flights
KAYAK. All of my flight bookings are all from KAYAK. Kayak is one of the world’s leading travel search engines and searches hundreds of travel sites.
I suggest you check Kayak (click HERE) as they usually offer cheap fare rates compared to other booking sites.
Travel Insurance
World Nomads. If you don’t have travel insurance when times get tough, basically you are screwed. Traveling always comes with inherent risks attached. Whether you are trekking in the Ural mountains or wandering the streets of Moscow, unforeseen events can suddenly upend your world. Generally speaking, travel insurance covers you for the following: Medical Costs – hospital visits, emergencies, evacuations; Property Loss – luggage and their contents; Travel Issues – accommodation and transportation expenses. Thus, I highly recommend you guys getting a travel insurance. I bought one from the World Nomads (available in 130+ countries) where most travelers get their travel insurances.
Go to this link to get to your World Nomads travel insurance.



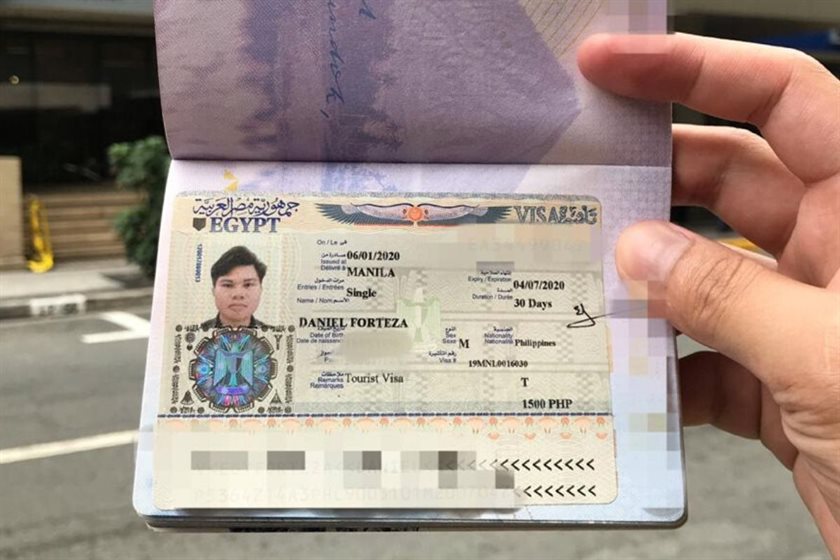


 Dan Travels